
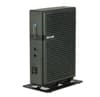
 The Atrust t176L client is geared towards virtual desktop infrastructure (VDI) knowledge workers looking for an unobtrusive VDI client that supports dual monitors. To give a brief spec overview, the Atrust t176L is a small form factor thin client that has 4 USB and 2 DisplayPort ports that is powered by an Intel CPU that runs a bespoken Linux operating system. It supports two monitors at 3840 x 2160 @30Hz or 2560 x 1600 @60Hz. It supports all of the major VDI environments.
The Atrust t176L client is geared towards virtual desktop infrastructure (VDI) knowledge workers looking for an unobtrusive VDI client that supports dual monitors. To give a brief spec overview, the Atrust t176L is a small form factor thin client that has 4 USB and 2 DisplayPort ports that is powered by an Intel CPU that runs a bespoken Linux operating system. It supports two monitors at 3840 x 2160 @30Hz or 2560 x 1600 @60Hz. It supports all of the major VDI environments.
Atrust is based in Taiwan and was founded in 2007. Atrust has had limited exposure to the North America market but its products are well known in Asia and Europe. Atrust produces thin clients, zero clients, VDI servers and VDI client management software.
This review will give an in-depth overview of the Atrust t176L VDI client’s specifications, design and build quality, and a summary of the testing that we carried out on it over three weeks. We will then lay out the key findings from those tests and provide our thoughts about the device and briefly discuss who would benefit from this product.
Atrust t176L Specifications
| Client type | thin client |
| Form factor | small |
| OS | Atrust OS (Linux) |
| Supported remote display protocols | Citrix ICA/HDX, Microsoft RDP with RemoteFX VMware Horizon View (PCoIP/RDP/Blast) |
| CPU | Intel Atom x5-E8000 Quad-Core 1.04GHz (Turbo 2.0G) |
| Memory | 2GB (optional: 4GB, 8GB) |
| Storage | 4GB (optional: 16GB, 32GB, 64GB) |
| Display | Two monitors at 3840 x 2160@30Hz or 2560 x 1600@60Hz |
| Power | DC 12V/3A external power adapter |
| Ports | 2 x DisplayPort 2 x USB 3.0 2 x USB 2.0 |
| Multimedia | 3.5 mm audio out jack 3.5 mm audio in jack |
| Network connectivity | RJ45 – 10/100/1000Mb (Optional WiFi) |
| Physical size | height 39.5mm x width 103mm x depth 143mm |
| Physical weight | 442 g |
| MSRP | $250 USD |
| Warranty | 3-year parts and labor |
Design and Build
The cardboard packaging box was that the device came in was heavy, and the device itself was wrapped in an electrostatic plastic bag. The box also contained a 12V 3amp DC power supply, and a quick start guide.
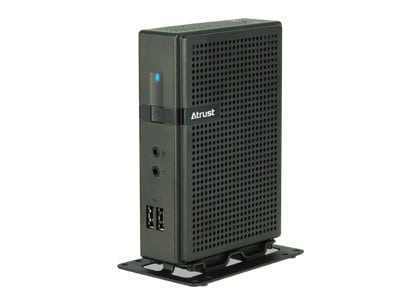
On the back of the device are two DisplayPort ports, two 2.0 USB ports, a RJ45 jack, and the power connection. The front of the device has the power button, two 3.5 mm audio jacks (one for audio in and the other for audio out), two 3.0 USB ports, and a power on indicator light.

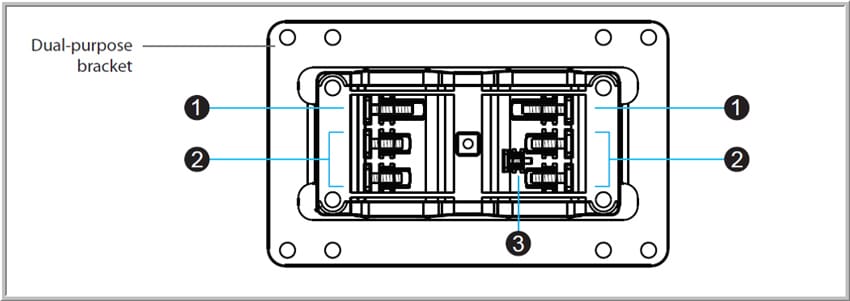
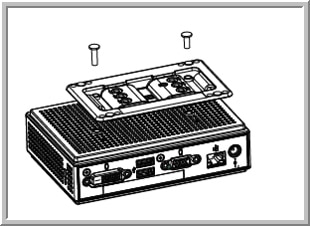
The entire case, except the rear, is made of thick black plastic with ventilation holes on the two sides and the top. The rear of the case is made of black metal. The left side of the device has two holes that can be used to attach the device to VESA mount. On the top of the device is a slot for a Kingston lock. On the side of the device is a dual-purpose stand that can be removed by removing a single Philips head screw. The removable stand contains six Phillip head screws that can be used with the holes on the side of the device to mount the base on to the side as a VESA mount; this is actually a very ingenious feature. Overall, the case on this device is very durable and should hold up in an office environment.
The case is held together with two Phillips-head screws on the side of the device, one of the screws is under a “Warranty void if removed” sticker. By removing these screws, you can pry the bottom off the device and expose the motherboard of the device, which is well-made, and an ADATA branded 2G X 4 SO-DIMM. All the visible components and ports are surface-mounted to the motherboard. The build quality of the device is above-average and has no mechanical parts, such as a fan, that could fail.
Documentation
The quick start guide had a URL to the VDI client’s documentation. The documentation for the device was 268 pages in length and did a very good job in explaining how to set up device and configuring it to work with the major VDI environments. For a company that is breaking into the US market we were pleasantly surprised with the quality of the documentation.
Usability
The real test of a virtual desktop client is its usability; to test the usability of the t176L, we used the client for three weeks in our Pacific Northwest lab with various configurations. Below are the key results we noted during our time using the client.
To test the t176L, we connected it to our network via a Cat 6 cable through the device’s RJ45 port which was connected to our network via a 1Gb network through a single switch that was connected to either a server or a WAN router. The server was hosting our local VMware Horizon virtual desktop while the WAN router was used to connect to cloud based virtual desktops. In order to create a controlled environment, the network was monitored during testing to ensure that no other traffic was present on the network. A Dell wireless keyboard and mouse (part number KM636) was used throughout our testing.
For the initial boot and testing of the device, we connected the t176L to a Dell UltraSharp 38” Curved 4K Monitor (U3818DW) through one of the devices DisplayPort’s. The Dell monitor has a keyboard, mouse, and video (KVM) switch built into it. The monitors built-in KVM switch was extremely useful during our testing as it allowed us to switch between the VDI client and our laptop with the push of a button. We plugged the keyboard/mouse’s dongle into the monitors upstream USB port.
Initial Configuration
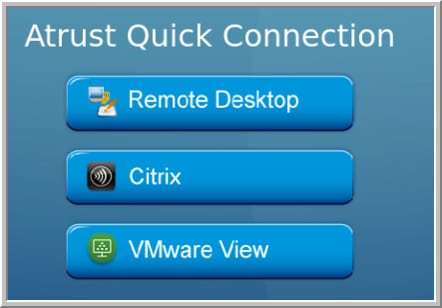
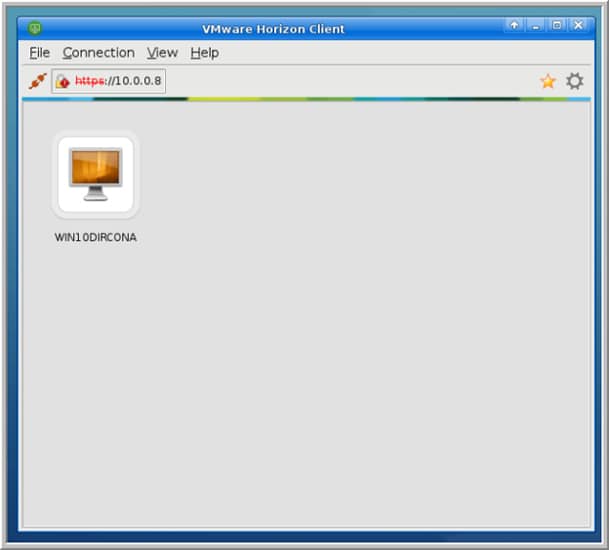
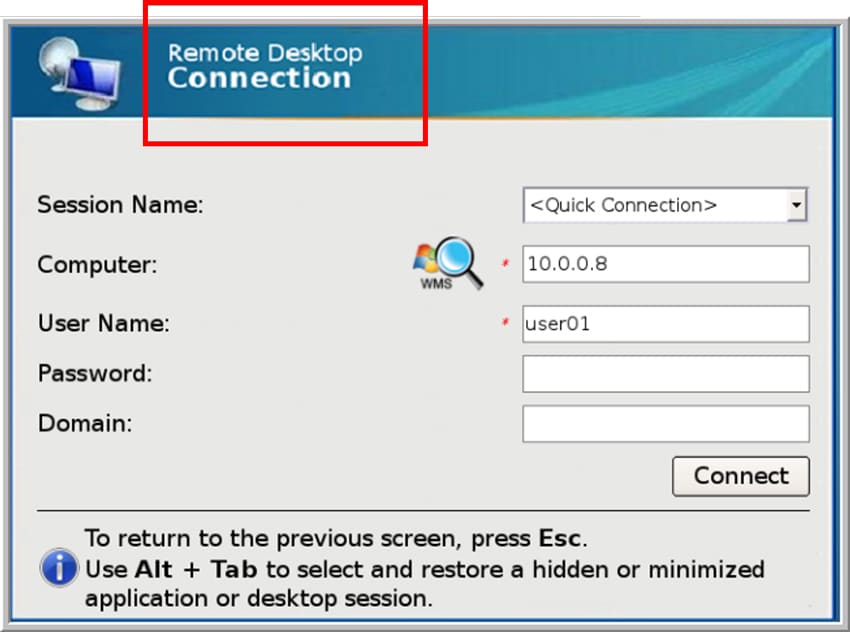
After powering on the device, it took 40 seconds total to boot, obtain an IP address from my DNS server, and present an “Atrust Quick Connection” screen that displayed a list of the three most common VDI solutions. The list included Citrix, VMware View and Remote Desktop connection. From this list, I selected VMware View, and was presented with a VMware Horizon Client (version 4.8). I configured the Horizon client to connect to my Horizon connection broker.
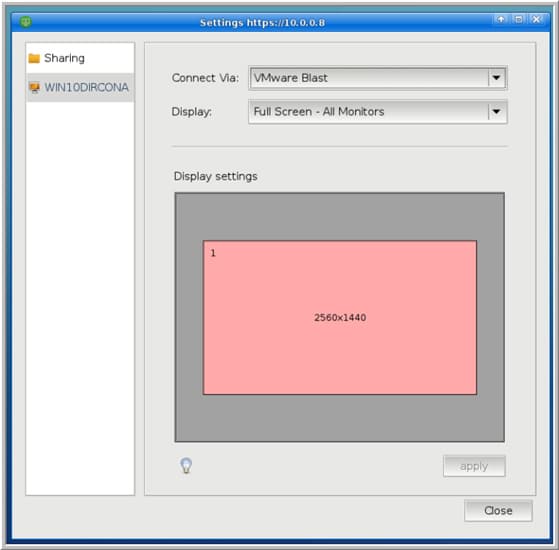
The VDI client set the display to a resolution of 2560 x 1440 rather than the devices max resolution of 3840 x 1600 we suspect that this was a problem with the monitors configuration as we were able to connect the device to our Lenovo P27 4K monitor through the same port and have a 3840 x 1600 resolution.
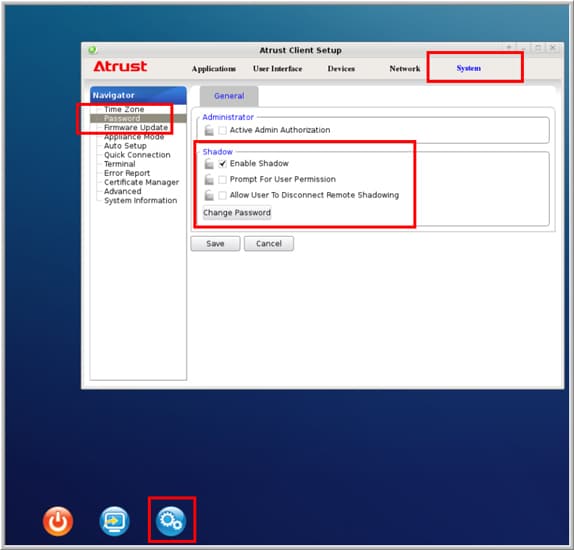
The device allows screen shadowing via VNC, which we used to capture many of the screenshot used in this review. To avoid adversely affecting the client’s performance, however, we did not use screen shadowing while monitoring the responsiveness of the device.
Screen sharing is enabled by selecting the settings(gears icon) on the lower left corner of the screen and then selecting System >Password, and selecting the Enable Shadowcheck box.
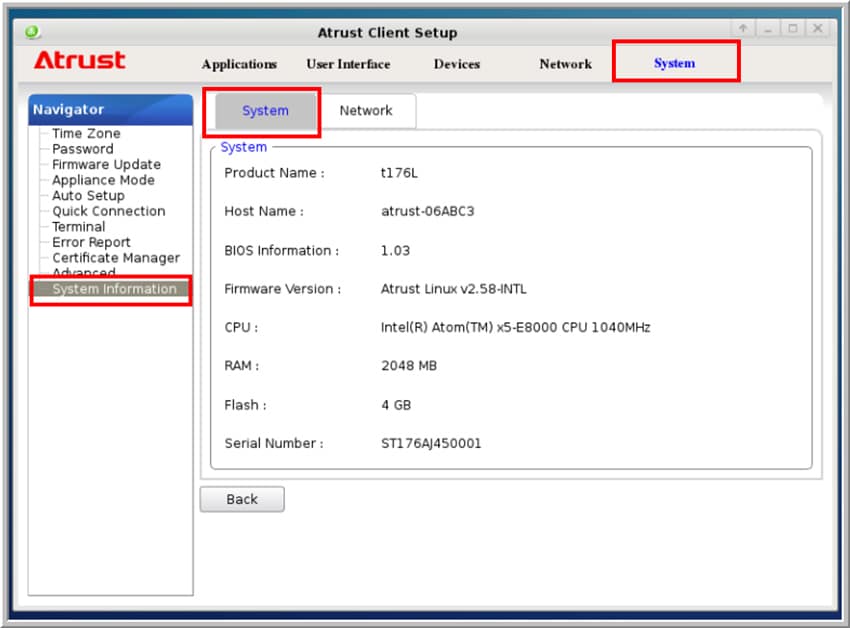
System information (such as the versions of the VDI clients, the software that it was running, and vendor information), is shown by selecting System> System Information from the settings menu.
The performance of the client was monitored by running top from the client terminal window. Access to the terminal is gained by selecting Settings> Terminal.

Citrix Storefront
The client was not tested in a Citrix environment.
Leostream
We tested the client with a cloud VDI desktop provided by Leostream. The Leostream connection broker and virtual desktop were running in an AWS datacenter. Leostream supports many of the major remote desktop protocols and a few niche ones, for this test we used HTML5 RDP protocol. We wanted to use this protocol as it is not dependent on having any additional software installed on the device and can be used from any device that has an HTML5 browser and virtual desktops that supports RDP connections, including Windows and Linux desktops.
To connect to the virtual desktop, I used the Atrust client’s Firefox web browser. I went to the Atrust Client Setup panel, selected Applications and clicked Web Browser where I entered a name for the session and the URL for the Leostream connection broker.
To launch the Leostream session I clicked the Leostream icon on the start menu which brought up the Firefox web browser, where I entered my username and password, and then, after a short wait, was presented with a virtual desktop.
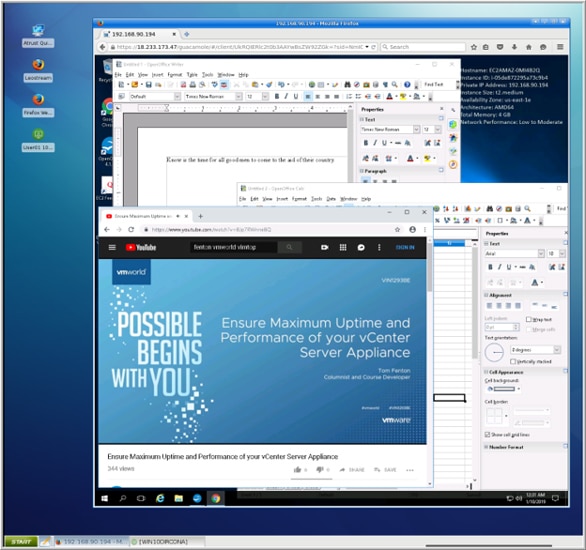
I used the Leostream virtual desktop to edit documents and stream videos with virtually the same experience as using a local desktop. As the client does not have a built-in speaker, I plugged a headset into the 3.5 mm port on the front of the VDI client. When I played a YouTube video in quarter-scale, the video played without any frames dropping; in full screen mode, however, the video was jerky, and frames were dropped. The audio was clear and stable throughout the video playback. The fact that video playback dropped frames while playing in full screen mode was not unexpected since I had experienced similar video quality reductions on other clients. Since I did not have this issue when working with the GPU-enabled virtual desktop, I believe that it is an artifact of the virtual desktop and not the client, network, or the HTML5 RDP protocol.
After disconnecting from the virtual desktop, I pinged the IP address of the connection broker and found that the round-trip time (RTT) was 98ms. Given the fact that the Leostream connection broker and virtual desktop were in an AWS datacenter located on the East Coast, and the client was running in our Pacific Northwest lab, I was pleasantly surprised to find that a virtual desktop with this much latency performed just as well as a virtual desktop that was hosted on-premise. I did find that if I resized the web browser that I need to log out of and then back into the session to have the new screen size recognized.
Local Horizon Desktop
For the remainder of the three weeks that I used the device, I used a local Horizon virtual desktop to do my daily tasks.
The virtual desktop that I used ran Windows 10 (1607), had 2 vCPUs, 8 GB of memory, and 50 GB of NVMe-based storage.
The first test I conducted using my local virtual desktop was to use VLC to play a video (1280 x 720 @ 712kbs) that was stored on the virtual desktop. First, I played the video using a quarter of the display, and then once again in full screen mode. In quarter-scale, the video played without any frames dropping; in full screen mode, however, the video was jerky and frames were being dropped as was the case with the Leostream virtual desktop. I believe video frames dropping is a result of the virtual desktop and not the client or network. The audio played flawlessly through a headset plugged in to the 3.5 mm jack when the video was displayed in both quarter-scale and full screen modes.
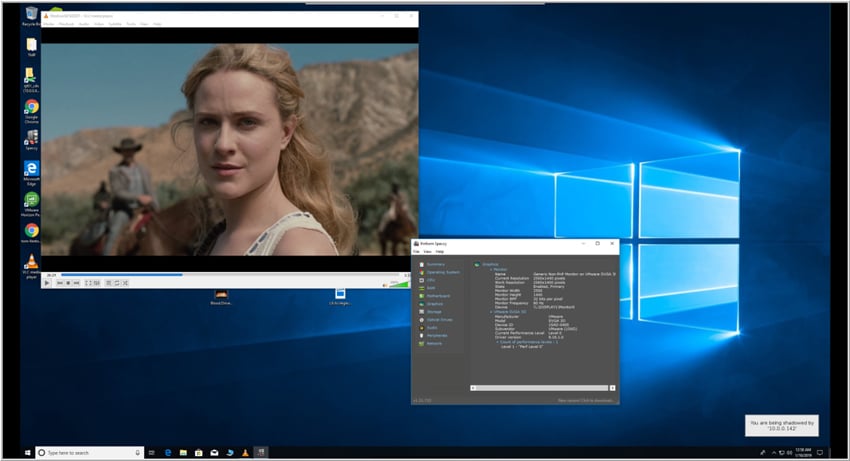
To further test the device, I connected a Jabra voice 150 headset to a USB connection; the Jabra headset was discovered by the virtual desktop and worked without any issues.
I used the client for my daily activities for three weeks without any problems. This included using Microsoft Office applications, Chrome web browser, playing internet-streaming music, etc. During this time the device performed flawlessly.
Adverse Network Conditions
Most of the time, the network connection between a virtual desktop and a VDI client connection is stable and clean, but in some circumstances, connections can be bad; network packets dropping, high latency, and packets being delivered out of order (jitter). To test how well the client handles these conditions, I injected networking issues into the stream between my virtual desktop and my client.
To test for adverse network situations, I connected the client to my local virtual desktop using PCoIP. After I injected non-optimal network conditions into the network stream, I performed tasks on documents and played a video in quarter-scale mode and full screen mode on the VDI clients and observed the results. To gather more information, the virtual desktop was pinged from the client and monitored CPU activity of the device using the top command.
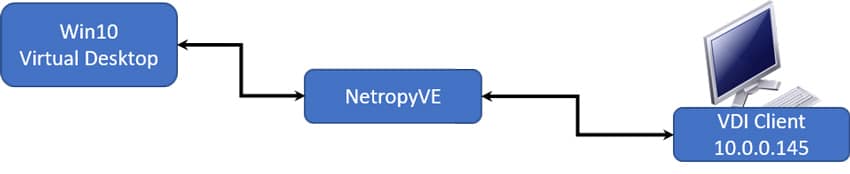
To introduce non-optimal network conditions into my network stream, I used Apposite NetropyVE, a software version of Apposite’s hardware-based network emulation appliance. The photo below shows how NetropyVE was situated in my network stream.
I configured and used different NetropyVE “paths” to observe the level of impact poor network conditions would have. The first path (Local) did not have any additional latency, packet drop, or latency injected in to the stream. The second path (Coast-to-Coast) had a latency of 100ms. The third path (Bad Local) had a 2% packet drop and a random jitter of 0-30ms. The fourth path (Bad Coast-to-Coast) had 2% packet drop and a random jitter of 70-100ms. The image shows the NetropyVE interface that I used to configure and select the paths. The next image shows how I monitored the CPU usage of the VDI client with top while playing a video on the virtual desktop. Table 1shows my observations when testing the VDI client under non-optimal network conditions.
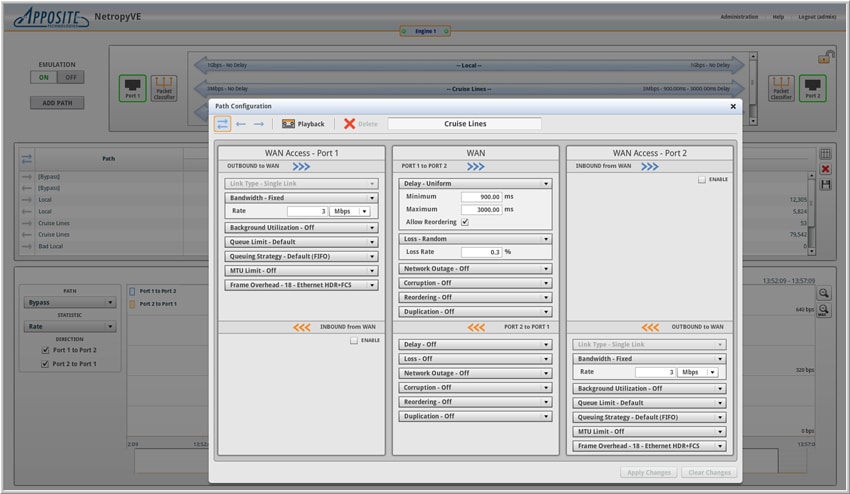
Table 1- Non-optimal network results
|
Path |
Ping |
Editing Documents |
Quarter Scale Video |
Full Scale Video |
|
Local |
<1ms
|
No issues |
CPU 24% Video played smoothly. Audio was clear. |
CPU 36% Video jerky. Audio was clear. |
|
Bad Local |
<4ms
|
No issues |
CPU 30% Video was choppy. Audio was fine. |
CPU 33% Video was choppy. Audio was fine. |
|
Coast-to-Coast |
101ms
|
No issues |
CPU 13% Video was choppy. Audio was fine. |
CPU 17% Video updated every 0.5 seconds and was out of sync with audio. Audio was raspy. |
|
Bad Coast-to-Coast |
92ms
|
No issues |
CPU 11% Video updated every 1 second and was out of sync with audio. Audio dropped noticeable. |
CPU 20% Video showed a frame every 2 seconds and was out of sync with audio. Audio was not usable. |
We are just starting to include adverse network conditions into our VDI client reviews, and we don’t yet have a full understanding of the implications and meaning of these results. As we do more testing over different devices, however, we will gain a better understanding of how a VDI client’s hardware, native network stack and the different remote display protocols affect the usability of these devices. As such, we are not taking these sub-optimal network tests into account in our conclusion on the device since their implications are still not yet fully understood.
Using Other Protocols
Atrust advertises the device as working with PCoIP, VMware Horizon Blast, and CITRIX HDX, but we found that when setting up a connection one has to have the option of using other protocols. Note: the information below is just from our own observations, which we did not take into account in our final verdict of the device.
As noted above, the device includes Firefox web browser that runs natively on the client and worked flawlessly with the Leostream virtual desktop. When we tested the device using SSH and RDP, we were able to connect to other systems using SSH and we could connect to an XP and Windows 10 system using RDP without any issues.
Device Management
The device can be used with Atrust Remote Management Console, a browser-based administration tool that is used to manage a multiple VDI clients from a single portal. Using Atrust Remote Management Console is beyond the scope of this review.
System Management
The Setting button, located in the lower left-hand corner of the toolbar, had the option to configure the device’s settings.
The configuration pane is broken down into five sections: Applications, User Interface, Devices, Network, and System.
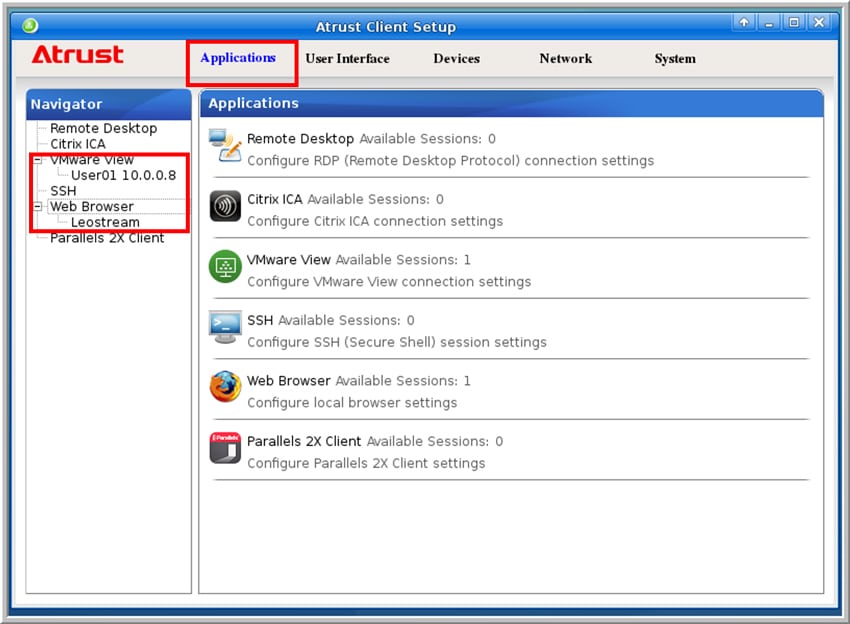
The Application section has the options to configure connections using the different protocols. Once a connection is configured it is shown in a tree structure in the Navigator on the left of the configuration pane.
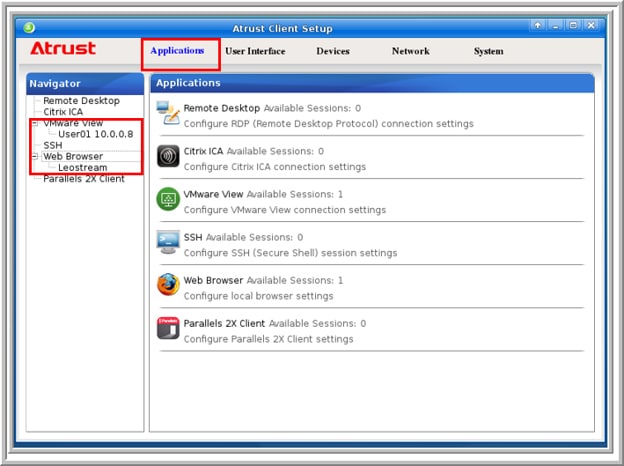
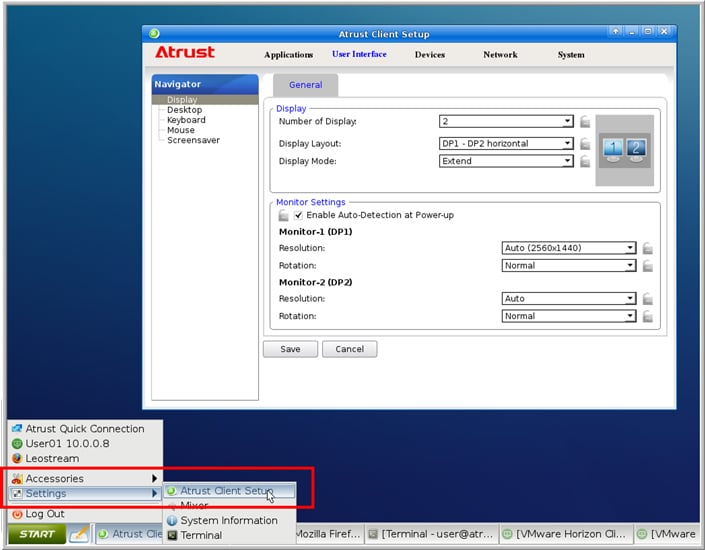
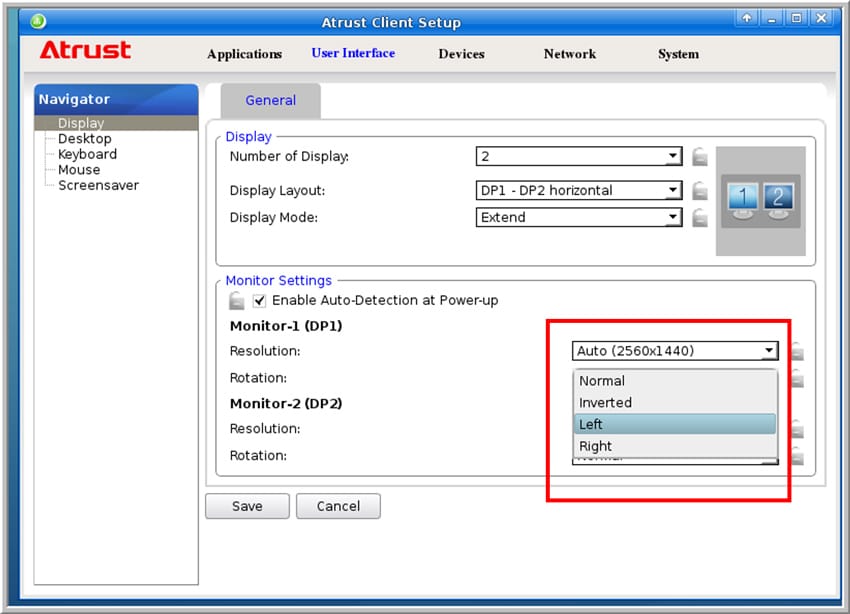
The User Interface section has the settings for the display, desktop, keyboard, mouse, and screensaver. Unlike some of the other client configuration menus that we have worked with, this one does not allow users to arrange and position the monitors graphically, but instead requires them to do so through a drop-down menu.
The other sections in the configuration pane are used to configure the client and the devices that are attached to it. We found the menu intuitive and easy to navigate and that the Atrust documentation can be consulted for more information on what the settings do.
Conclusion
Atrust has been a going concern for 10 years and has seen wide acceptance in Europe and Asia but Atrust is new to the America market. After using the Atrust t176L client for three weeks, with both on-premise and cloud-based virtual desktops, we found it to be a well-built device, with very good documentation that has some interesting features, such as the dual-purpose base/VESA stand. The Atrust t176L is a good candidate for businesses that need a reliable and well-built VDI client for knowledge workers who need one or two monitors with up to 4K resolution to complete their day-to-day tasks.
Sign up for the StorageReview newsletter