Last year, Veeam released Veeam Backup for Amazon Web Services (AWS), the company’s first cloud-native solution. A month ago, Veeam was hitting the cloud data protection market once again, announcing the general availability of Veeam Backup for Microsoft Azure. Veeam, with this new integration, keeps expanding on the hybrid cloud realms, claiming to overcome any cloud data loss. The service, deployed as an appliance, delivers native Azure backup for Microsoft Azure virtual machines (VMs). Furthermore, Veeam enables its users to cost-effectively and securely protect their cloud data; through new features and neat policy-based protection.
Last year, Veeam released Veeam Backup for Amazon Web Services (AWS), the company’s first cloud-native solution. A month ago, Veeam was hitting the cloud data protection market once again, announcing the general availability of Veeam Backup for Microsoft Azure. Veeam, with this new integration, keeps expanding on the hybrid cloud realms, claiming to overcome any cloud data loss. The service, deployed as an appliance, delivers native Azure backup for Microsoft Azure virtual machines (VMs). Furthermore, Veeam enables its users to cost-effectively and securely protect their cloud data; through new features and neat policy-based protection.
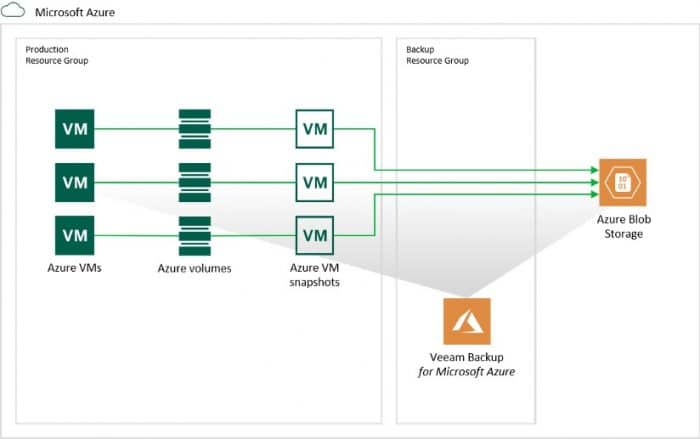
Data in the cloud is vital for modern enterprises. Still, businesses are prone to lose all this valuable data in a blink of an eye if they overlook backup and protection as a priority. According to Veeam, all companies are experiencing cloud data loss, including companies based on public cloud IaaS service providers. Cloud providers guarantee the uptime of the infrastructure for production workloads. But, whether an error, retention ruptures, security threats, or an unintended deletion, customers are responsible for protecting data despite location, on-premise, or in the cloud.
Cloud services offered by tech giants like Microsoft are not exempt from these risks. A well-known term in Microsoft’s Services Agreement encourages the use of third-Party Apps and Service to protect Microsoft’s content and services, stating the following:
“We strive to keep the Services up and running; however, all online services suffer occasional disruptions and outages, and Microsoft is not liable for any disruption or loss you may suffer as a result. In the event of an outage, you may not be able to retrieve Your Content or Data that you’ve stored. We recommend that you regularly backup Your Content and Data that you store on the Services or store using Third-Party Apps and Services.”
The above term applies to Microsoft Azure, Office 365, and all Microsoft products in the cloud. Therefore, companies need more than the native, default backup offered by Microsoft to address critical data protection, compliance, and data retention requirements. Users could use Veeam Backup for Microsoft Azure to extend and natively protect Azure VMs automatically. What’s more, to overcome any hybrid cloud disruption and protect anything, from data to apps, Veeam Backup for Microsoft Azure creates backups in the native Veeam format and extends Veeam Backup & Replication. Therefore, users can create a copy of Microsoft Azure VMs backups in on-premises repositories and perform data migration between cloud, on-premises and virtual infrastructures.
Both companies provide this new powerful solution for hybrid cloud businesses delivering Azure backup and recovery. Cost-effectively and securely, the solution protects cloud applications and data. Veeam has launched its offering in free and BYOL versions. The first of them is free forever for up to 10 Azure VMs, while the BYOL edition allows for using Veeam Universal Licenses (VUL). This license is portable across several company products, thus suitable to protect almost any type of workload with ease, whether it be cloud, virtual, physical, on-premises or across public clouds.
Veeam Backup for Microsoft Azure Capabilities
Veeam Backup for Microsoft Azure brings new capabilities to protect hybrid cloud data. Whether as native Azure VM snapshots, backup to Azure blob storage, or backup to any other Veeam supported repository. The product/appliance can be deployed easily and quickly through the Azure Marketplace. During its deployment, we can specify resource groups to isolate the backup appliance from workloads for enhanced security.
One of the key features introduced by Veeam is the policy-based automation of Azure VM snapshots for frequent restore points. This integrated snapshot automation is suitable for more regular recovery points, to backup to Azure Blob storage, and for a fast and full file-level recovery. We could create policies based on service level agreements, regions, workloads, or anything we want.
Furthermore, Veeam, to avoid unexpected costs associated with the service, includes a built-in backup cost calculation. Unclear cost is a common reason preventing companies from considering the cloud. The new backup cost calculator optimizes policies and helps to understand and manage cloud consumption.
Here is a complete list of features and capabilities by Veeam:
Azure-native
- Rapid deployment: Deploy quickly through the Azure Marketplace to start protecting your IaaS workloads instantly
- Agentless backup: Utilize native Azure VM snapshots for more frequent Azure backups and faster restores
- Automated efficiency: Automate Azure VM snapshots, backup and retention policies for more reliable cloud backup
- Fast and flexible recovery: Resume production operations quickly with flexible full- and file-level restore options
Cost-effective
- Optimized cloud costs: Optimize protection while controlling cloud costs through built-in backup cost estimation
- Low-cost retention: Back up Azure VM snapshots to Azure Blob object storage for cost-effective long-term retention
Secure
- Increased security: Isolate and secure backup data from production with support for cross-subscription and cross-region configurations
- Layered defense: Protect against cyberattacks and security breaches with multi-factor authentication
Cloud Mobility
- Portable backup format: Enable seamless backup, recovery and migration across a multi-cloud environment
- Two-step portability: Automatically protect workloads recovered or migrated to Azure from on-premises or other clouds
How to deploy and set up Veeam Backup for Microsoft Azure
Here, at StorageReview, we spent some time with this excellent product, exploring all the required processes from deploying to configure the appliance. We are showing how simple its configuration is while taking a look at some of the essential options.
So, in this section, we are presenting a complete walkthrough on the Veeam Backup for Microsoft Azure. There are three critical areas to take action: at Microsoft’s Azure Portal, to deploy the appliance; the Veeam Backup for Microsoft Azure appliance, to configure and enable the services; and finally, the Veeam Backup and Replication console, to connect the service with an on-prem platform if required.
First off, make sure to create and configure an Azure Storage account, as is required to create the backup containers. Another critical thing to do is to enable the Client IP address to allow access from Veeam to the Azure service. In the end, this configuration is going to allow Veeam to archive on-premises data to Azure. More specifically, to the Azure Blog Storage service.
Microsoft Azure Portal
The first thing to do is to log into your Azure account. From here, we are going to have some options to deploy the Veeam Backup for Microsoft Azure appliance/VM. One option is to go directly to the Azure Marketplace and search for Veeam services. We are going to skip this one.
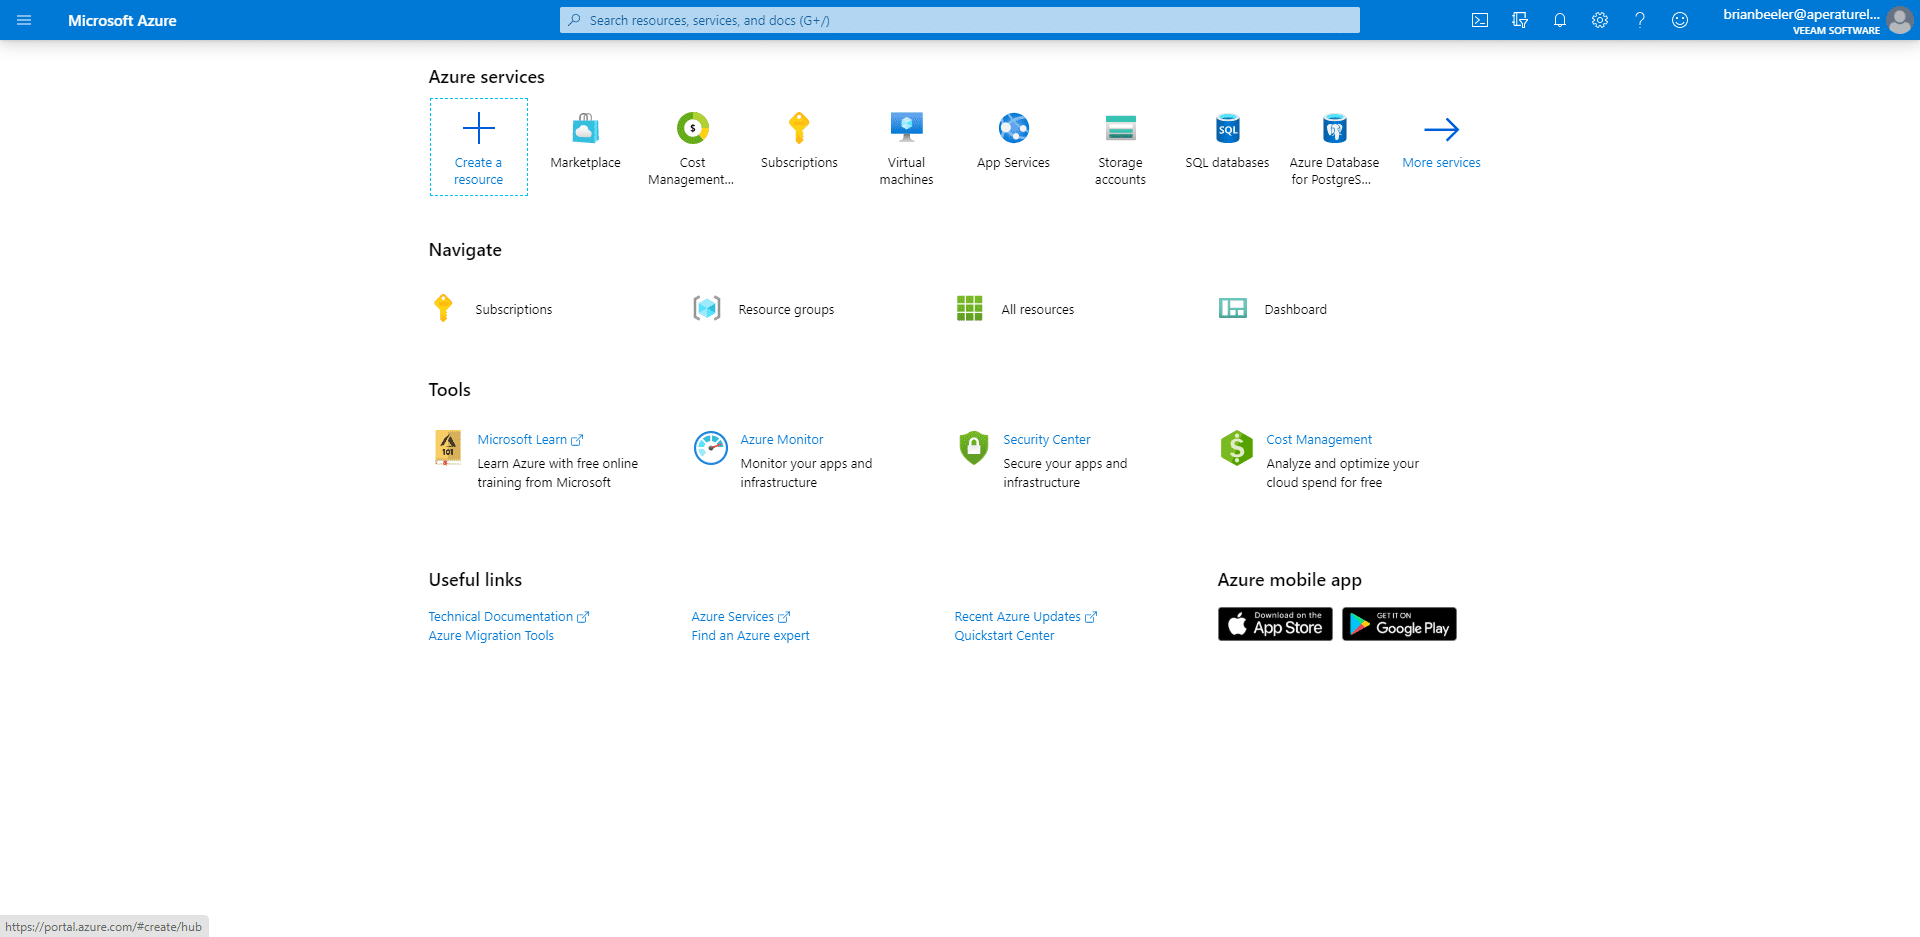
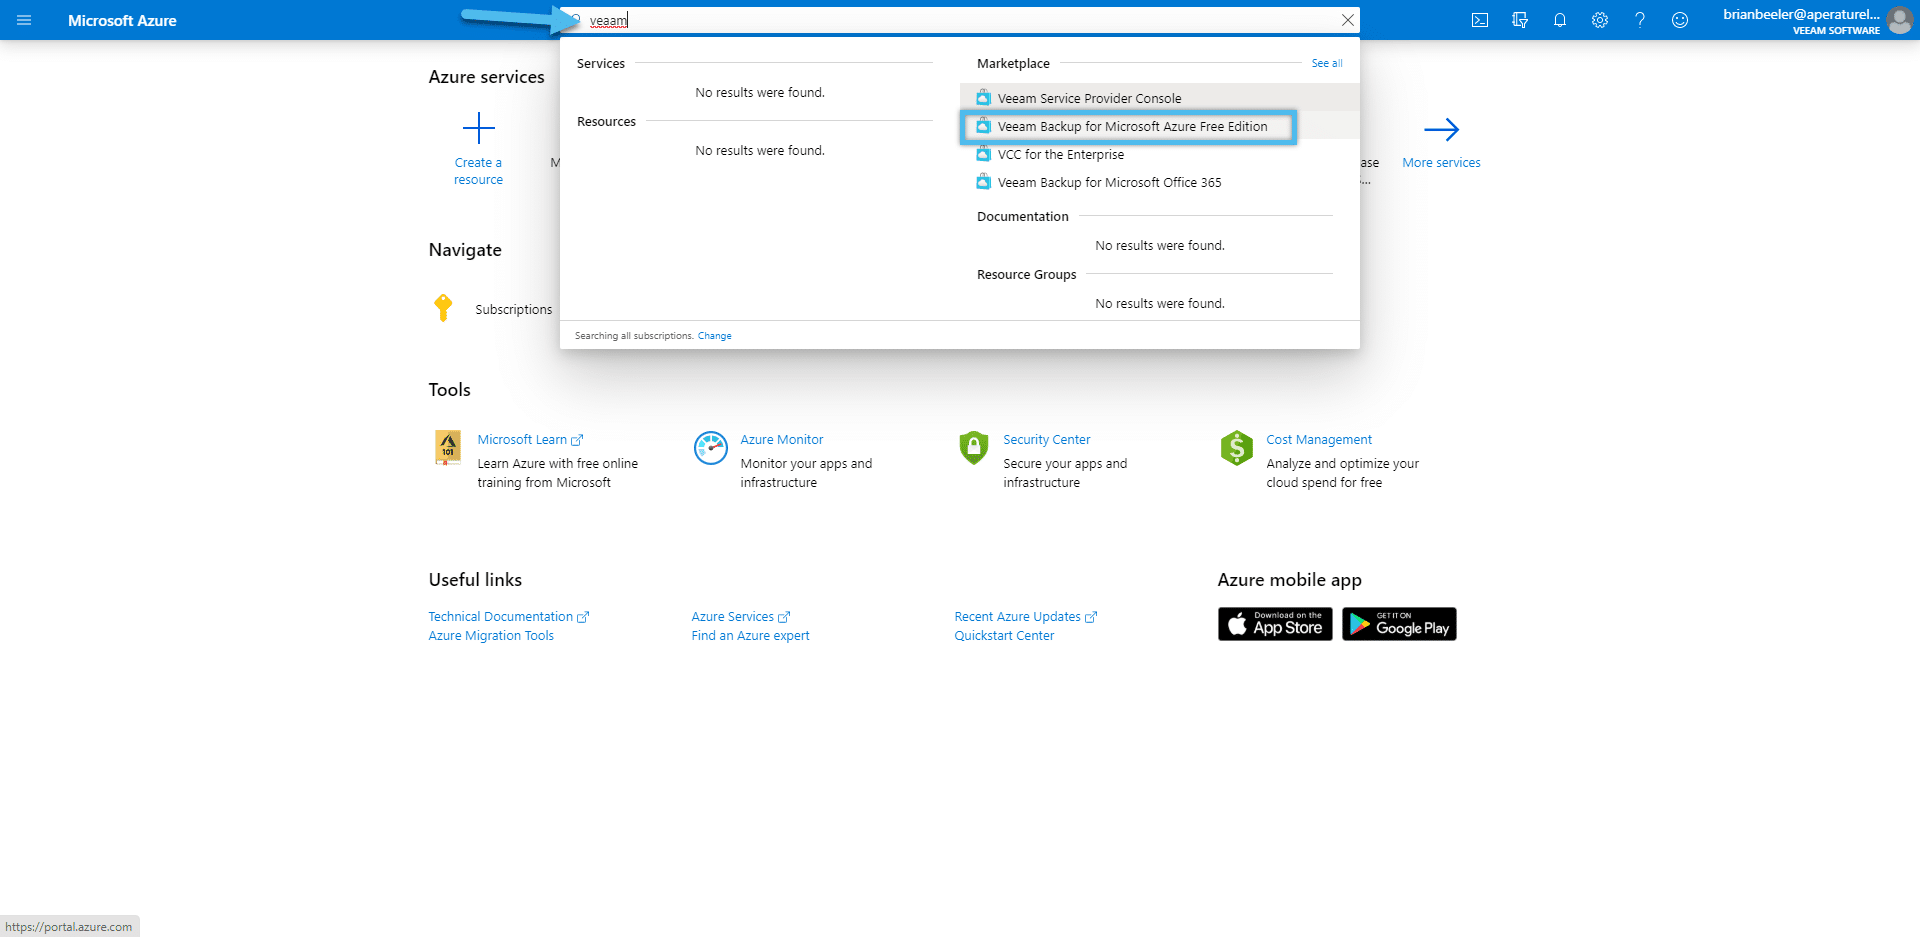
Another and quickest way to deploy this VM is by directly typing “Veeam” in the Azure search box. Next, we select the Veeam Backup for Microsoft Azure Free Edition option.
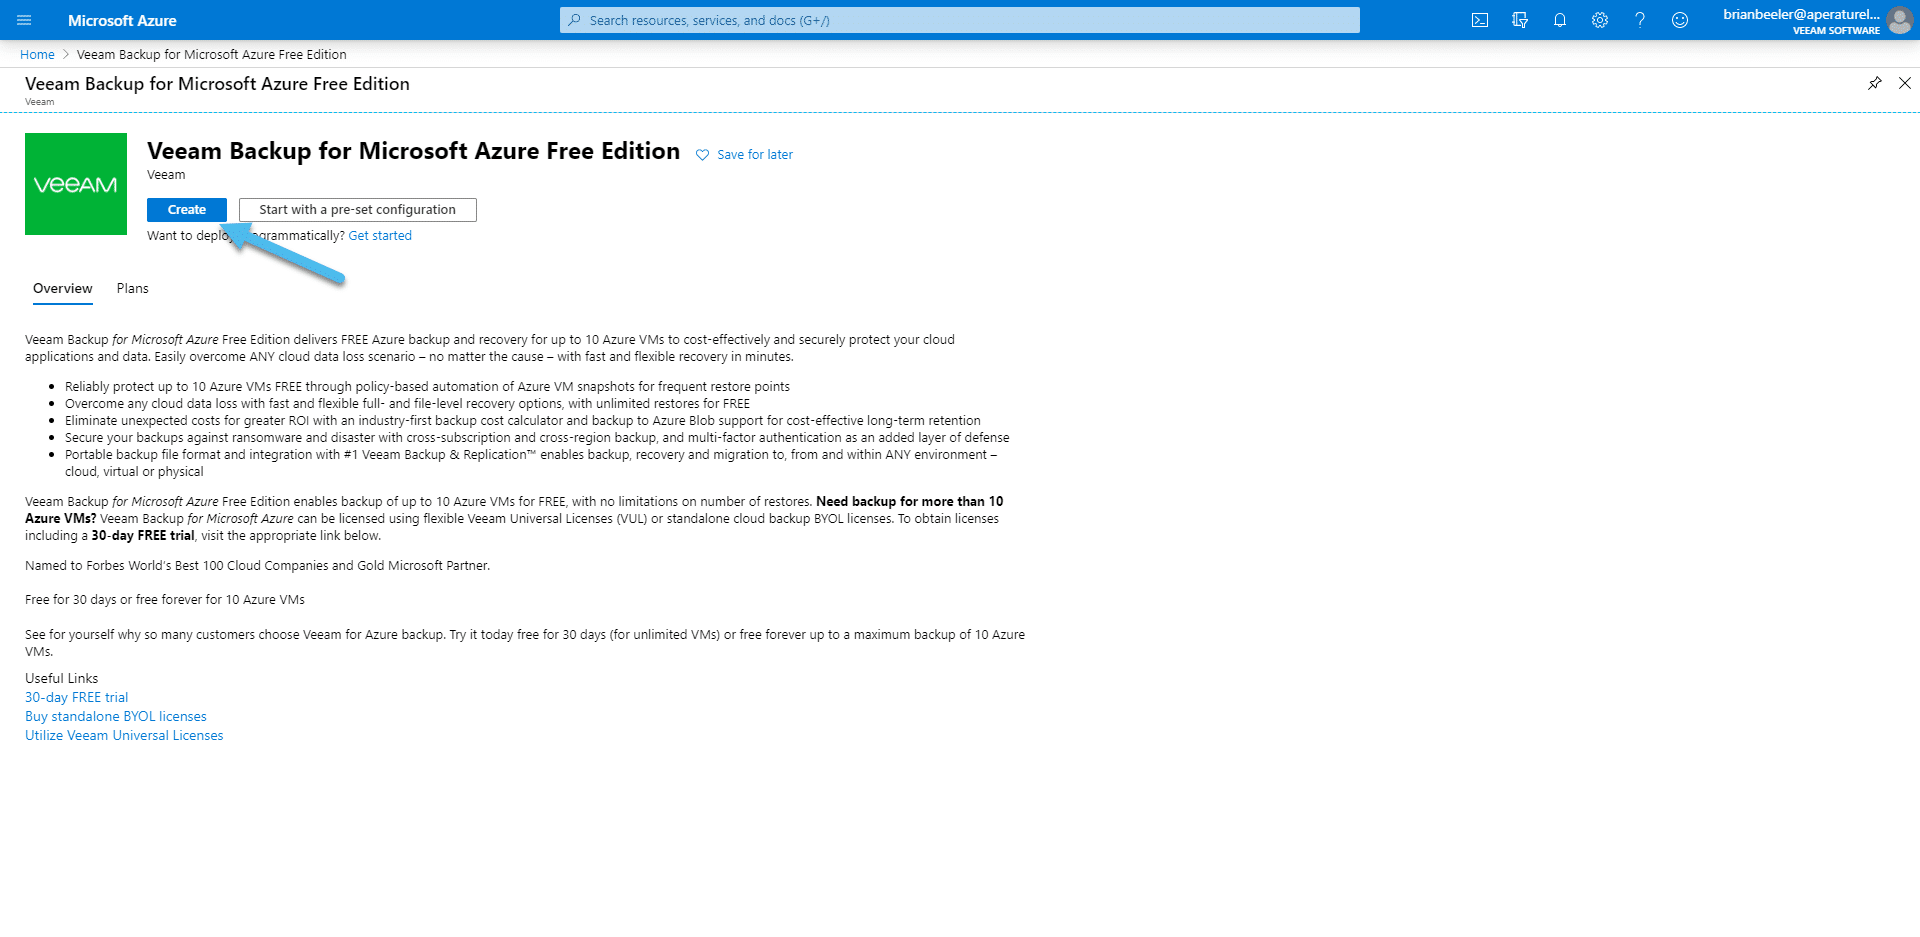
We are going to be brought to the Veeam Backup for Microsoft Azure Free Edition page. The next step is to click on “Create” to deploy this Veeam appliance into the Azure environment.
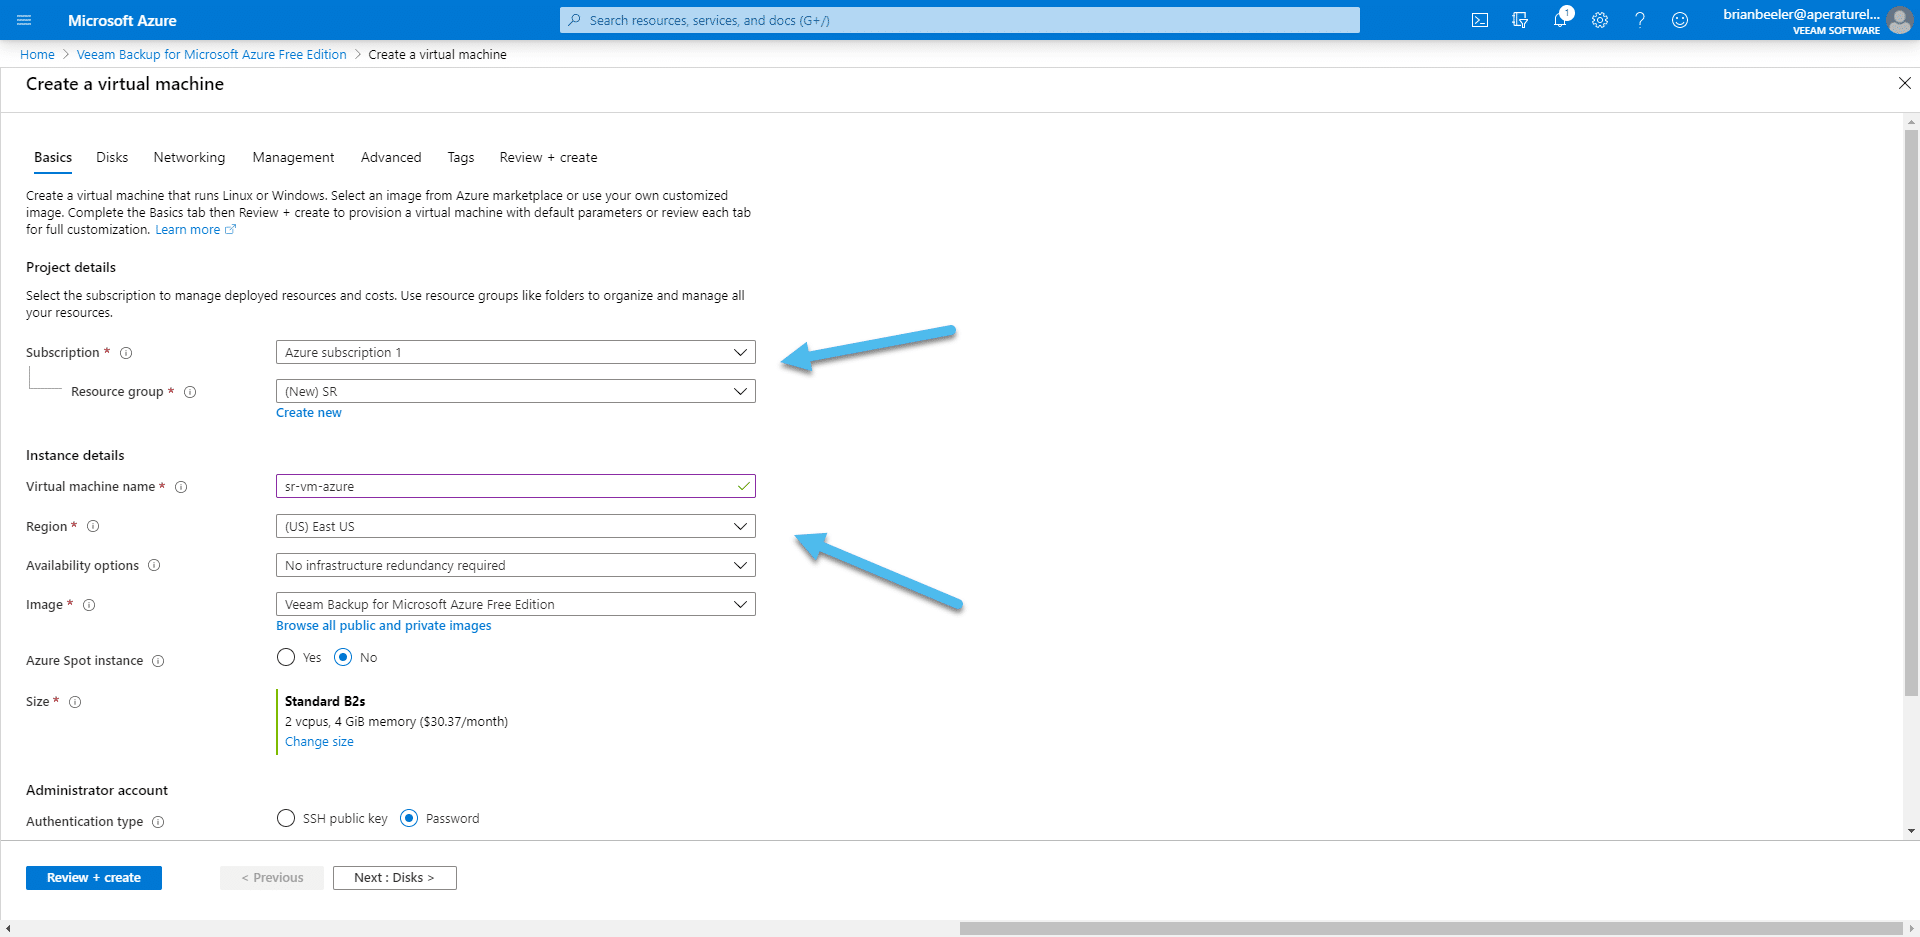
When we start deploying the appliance, we are going to have some critical details to configure. These details are under the “Basic” tab when creating a new virtual machine, in our case, the Veeam appliance. Under Project details, we must select a subscription and a resource group. If you haven’t created a resource group, you can easily create one at the moment of this step.
Other key details that we must configure are located under Instance details. Here, we need to name our VM and select Regions. The other options can be left as default. The Image option also leaves it as default, as the required image is Veeam Backup for Microsoft Azure Free Edition.
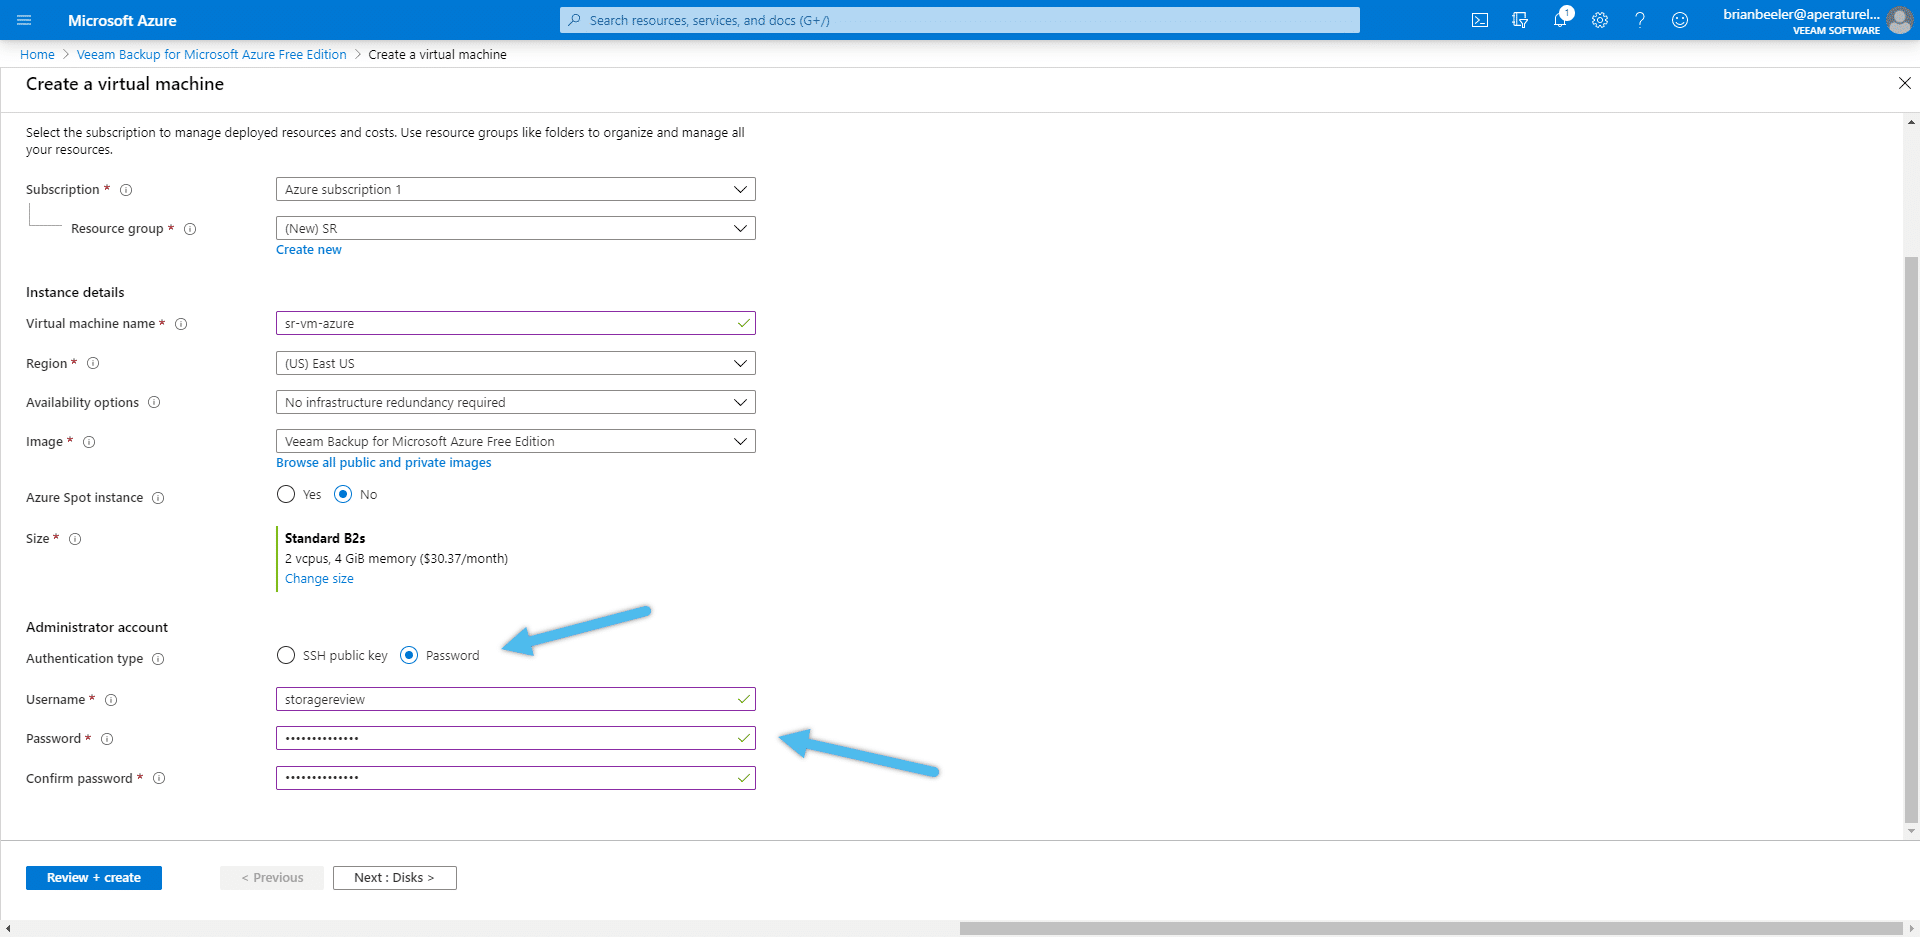
If we keep scrolling down, we find the Administrator account option at the bottom of the Basic tab. Here we need to change to the Authentication type to Password. Then, set a username and password. It is important to remember these credentials, as are required to access and configure this appliance in the next section.
After you configure the Basic tab, click Next to go through all the other tabs requires to configure a VM in Azure. The next tab, Disk, can be left as default.
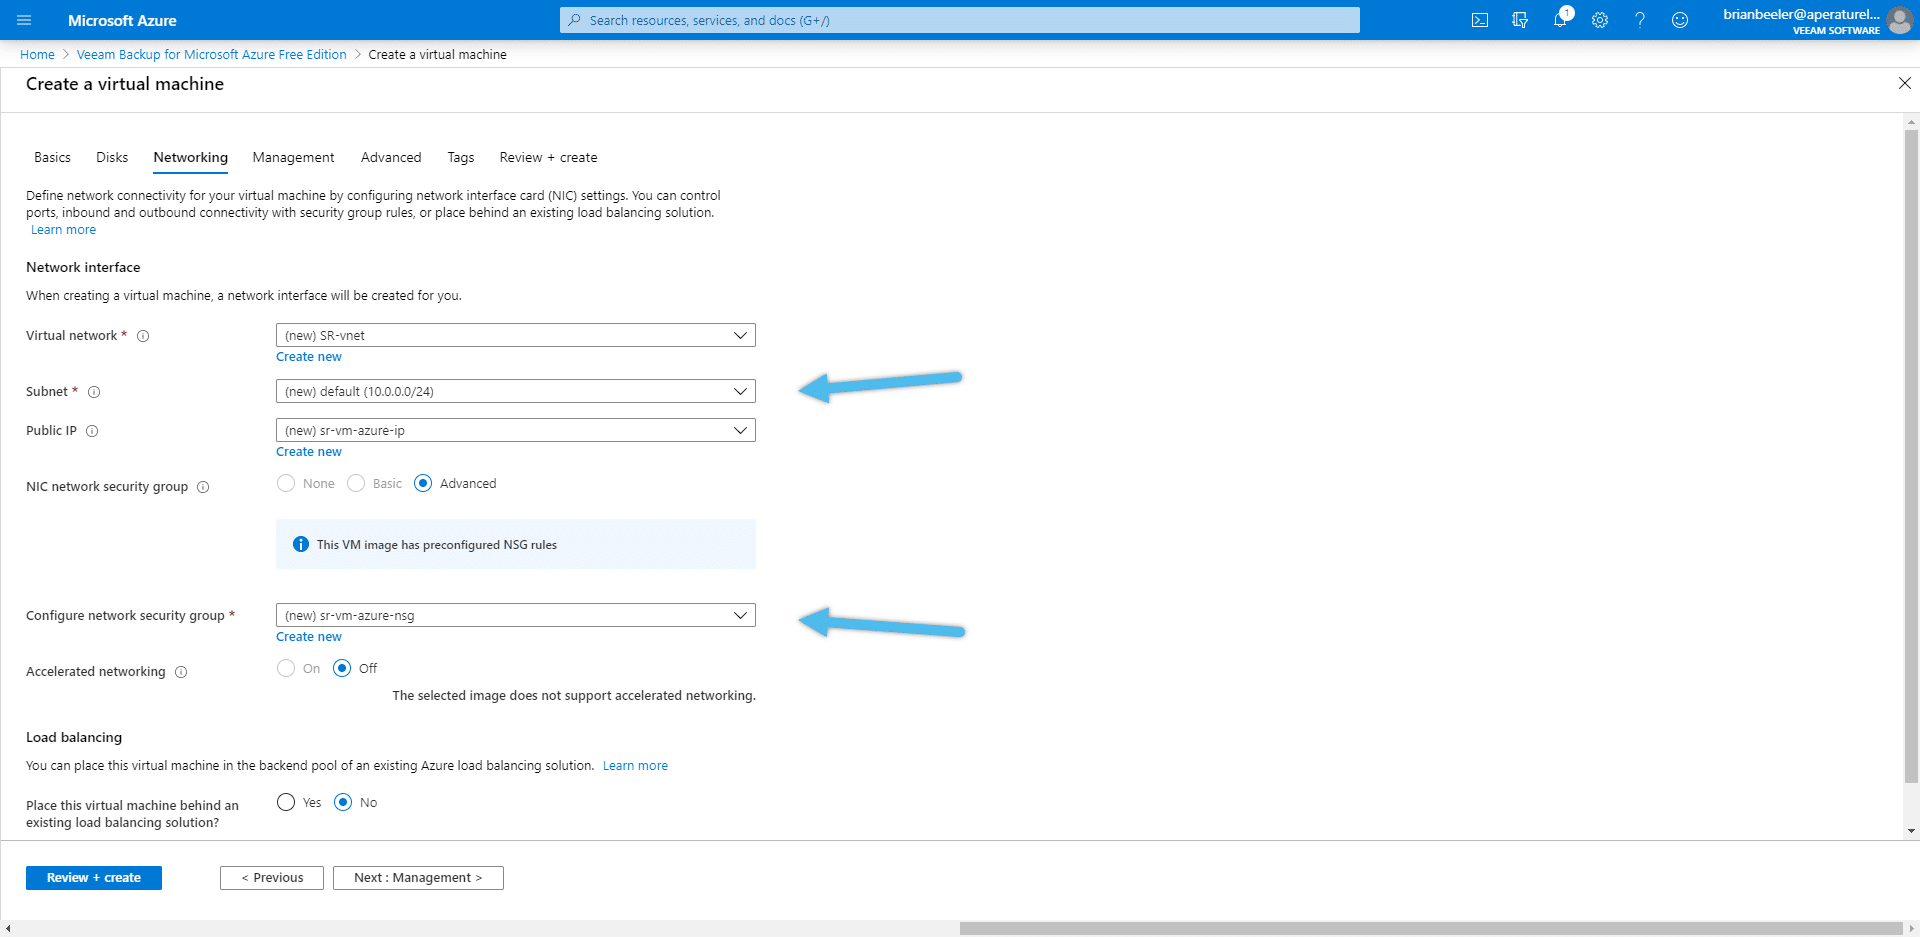
Under the Networking tab, select the appropriate options based on your Virtual network, Subnet and Public IP. Also, configure a network security group. Here, click Next.
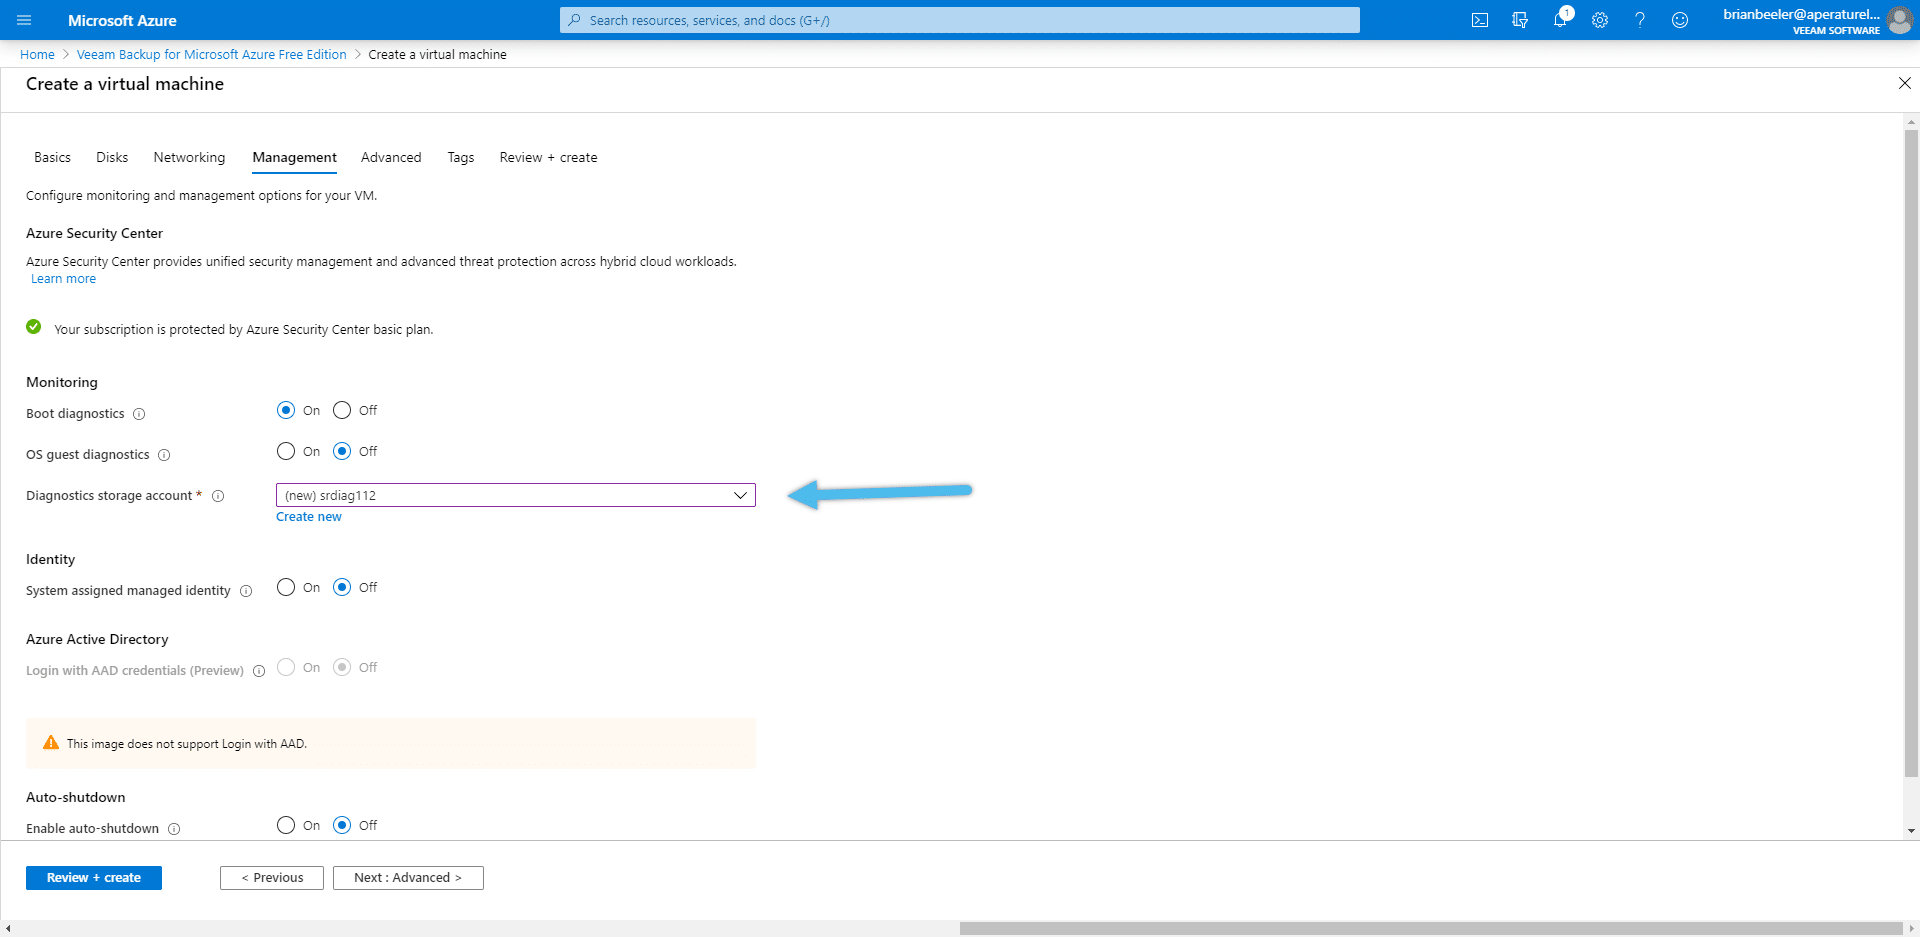
In the Management tab, under Diagnostics storage account, select the storage account that you want to associate with this appliance. Click Next.
Under the Advance and Tags tabs, leave everything as default.
It is important to note, that when protecting our VMs, the Tags tab can be used to set the Veeam Backup for Microsoft Azure policies. But Tags are not necessary for this appliance, and during this walkthrough, we are not going to be using this option.
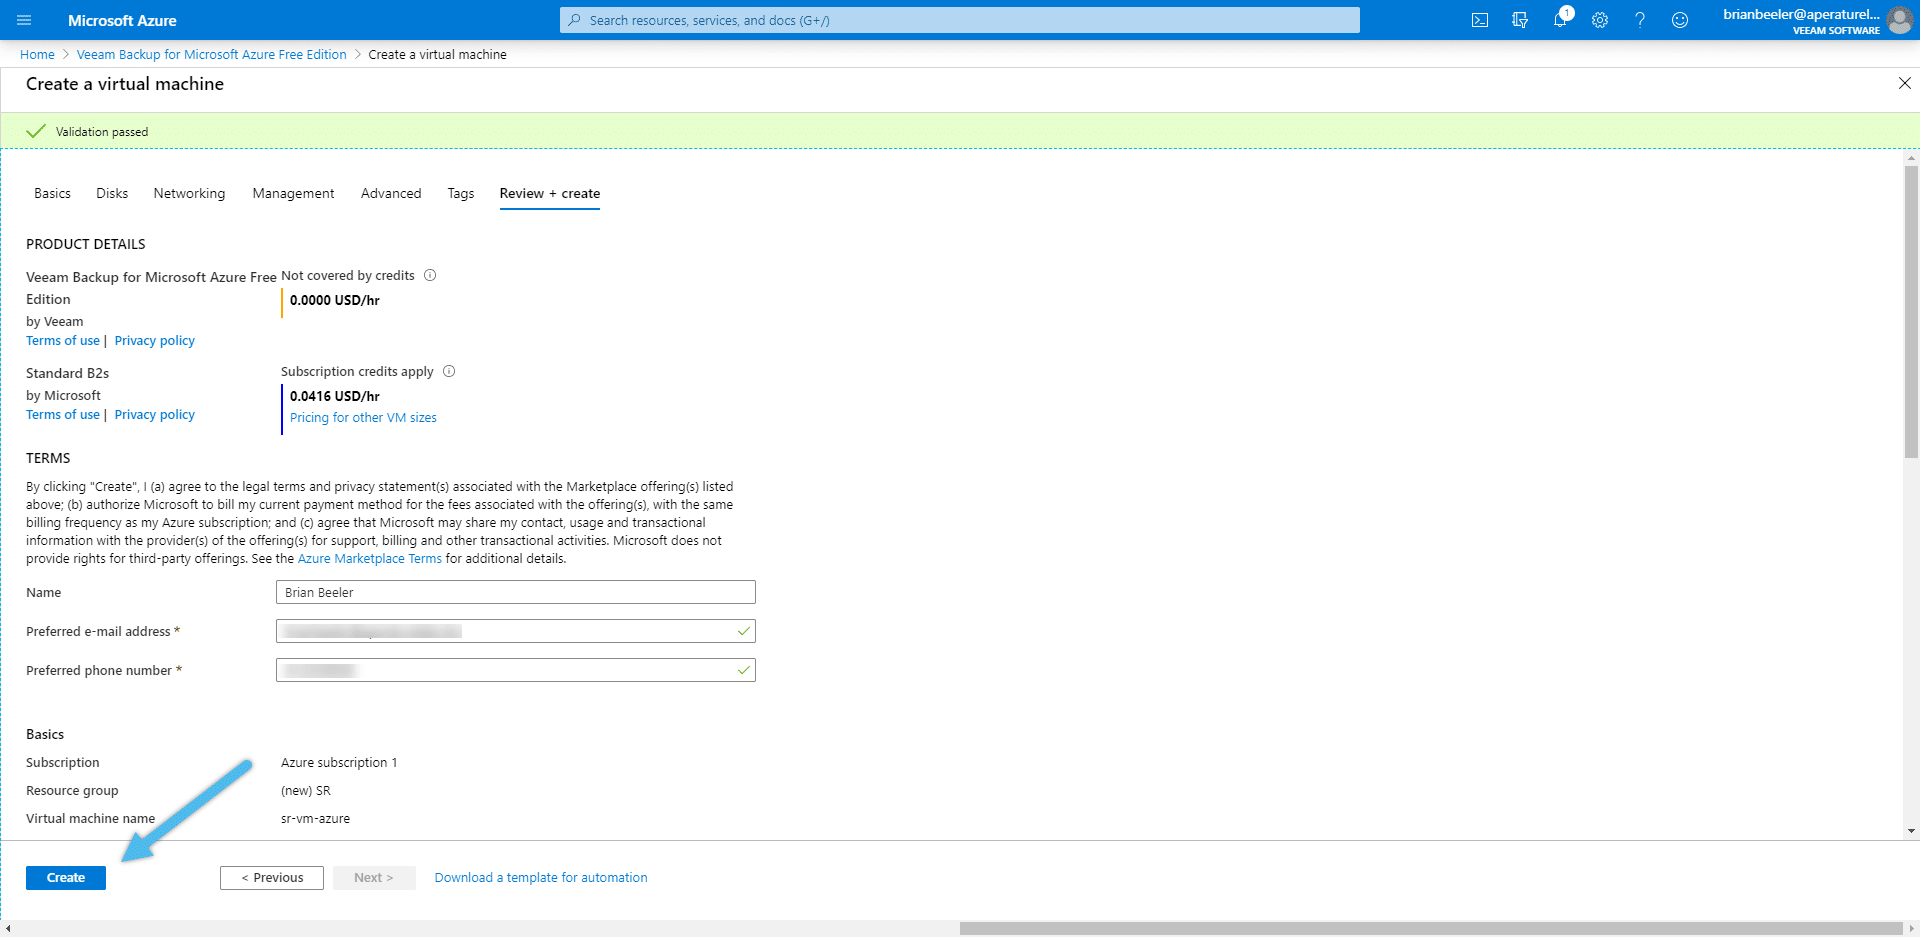
Finally, review the configuration and click “Create” to start deploying the appliance.
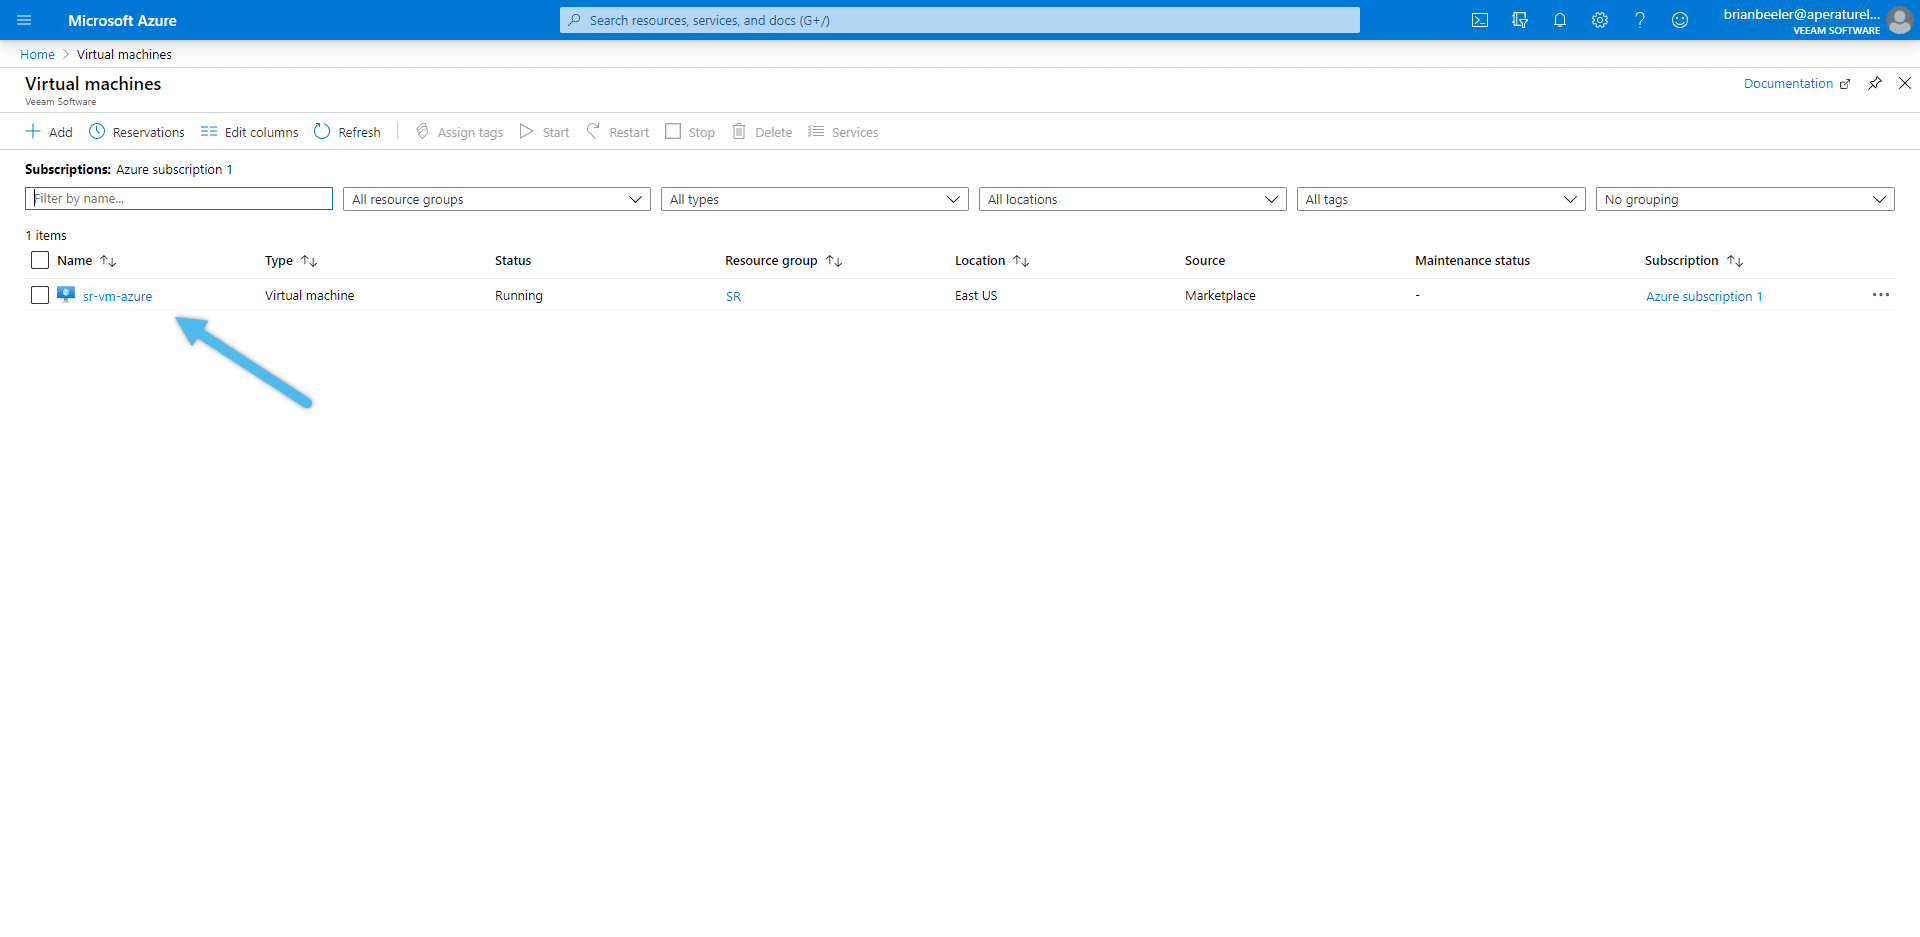
Under your Azure account, Virtual Machines, now we see the new Veeam appliance created.
Veeam Backup for Microsoft Azure appliance
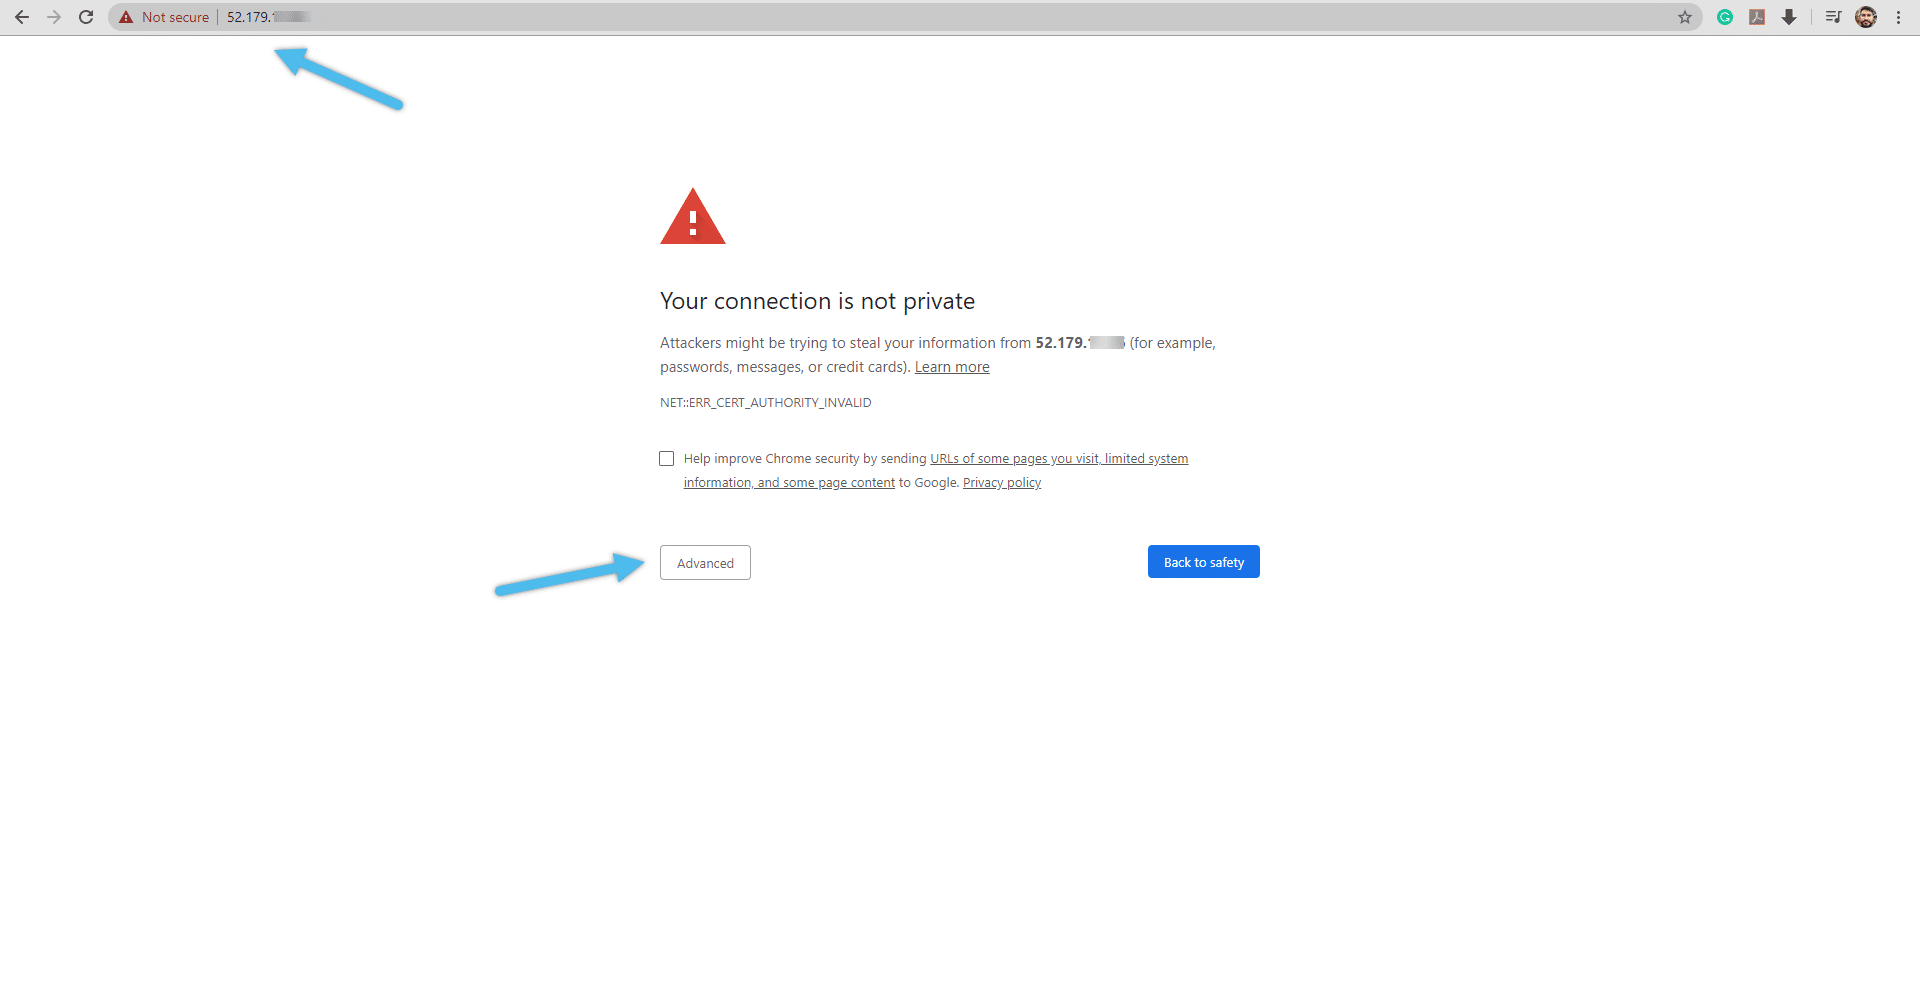
Under the appliance is where management and configuration happen. First, we need to open this new Veeam VM options, search, and copy its Public IP address. Now, use this IP address in a new web browser tab to access the appliance. Ignore the security warning by the web browser.
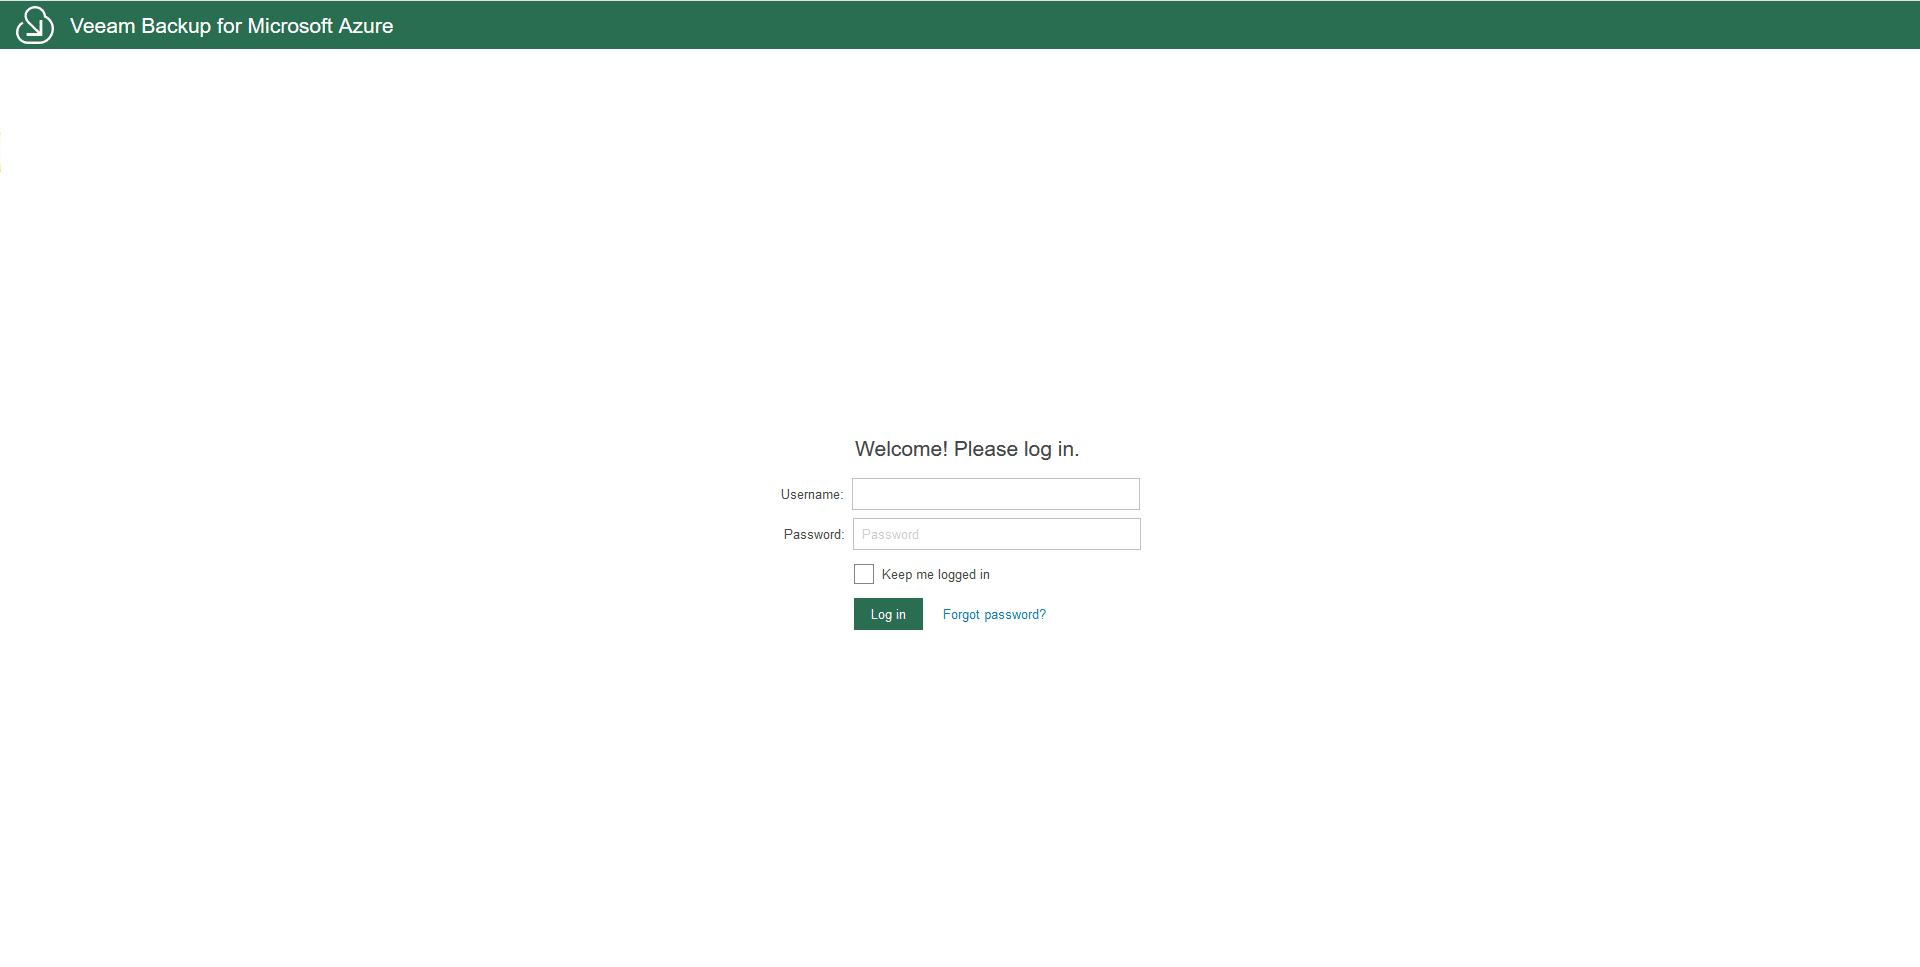
Input the credentials previously configured during the creation of this appliance.
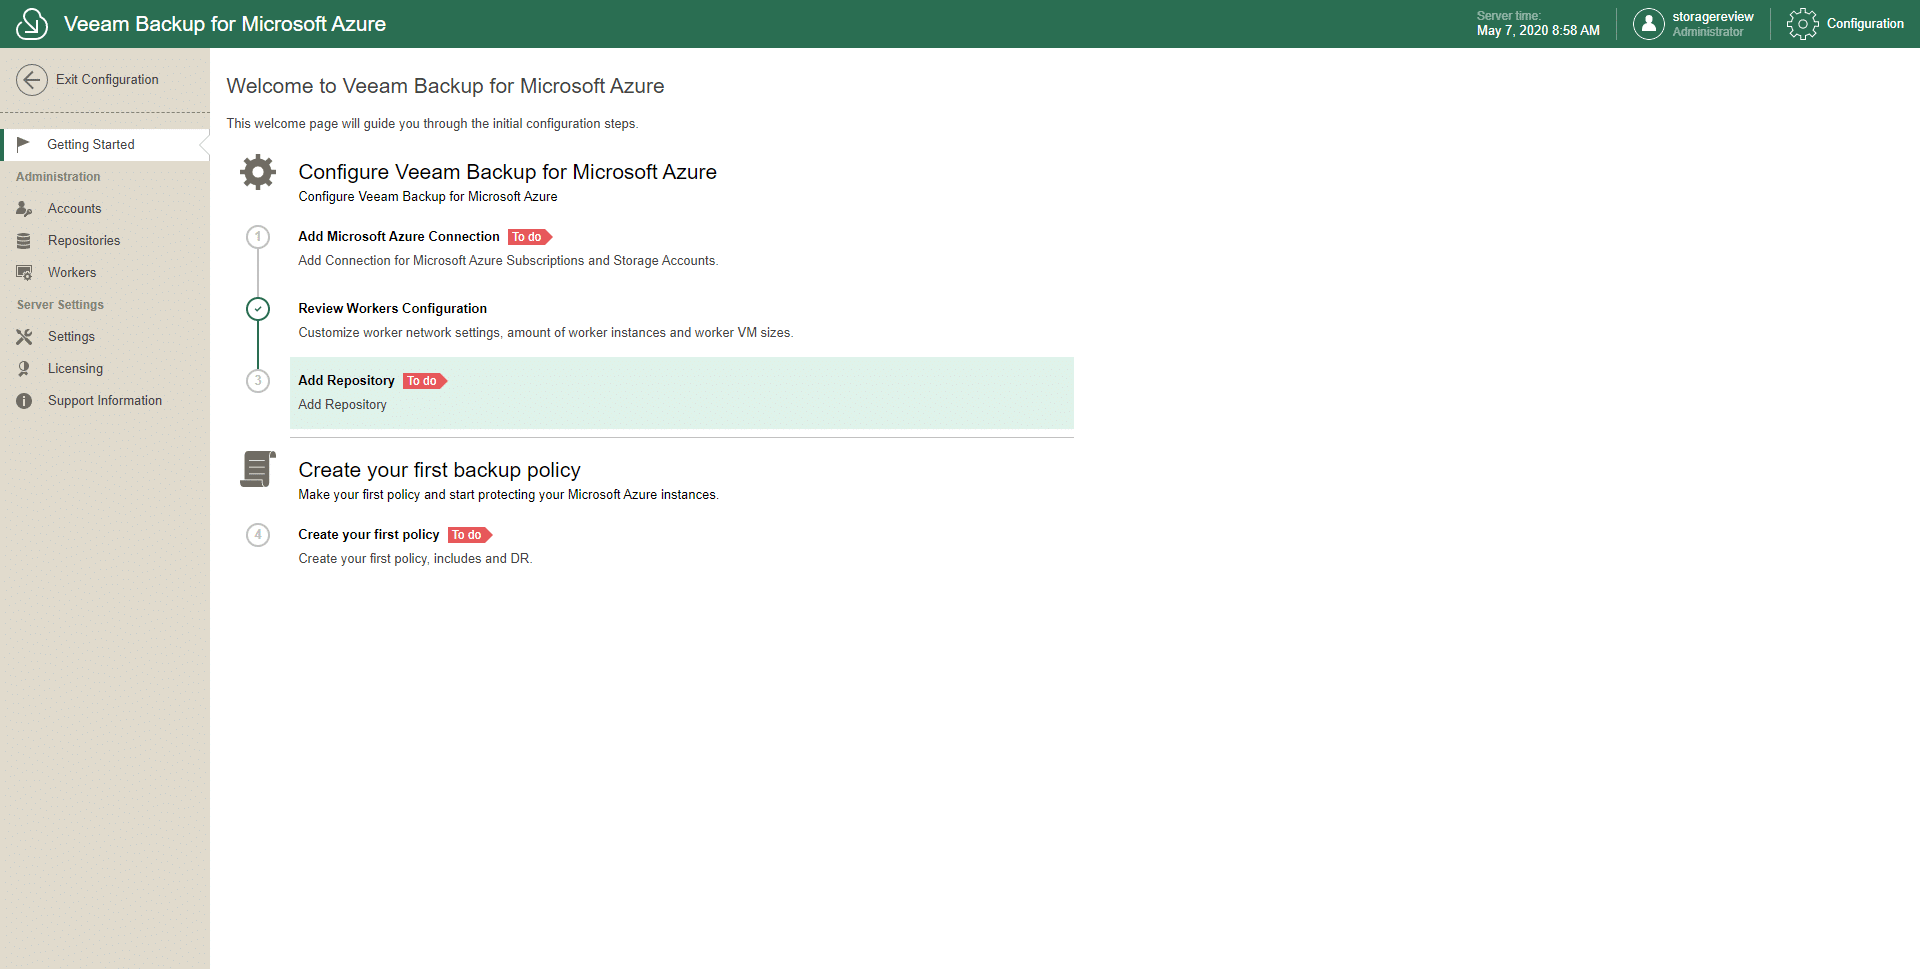
The first time we access this appliance, we are going to be welcomed by the Getting Started page. Here, there are 4 initial steps that we need to configure to make our Veeam backup service ready to roll. These steps are Add Microsoft Azure Connection, Review Workers Configuration, Add Repository, and Create your first policy.
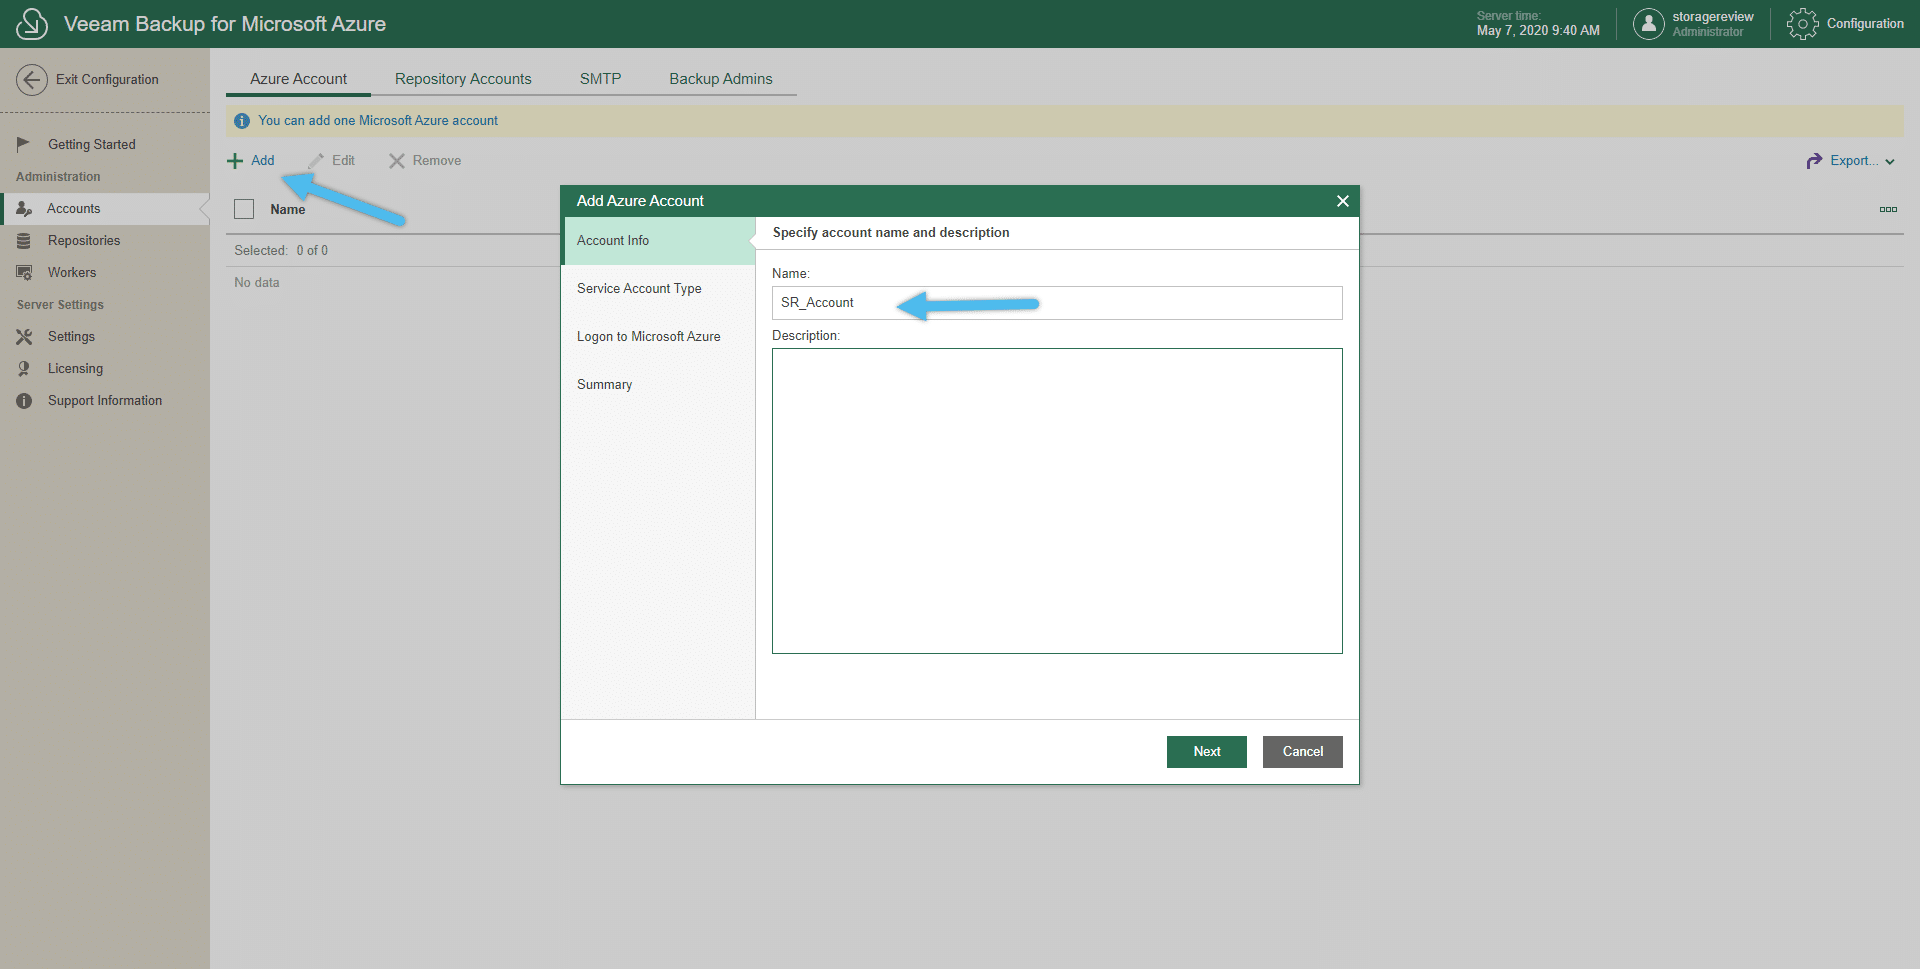
First of all, click on Add Microsoft Azure Connection. We are going to be taken to a new page, the Azure Account one. Click on the Add to start the Add Azure Account wizard, name this service account, and follow the steps to link the account with this Veeam appliance. After these steps, this Azure account is created.
The next step, under the Getting Started page, is to add workers (as we don’t have any at the moment). Workers are auxiliary Linux-based machines deployed for the scaling purposes and transfer fee reduction.
You can always go back to the Getting Started options by clicking on Configuration, on the top-right corner. Click on Review Workers Configuration to access its page and then click on Add, to add a new worker.
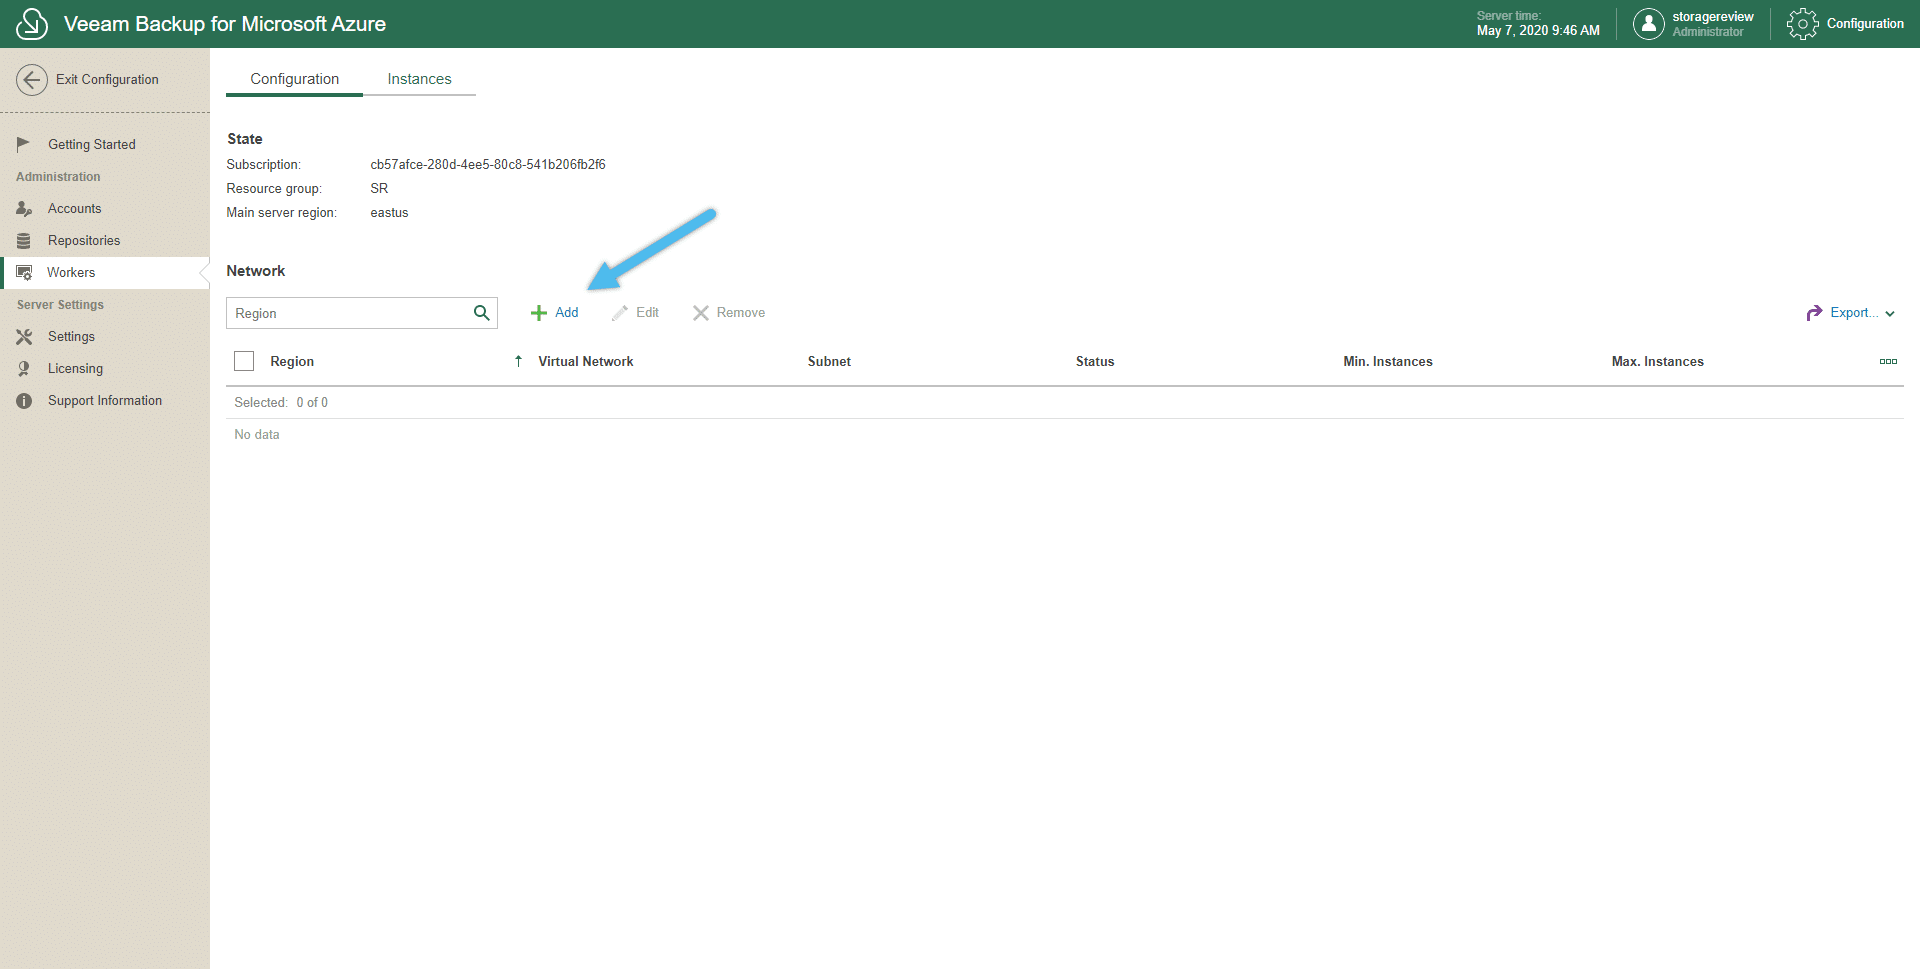
Remember that during the configuration of Workers and Repositories, it is necessary to have correctly configured the Azure Storage Account that we are going to link with this service. As mentioned at the beginning of this section, this configuration includes the Virtual networks and Subnet. Also, you must allow the client IP address to access to storage services.
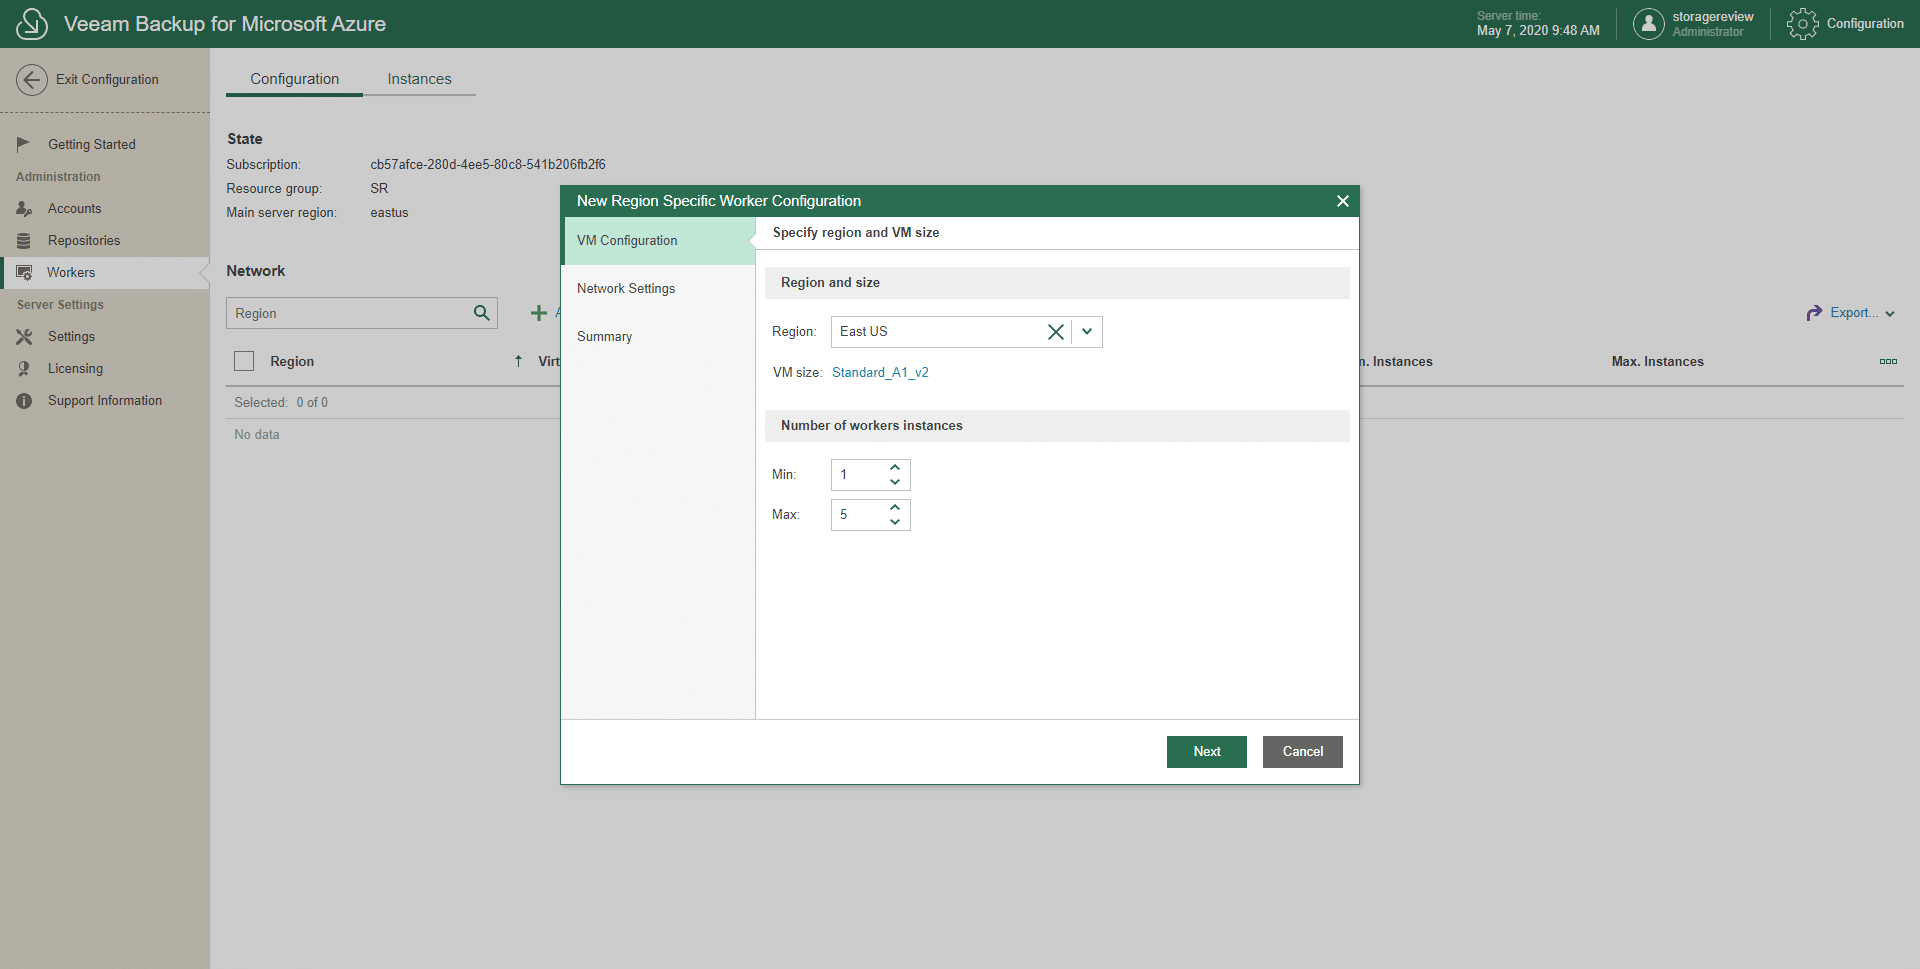
A new wizard is prompt, New Region Specific Worker Configuration. Follow the wizard steps to configure this worker, selecting the network according to the previously established configuration for this appliance environment. After these steps, the new worker is created.
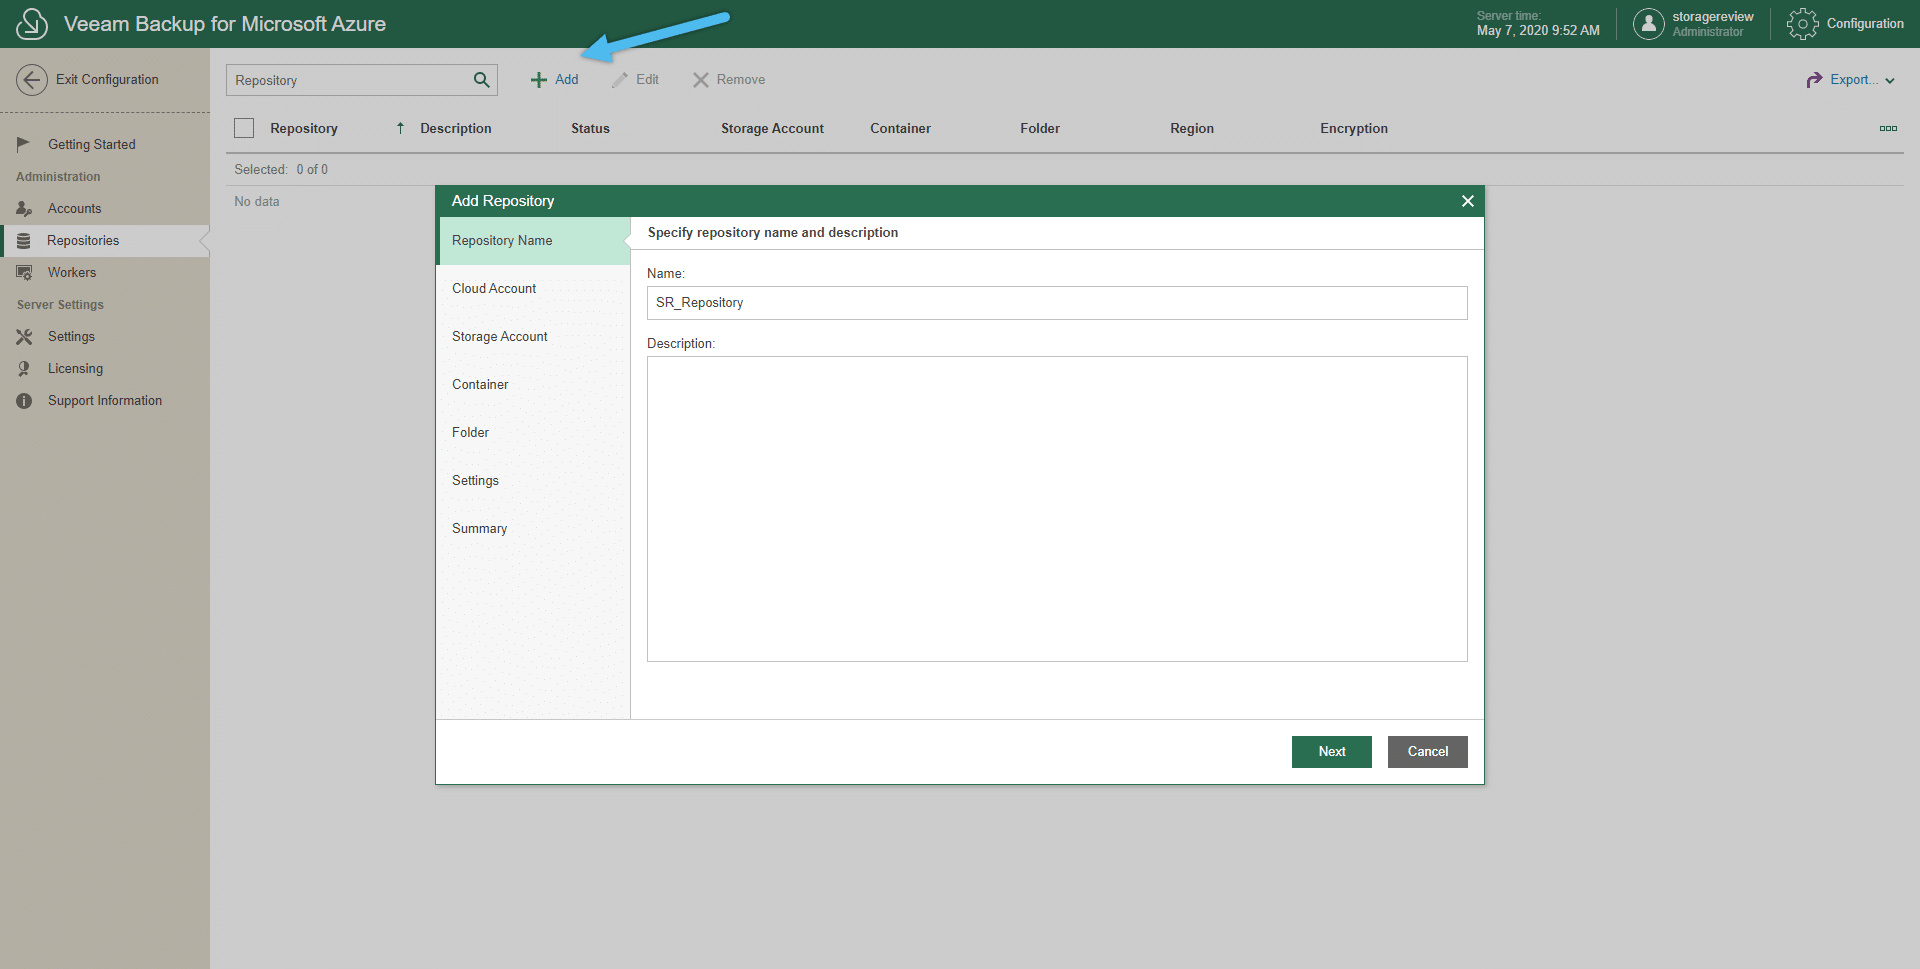
Now, let’s go back to the Getting Started page; it is time to configure a Repository. Click on Add Repository, to open the Repositories page. On this page, click on Add, to start the Add Repository wizard. Here: name the repository, select the storage account, container, and folder. After these steps, the new Repository is created.
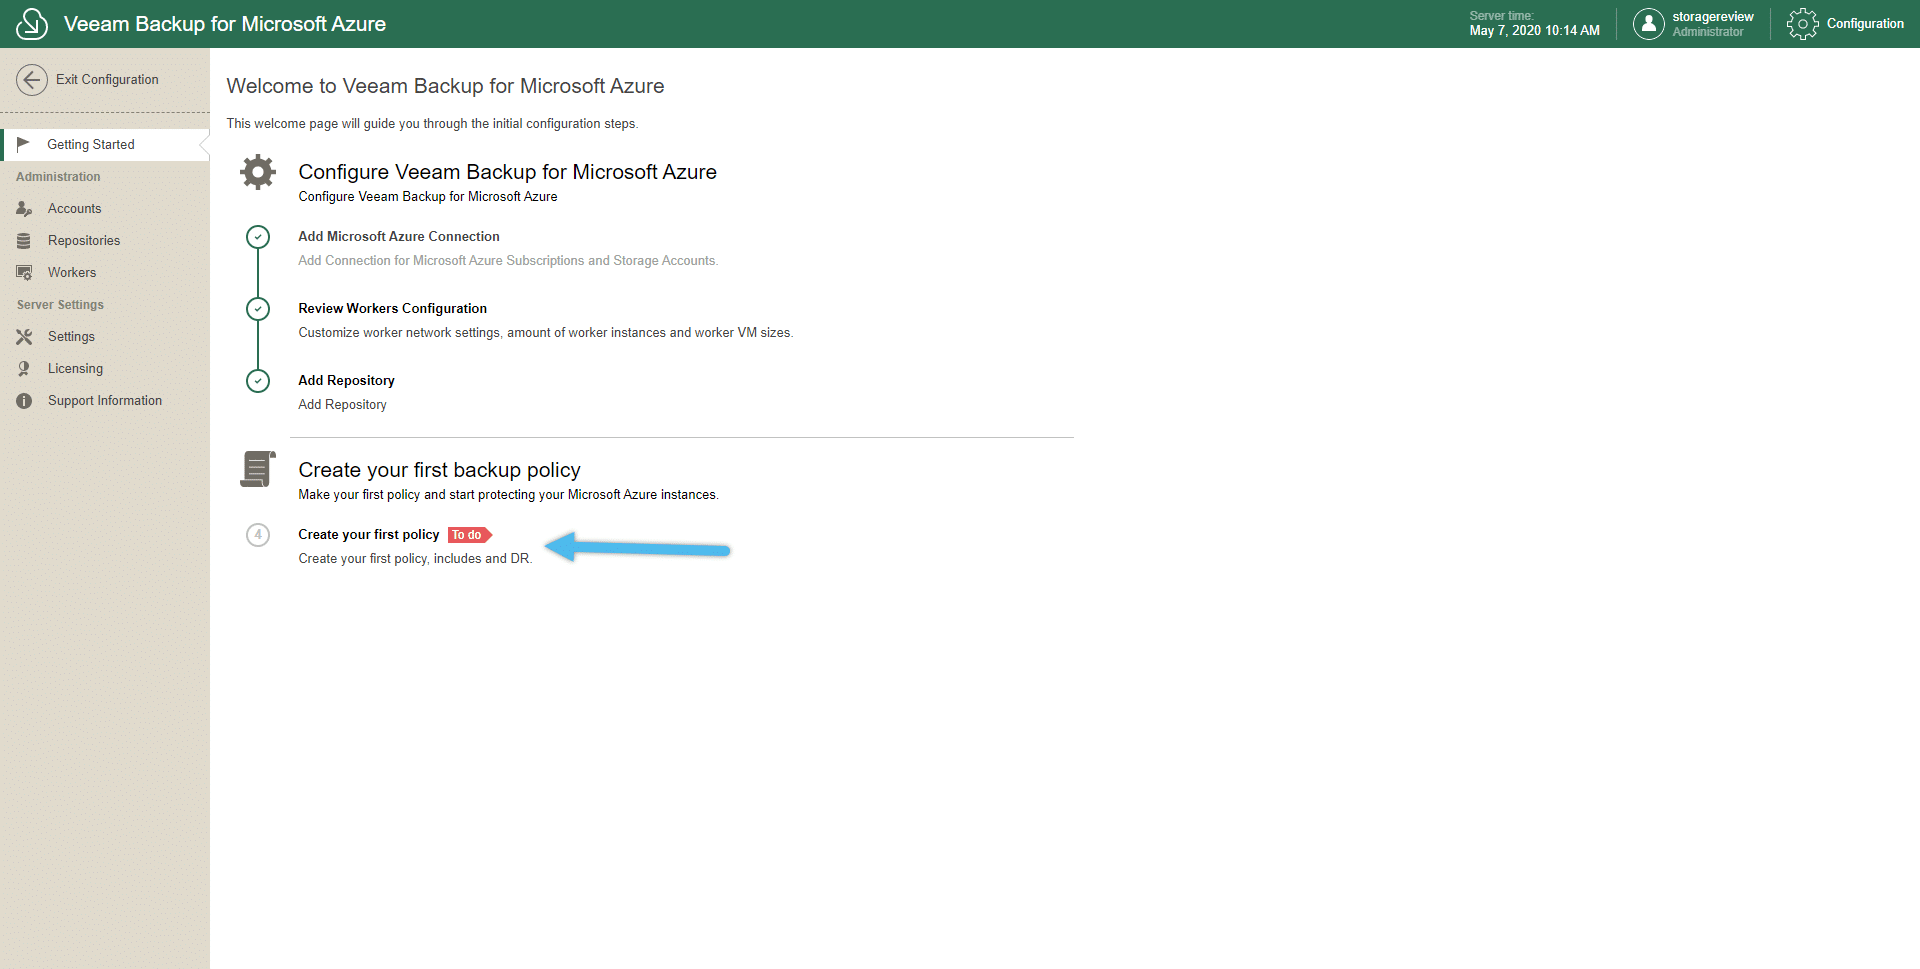
The final step, under the Getting Started page, is where all the Veeam Backup for Microsoft Azure magic happens. Let’s click now on Create your first policy.
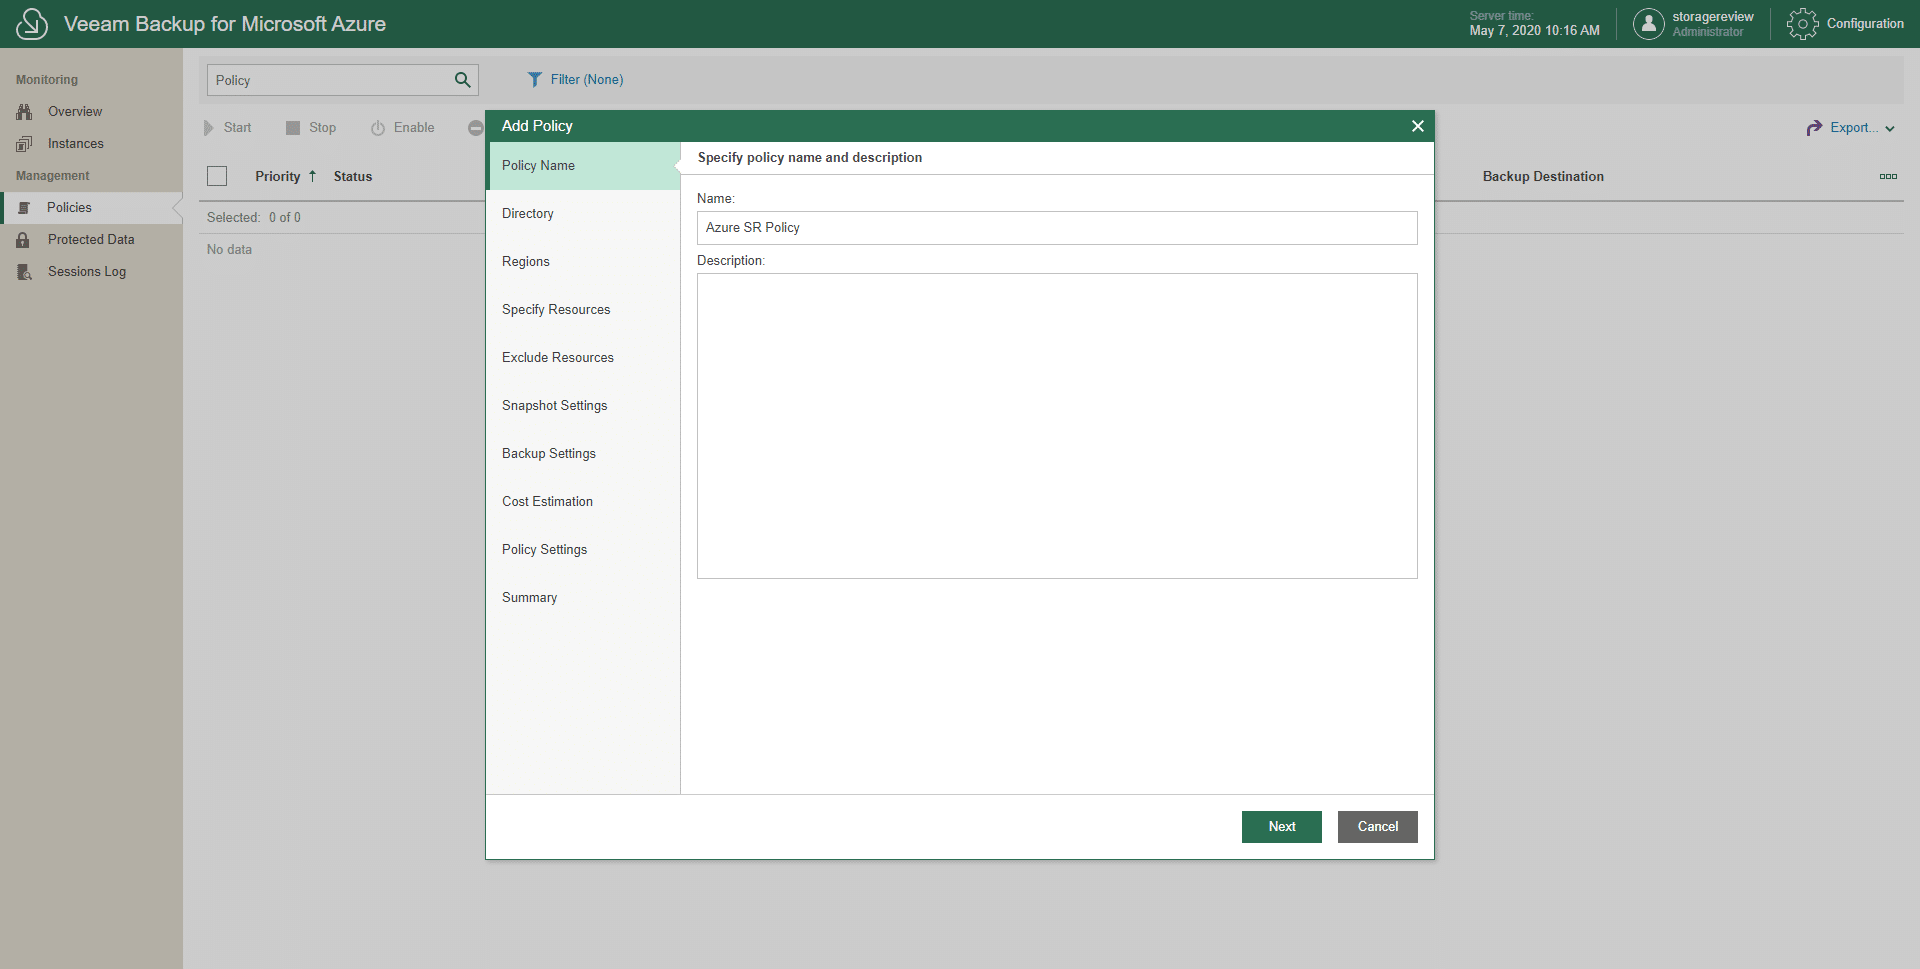
On the Policies page, click on Add to start the Add Policy wizard. In the first step, name your policy, and in the next step, Directory, select an Azure Active Directory.
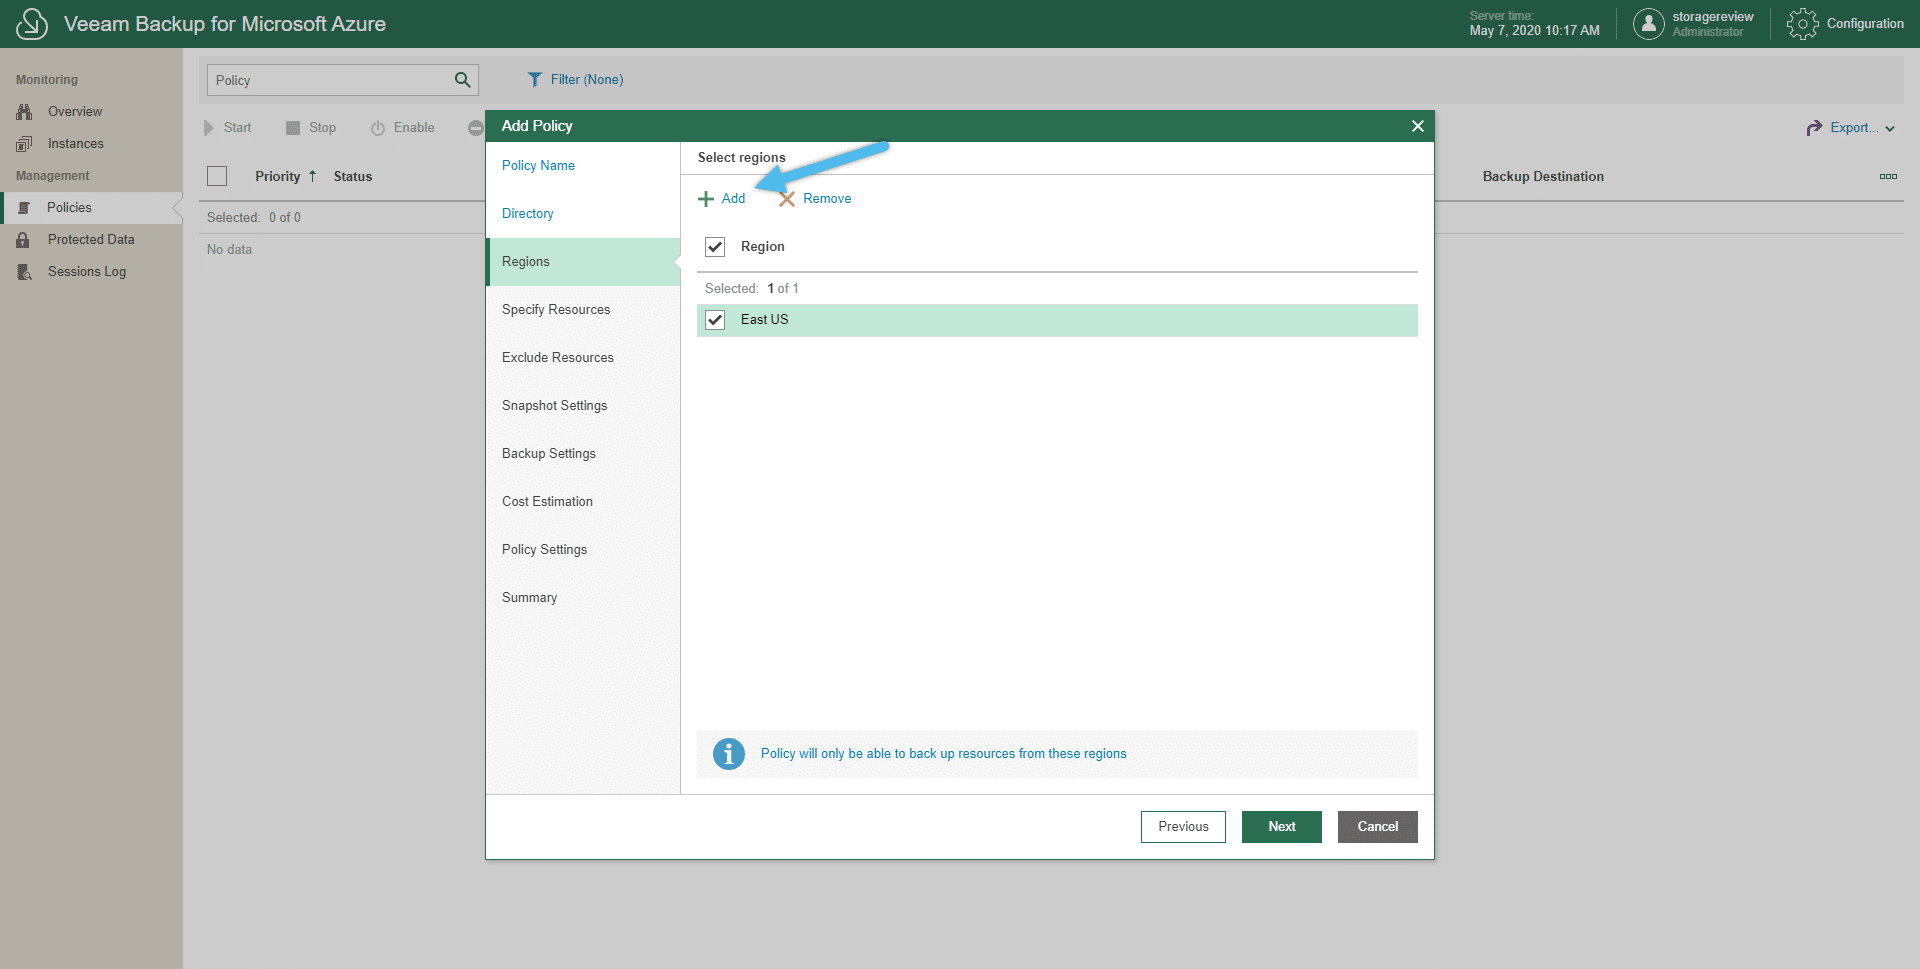
Under the Region step, click Add to select the regions we want to back up. This policy will only be able to back up resources from the selected region here.
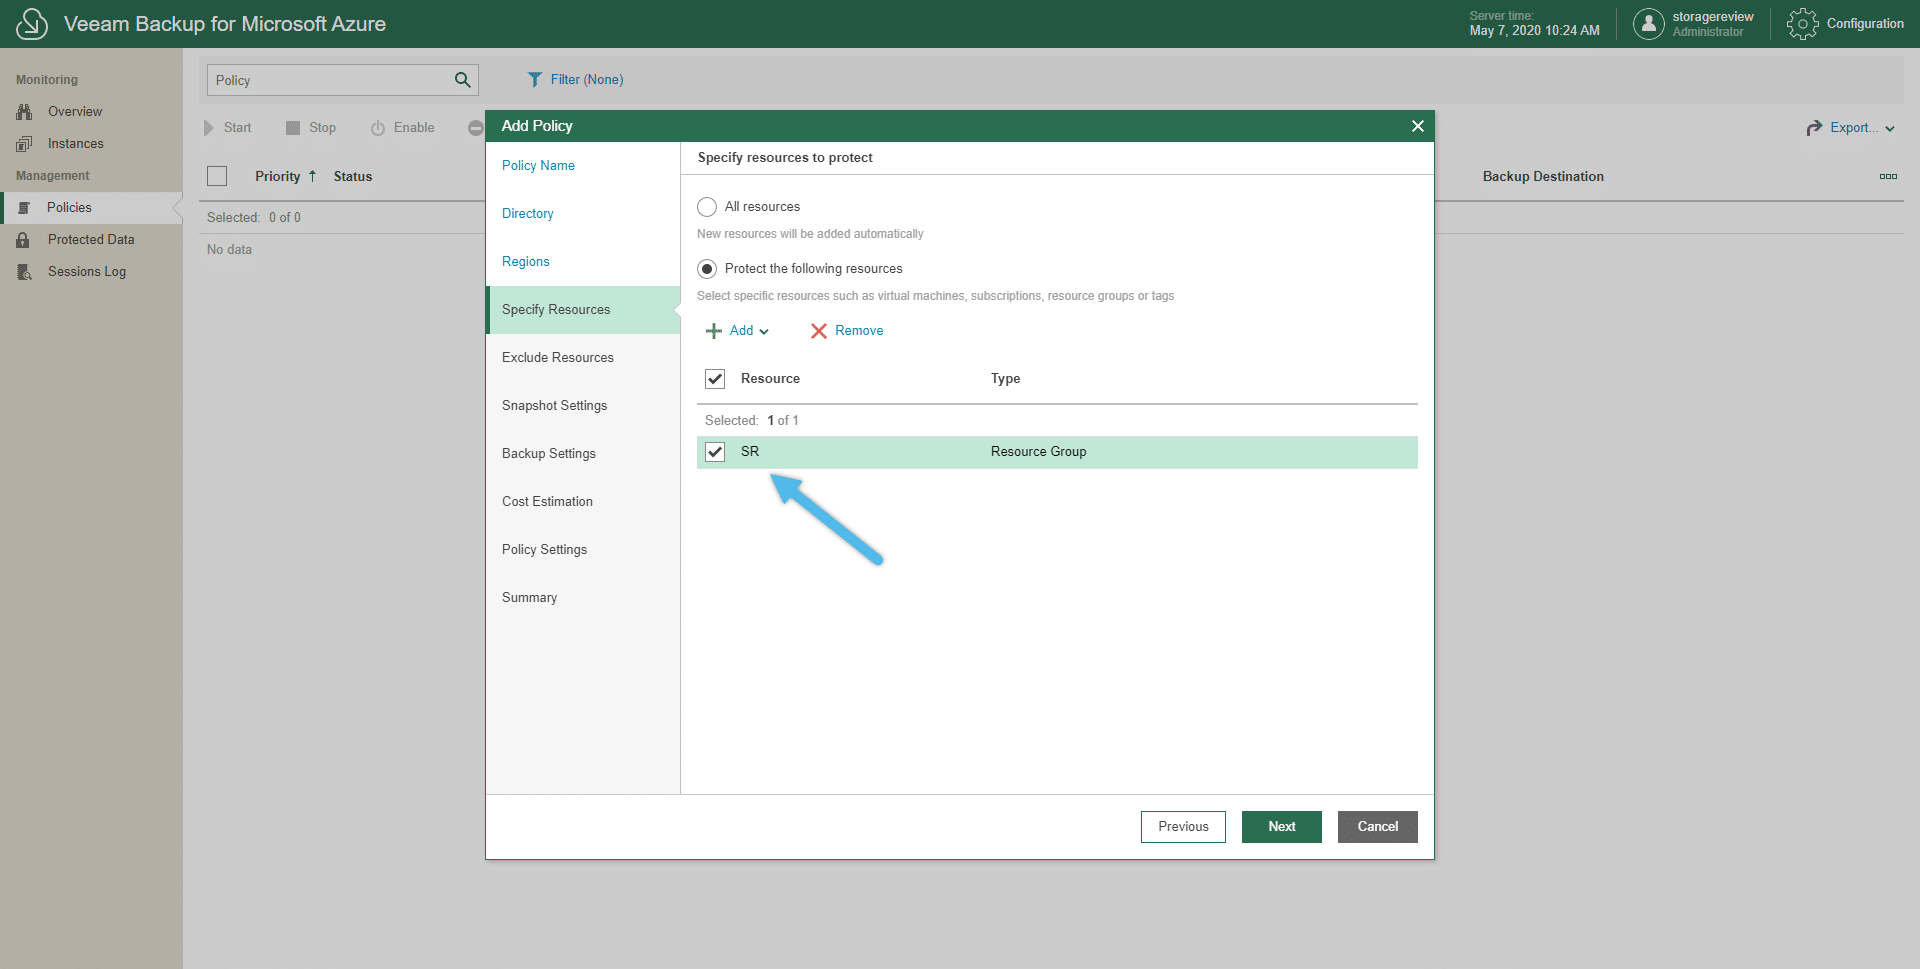
We are now getting the most significant options for this new Veeam appliance. Under the Specify Resources step, we can either select all the resources or select specific resources. With these specific resources, we can set a very granular backup. These resources are Subscriptions, Resources Group, Tags, and Virtual Machines. As explained before, remember that VMs can be tagged, and here you can use the Tags option to apply policies.
We selected our Resource Group as the resource we want to protect during this example.
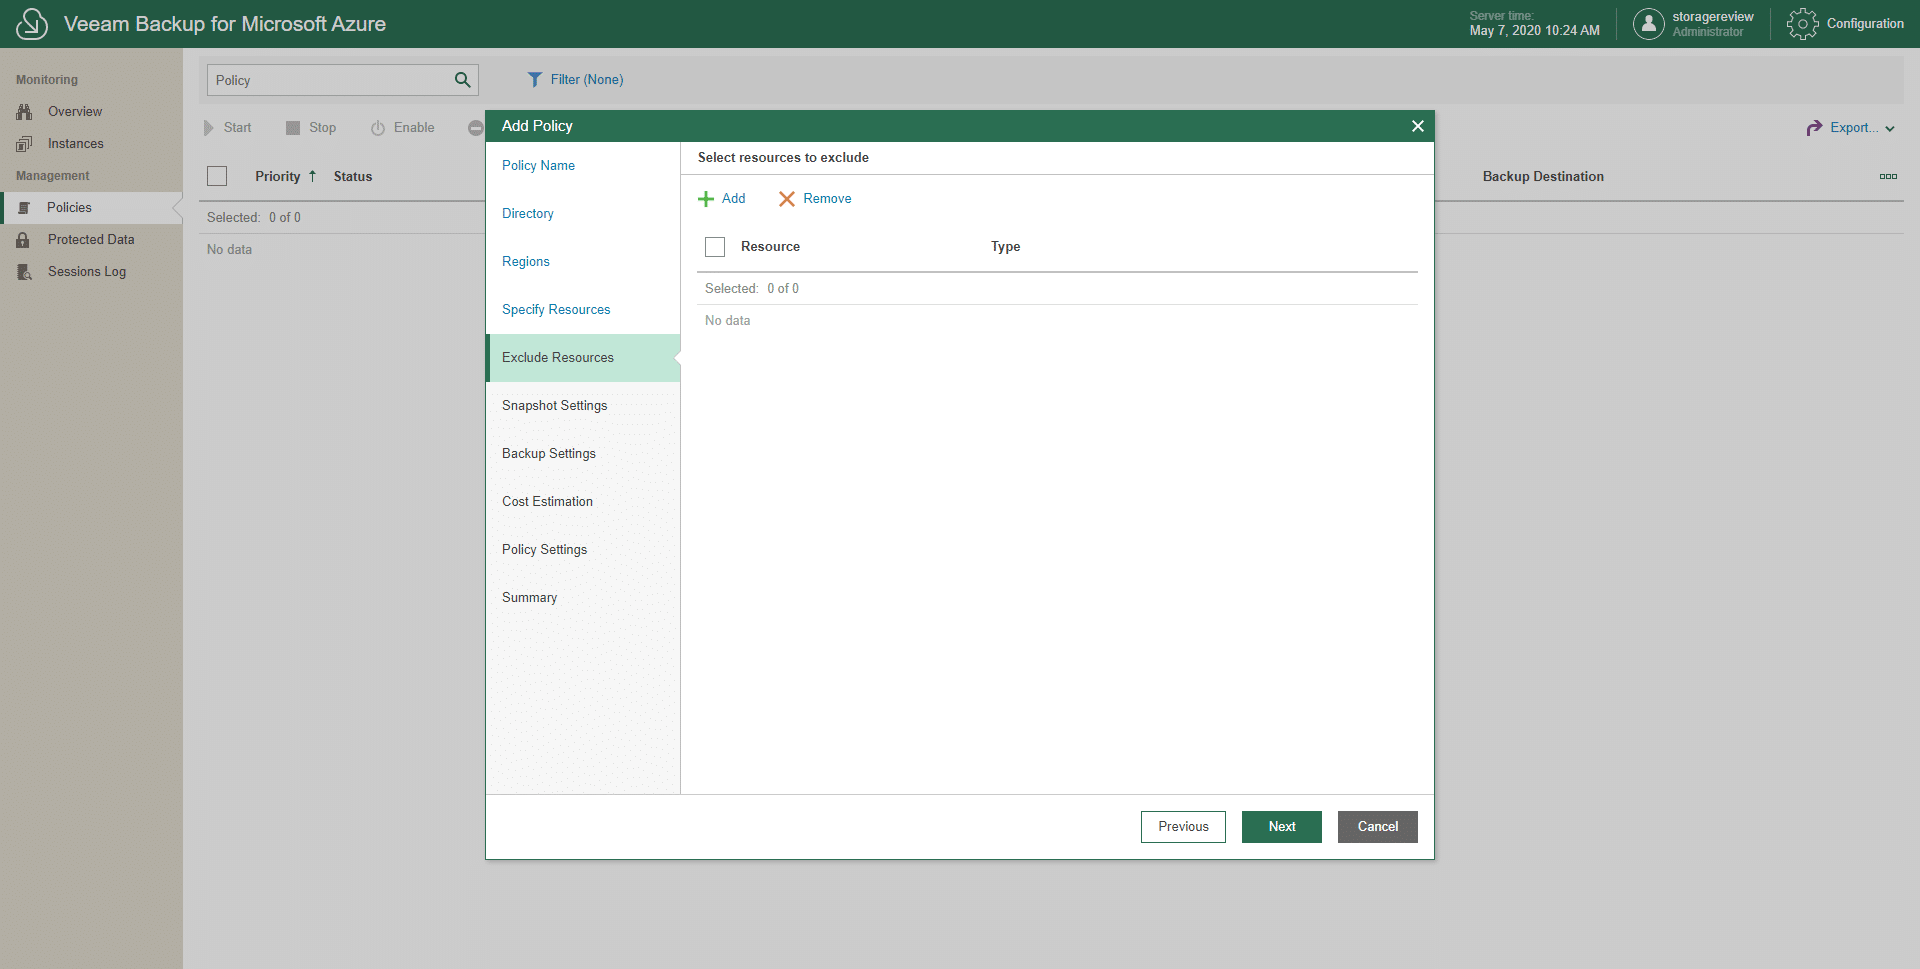
Resources can also be excluded, and we can configure this option in the Exclude Resources step. This option is ideal if we selected a subscription containing several VMs in the previous step, and we don’t want to protect all these VMs.
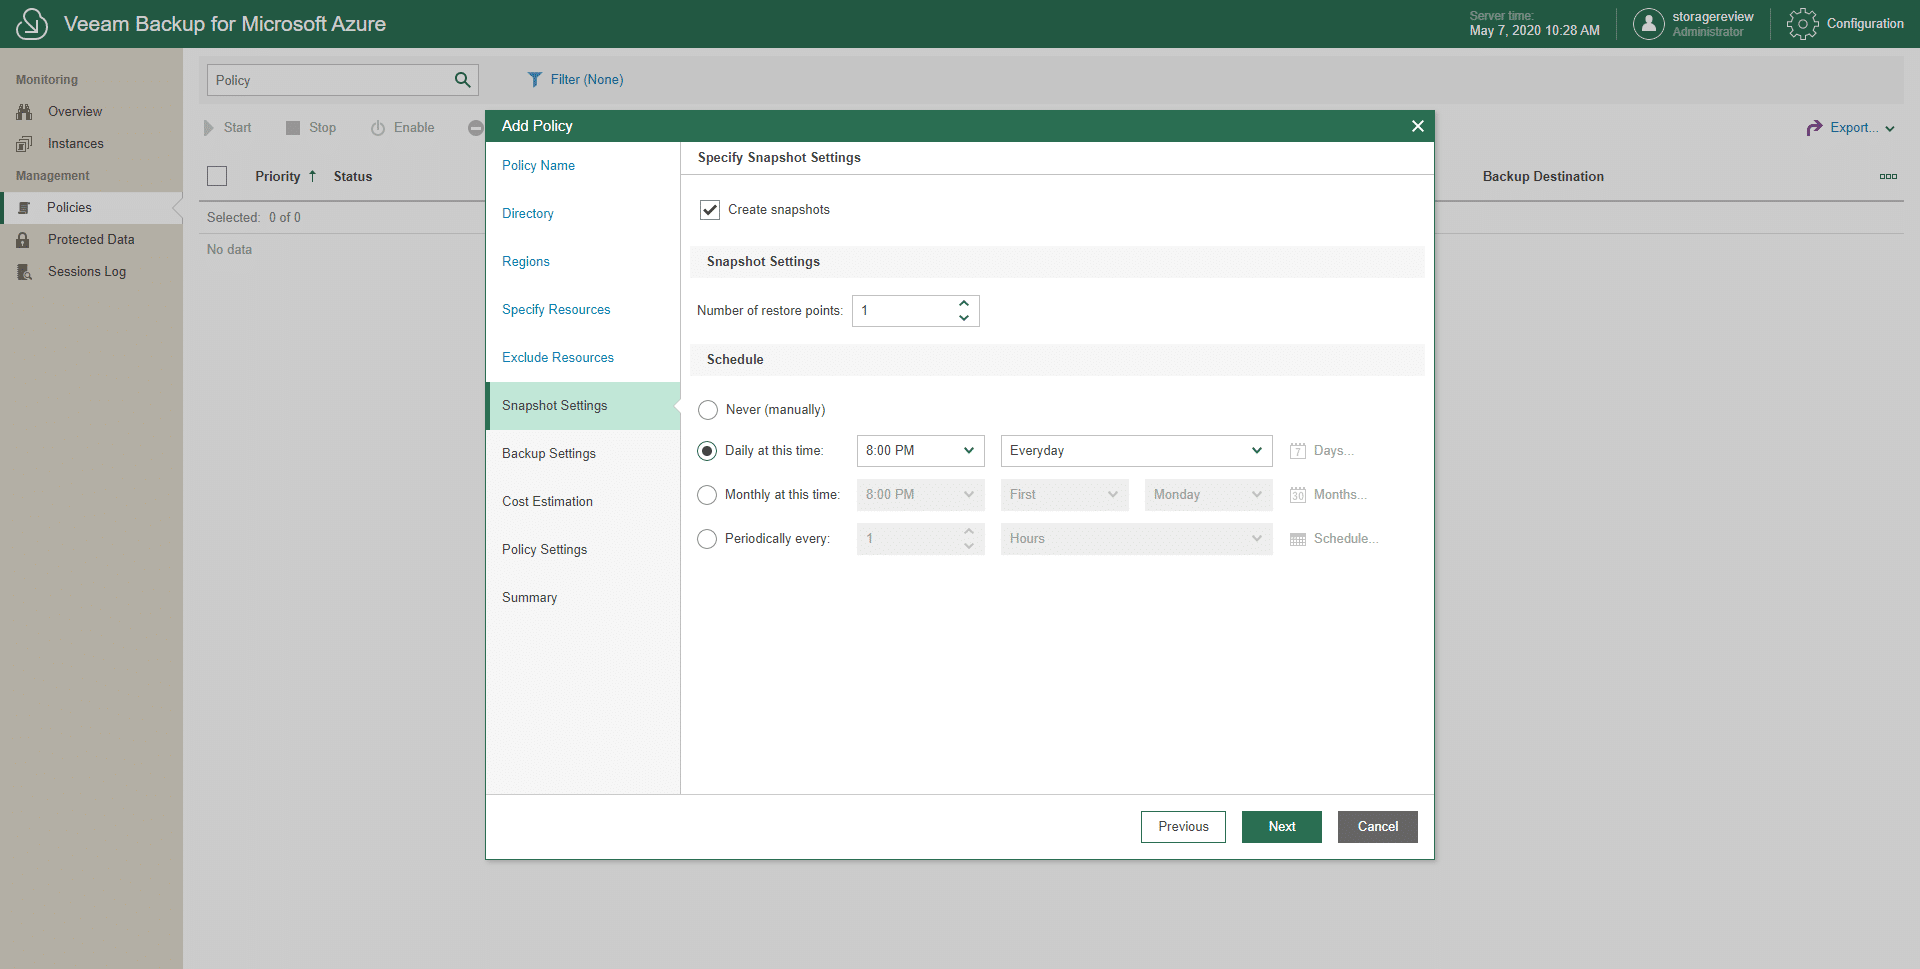
Under the Snapshot Settings, we can enable the creation of snapshots, set the number of restore points, and configure the snapshot schedule. These snapshots are suitable when speedy recovery points are needed, as these can be rolled-back quickly.
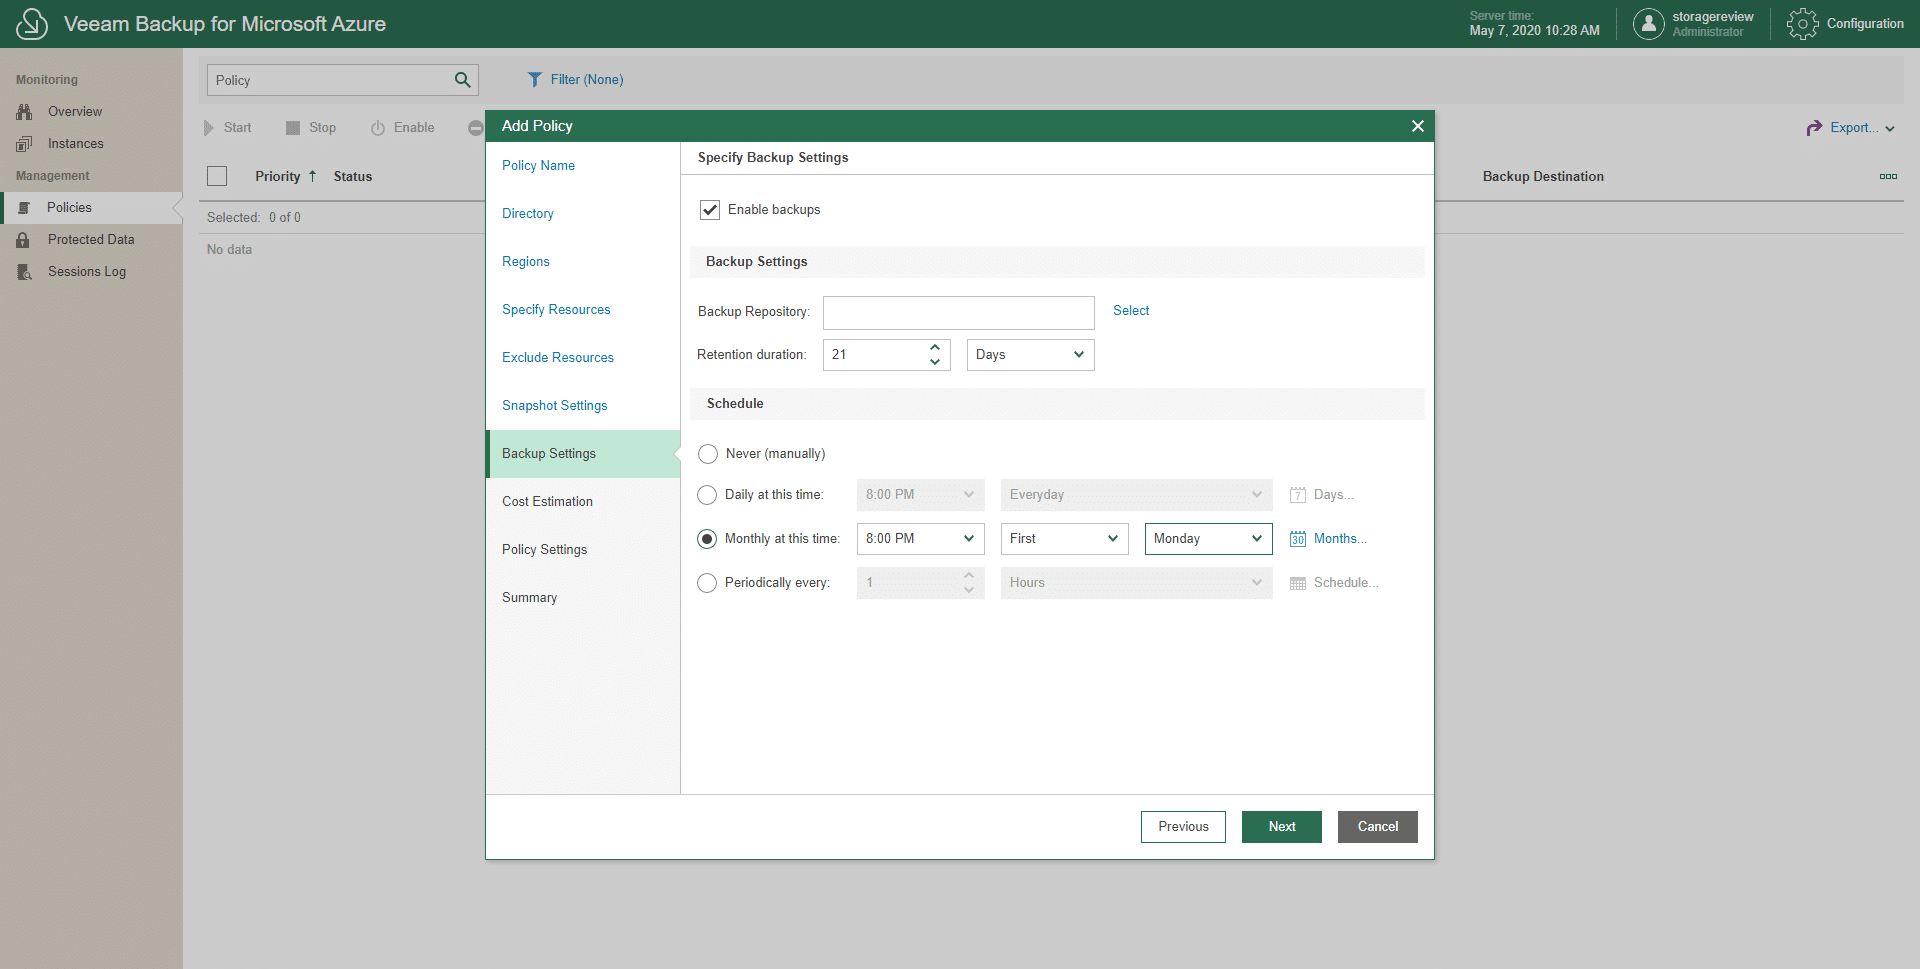
On the Backup Settings step, we are going to have more configurations to protect our data using the Azure Blob Storage service. For this option, remember to have the Azure storage account adequately configured. Then, we should select a Backup Repository and configure a schedule.
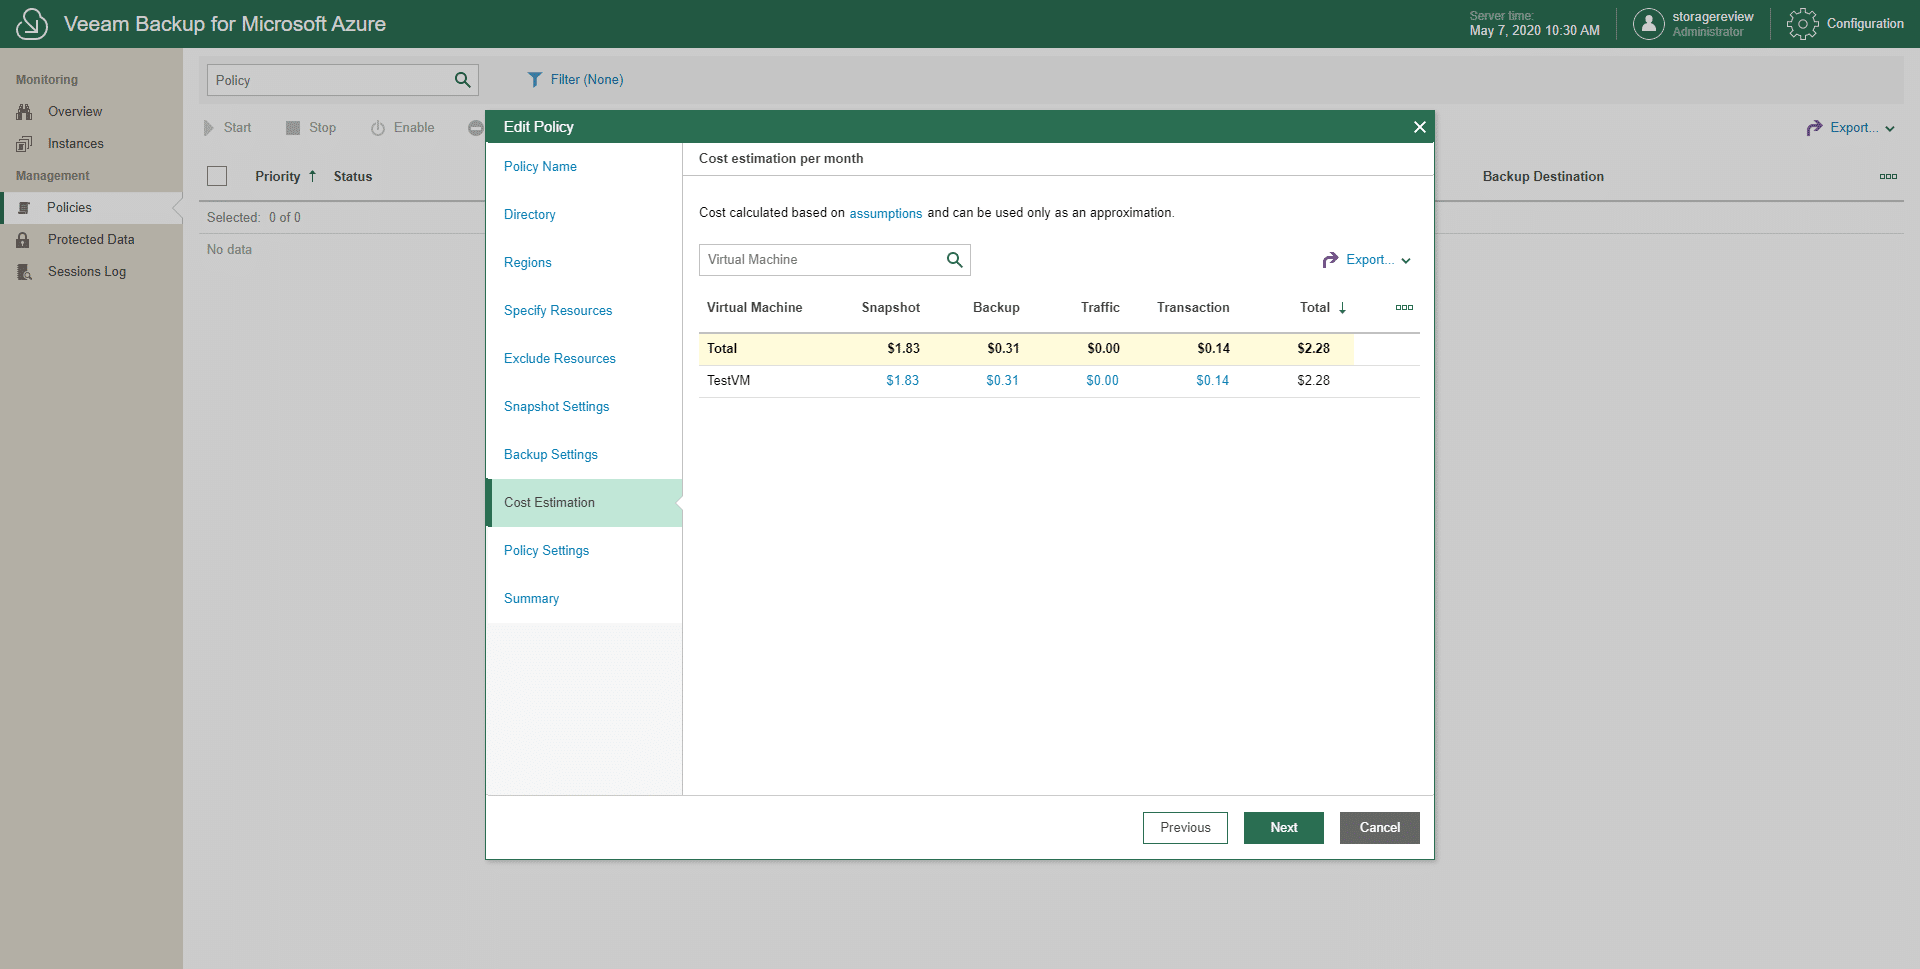
The next step is also a great feature, one we mentioned during this product’s capabilities, Cost Estimation. With this Cost Estimation option, we can have a reasonable assumption and understanding of what is going to be the overall cost based on the amount of time that we are going to keep our backup.
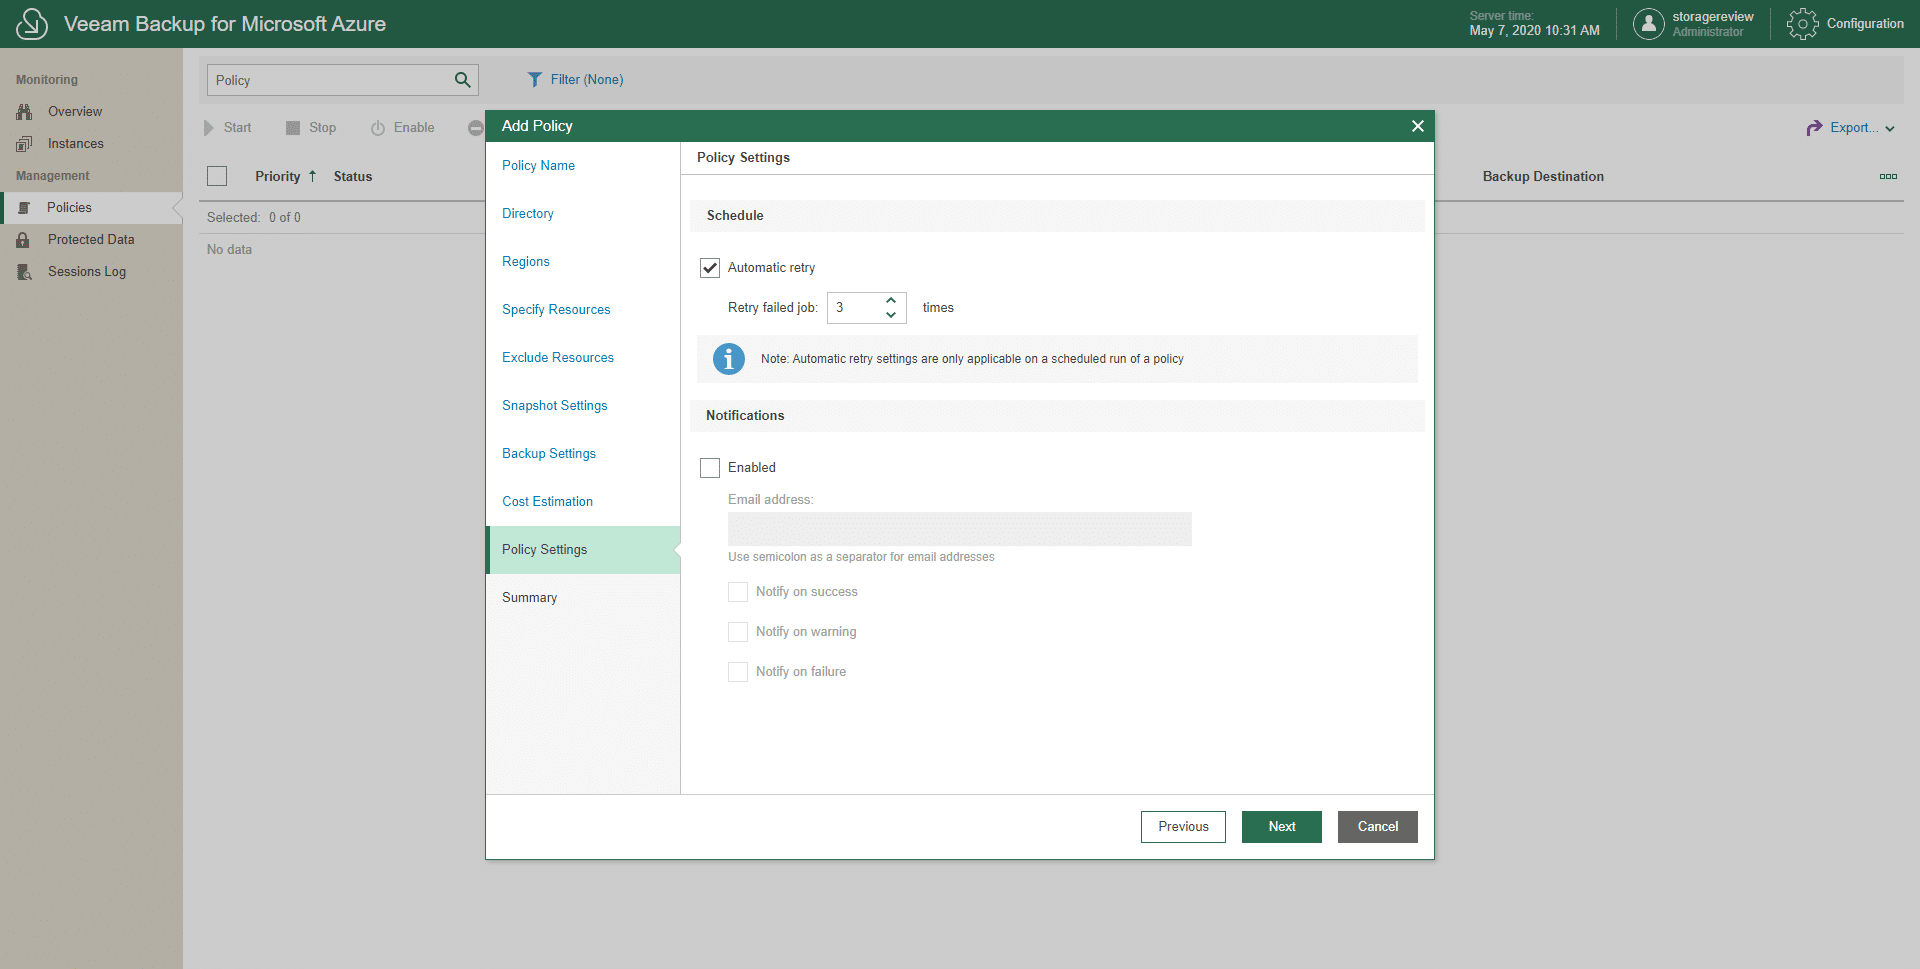
Additional settings can be configured in the Policy Settings step. Email notification can be set here.
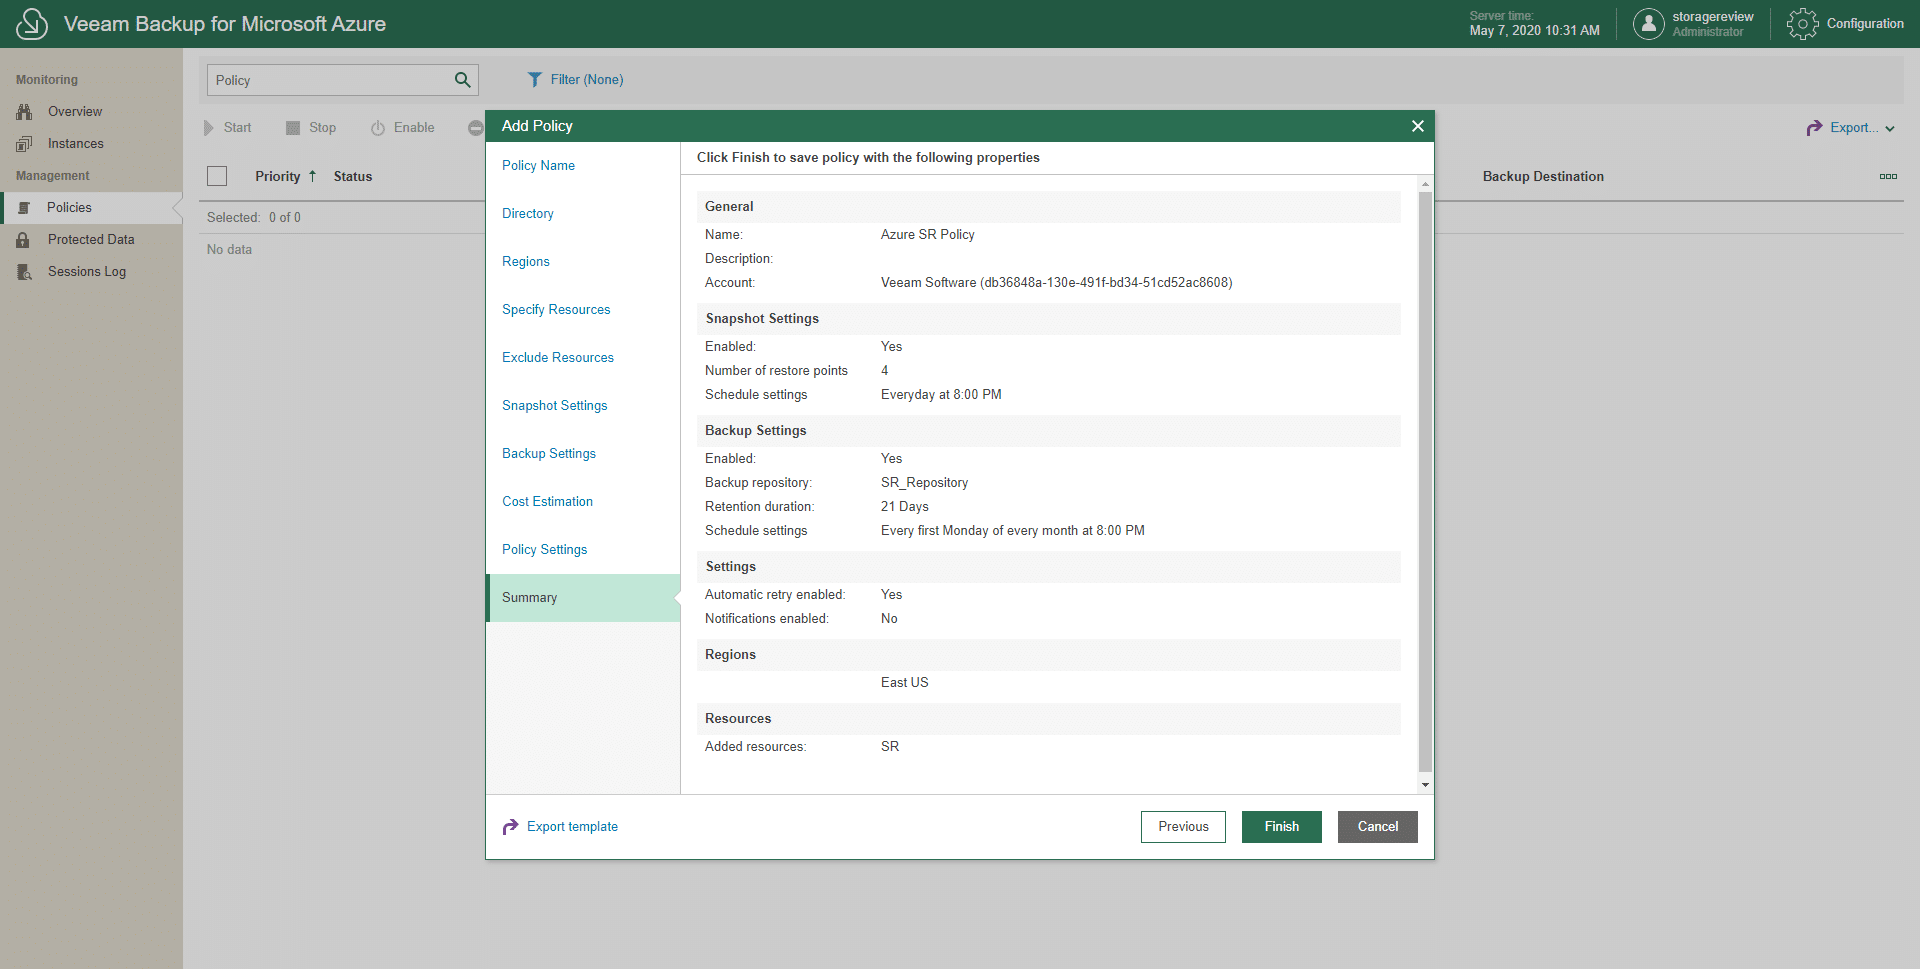
Finally, under Summary, check all the policy properties and click Finish to save.
After all these steps, our new policy is created. Some of these steps are optional such as snapshots and backup settings. Therefore, we are allowed to create an elegant policy (or policies) that fits our backup needs.
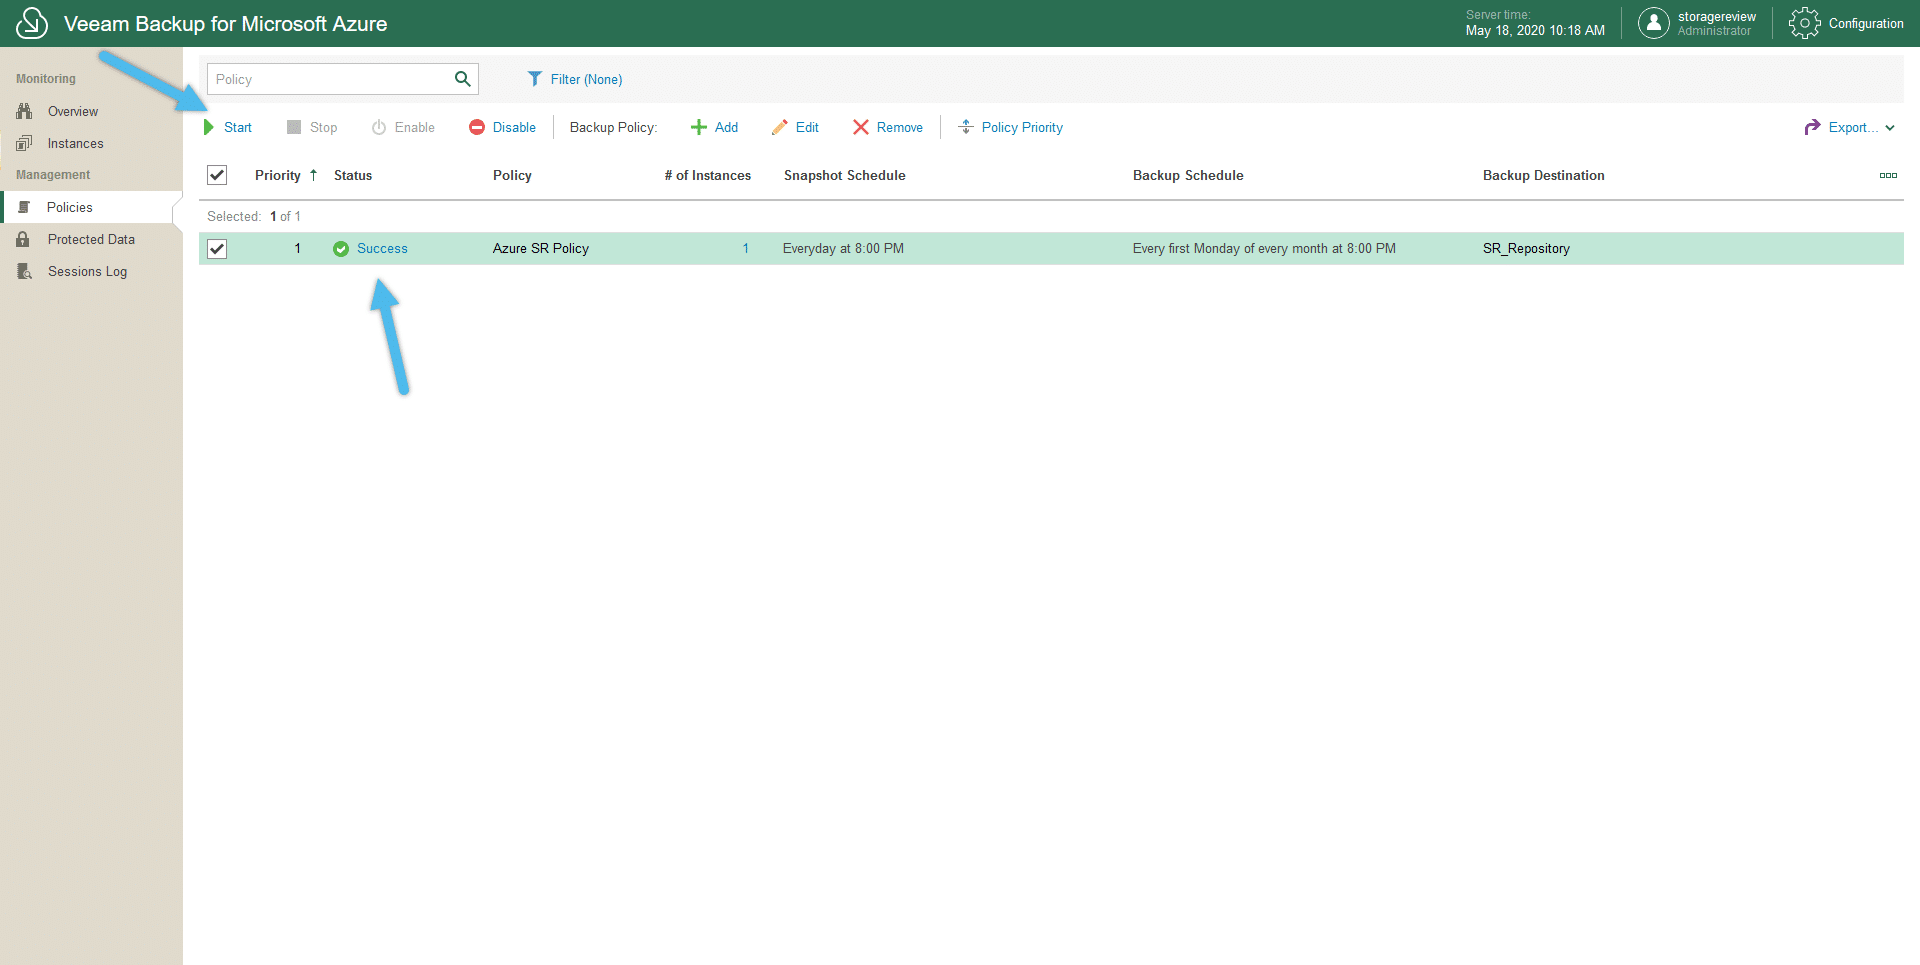
Once Veeam Backup for Microsoft Azure is deployed, we are presented with a dashboard that provides vital information about the environment’s protection, making it easy to understand the current status. The new policy is visible under Management / Policies, and its status should be marked now as “Success.” Notice that this policy is only rolled out once you hit the “Start” option. Here, you also have other options for the policy, like Stop, Enable, Disable, Edit, Remove, and more.
Veeam Backup and Replication console
Once the appliance has been configured, it can be integrated into Veeam Backup & Replication. This integration is the one that provides a single platform for hybrid cloud organizations to manage and migrate cloud workloads.
Now, it is time to add the external repository using Veeam Backup & Replication console. Located on the Veeam console, go to Backup Infrastructure > External Repositories; then click Add Repository. Under this new window, select Veeam Backup for Microsoft Azure.
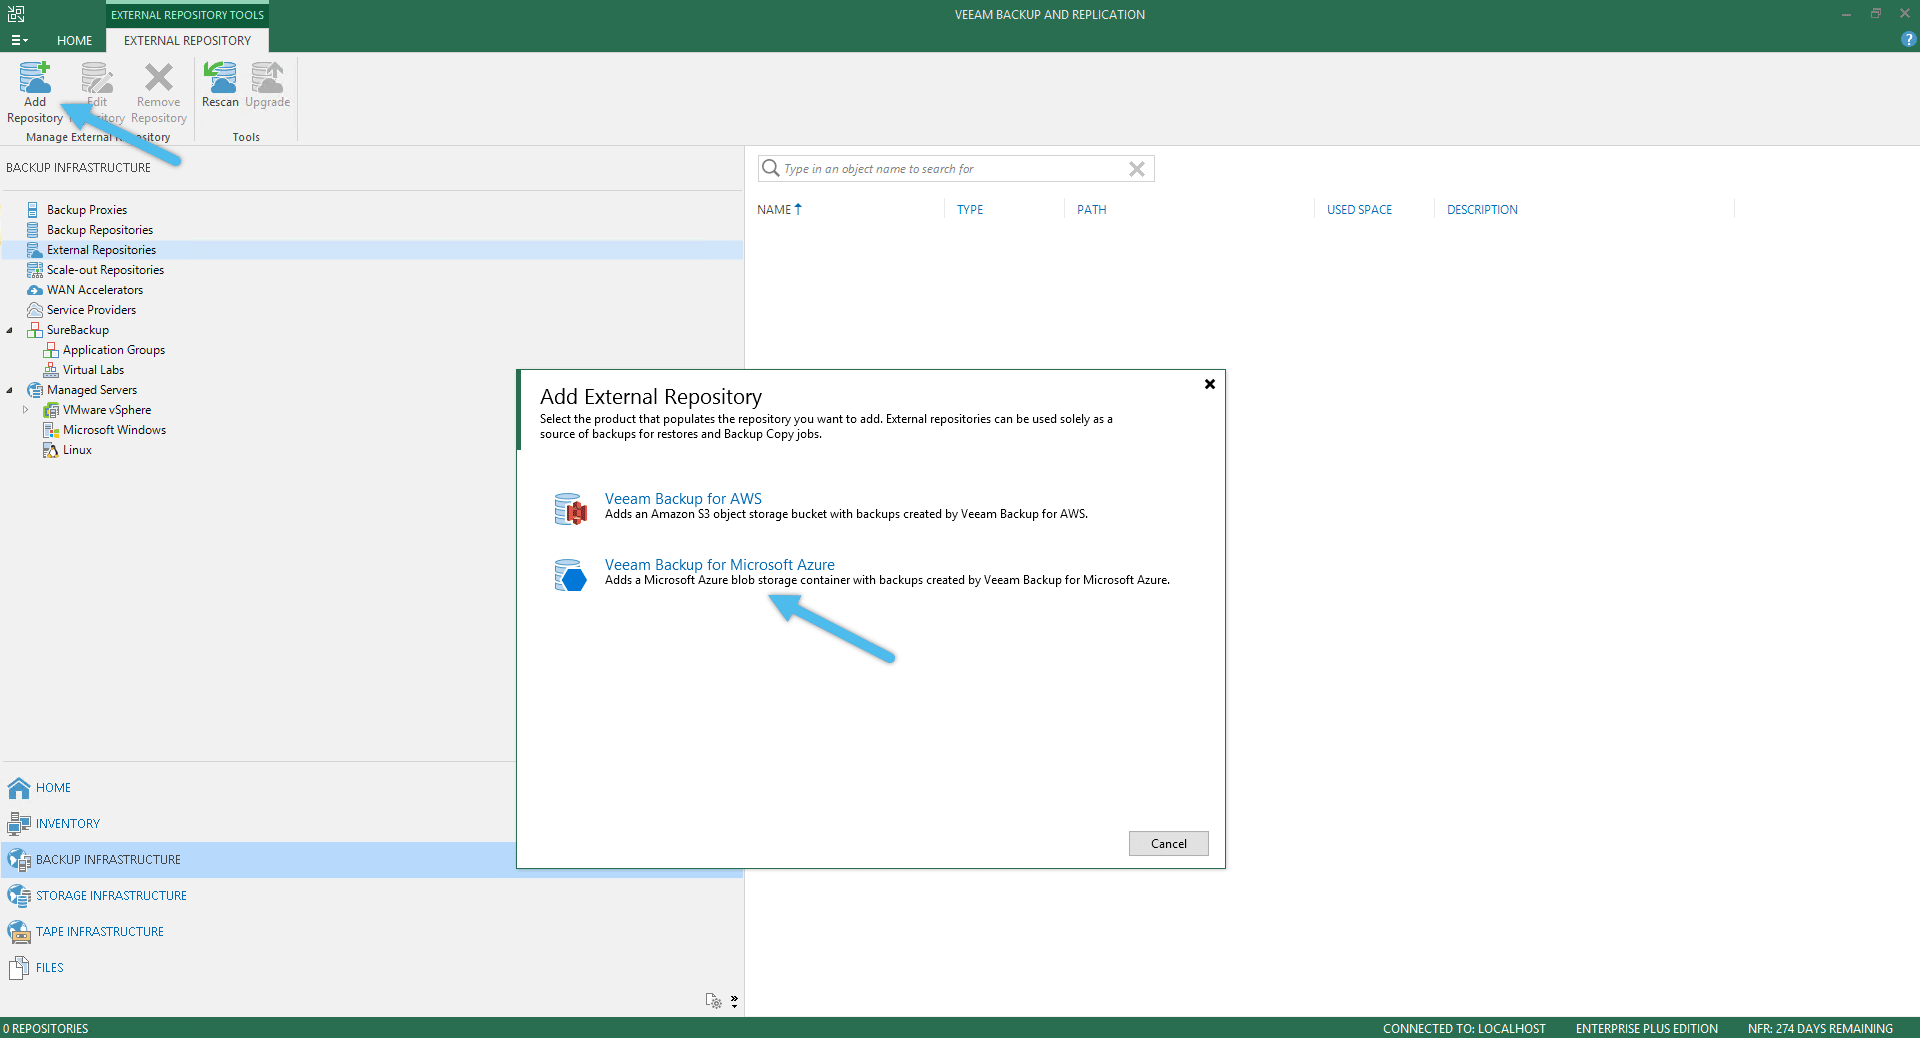
Name this repository, and click Next.
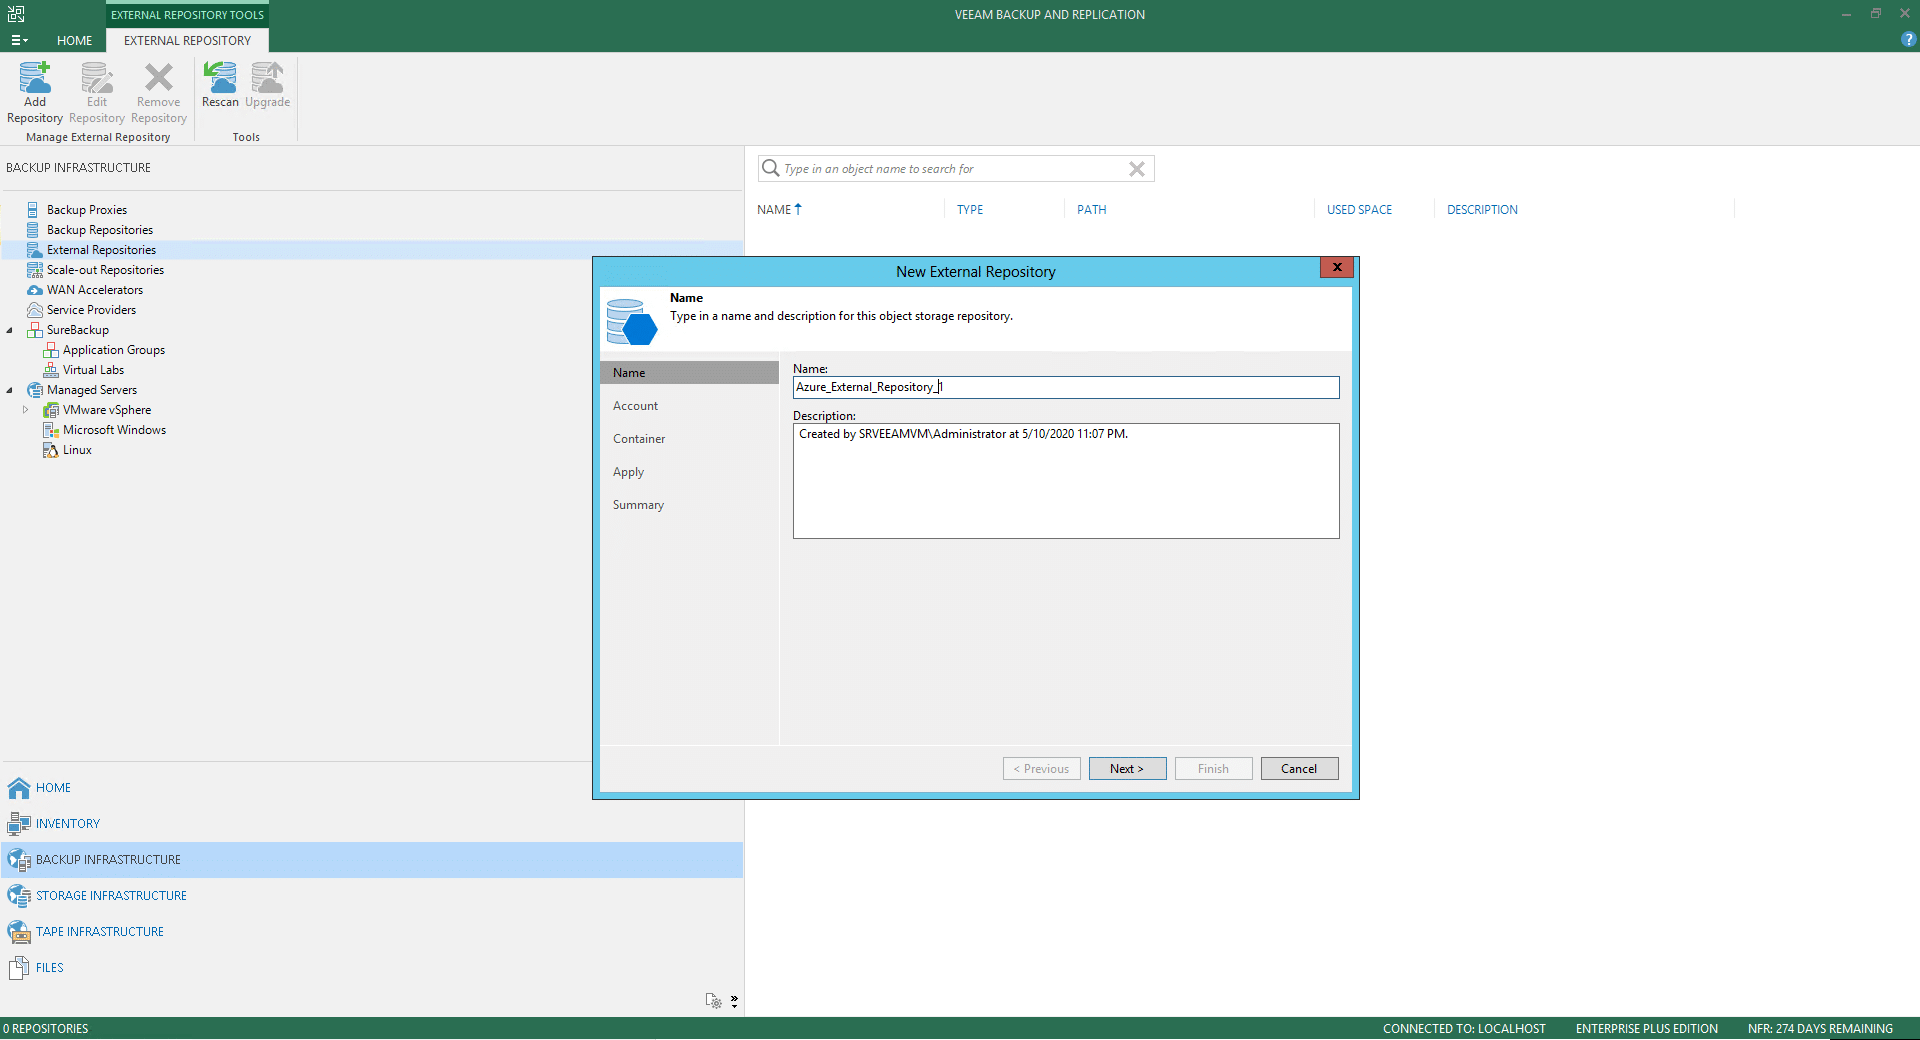
Add your Microsoft Azure account for connecting to Azure blob storage container. In this step, remember to have correctly configured the network setting of your storage account.
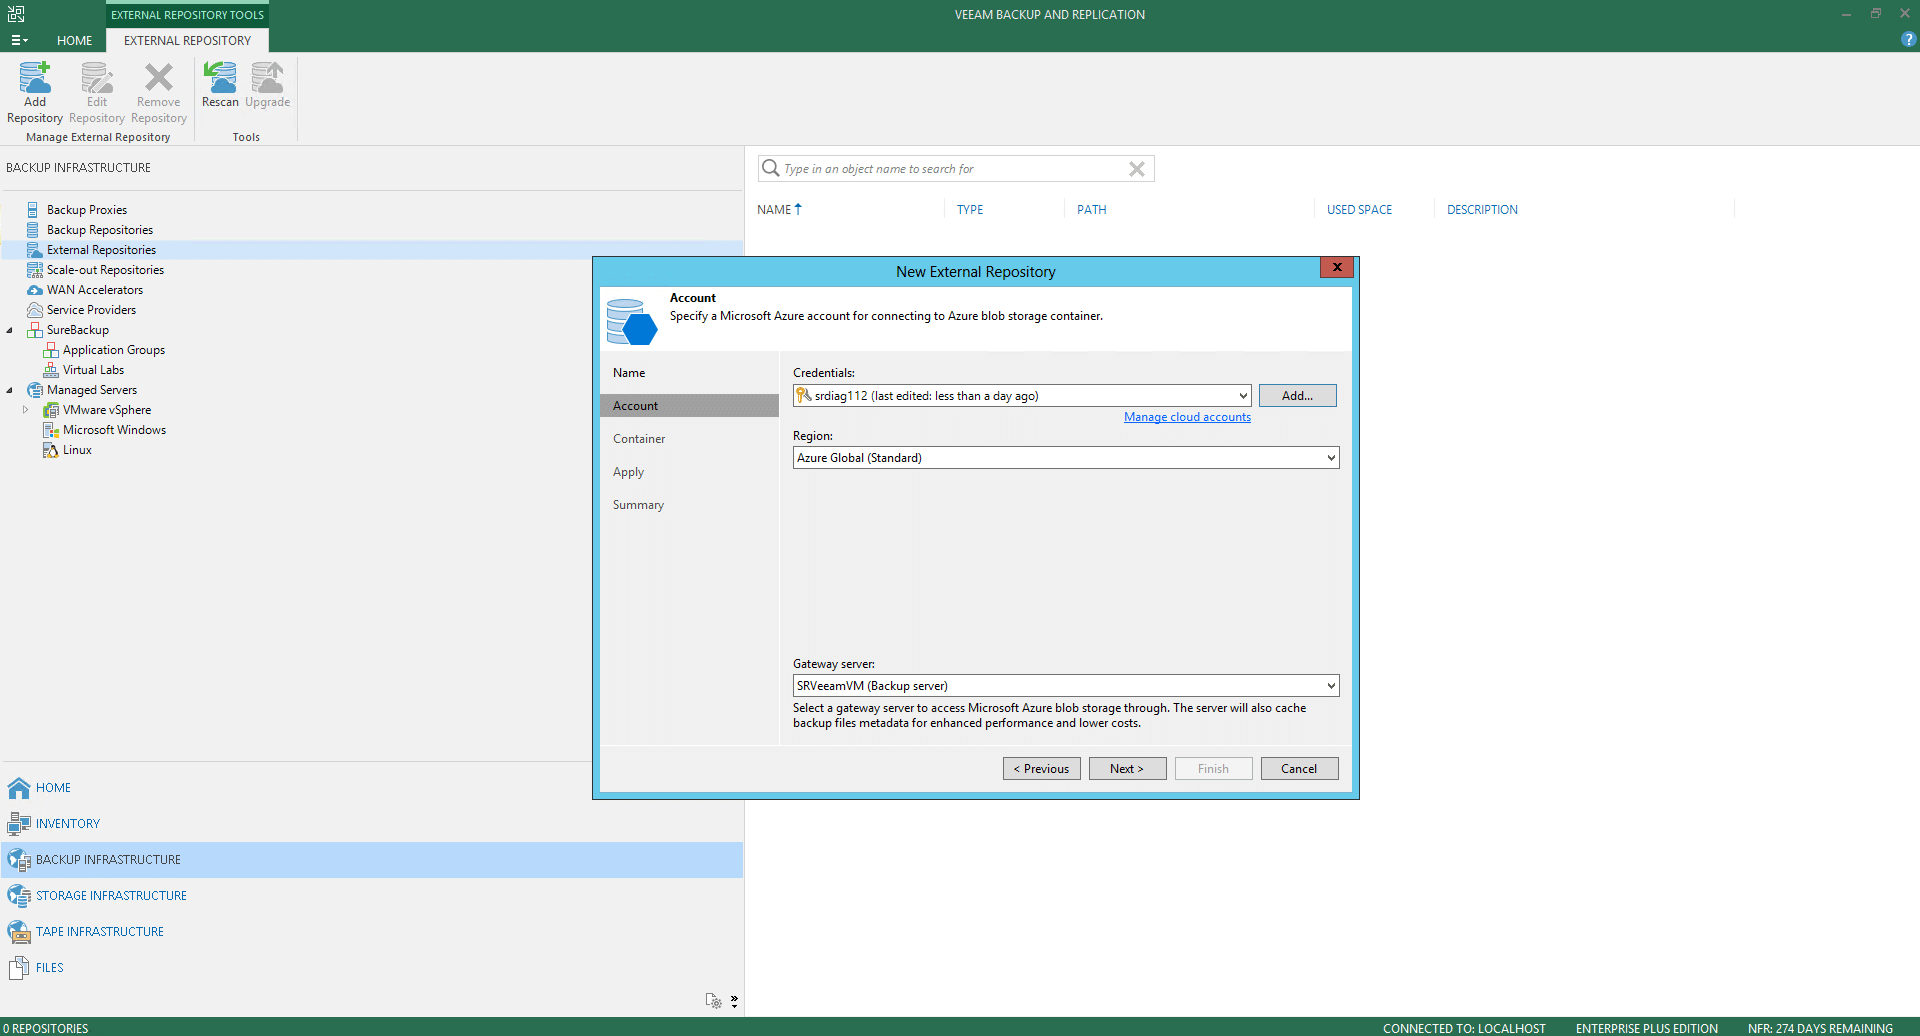
Add the Azure blob storage container that you wish to connect to.
Settings are saved to the configuration database. After all the checks pass, click Next.
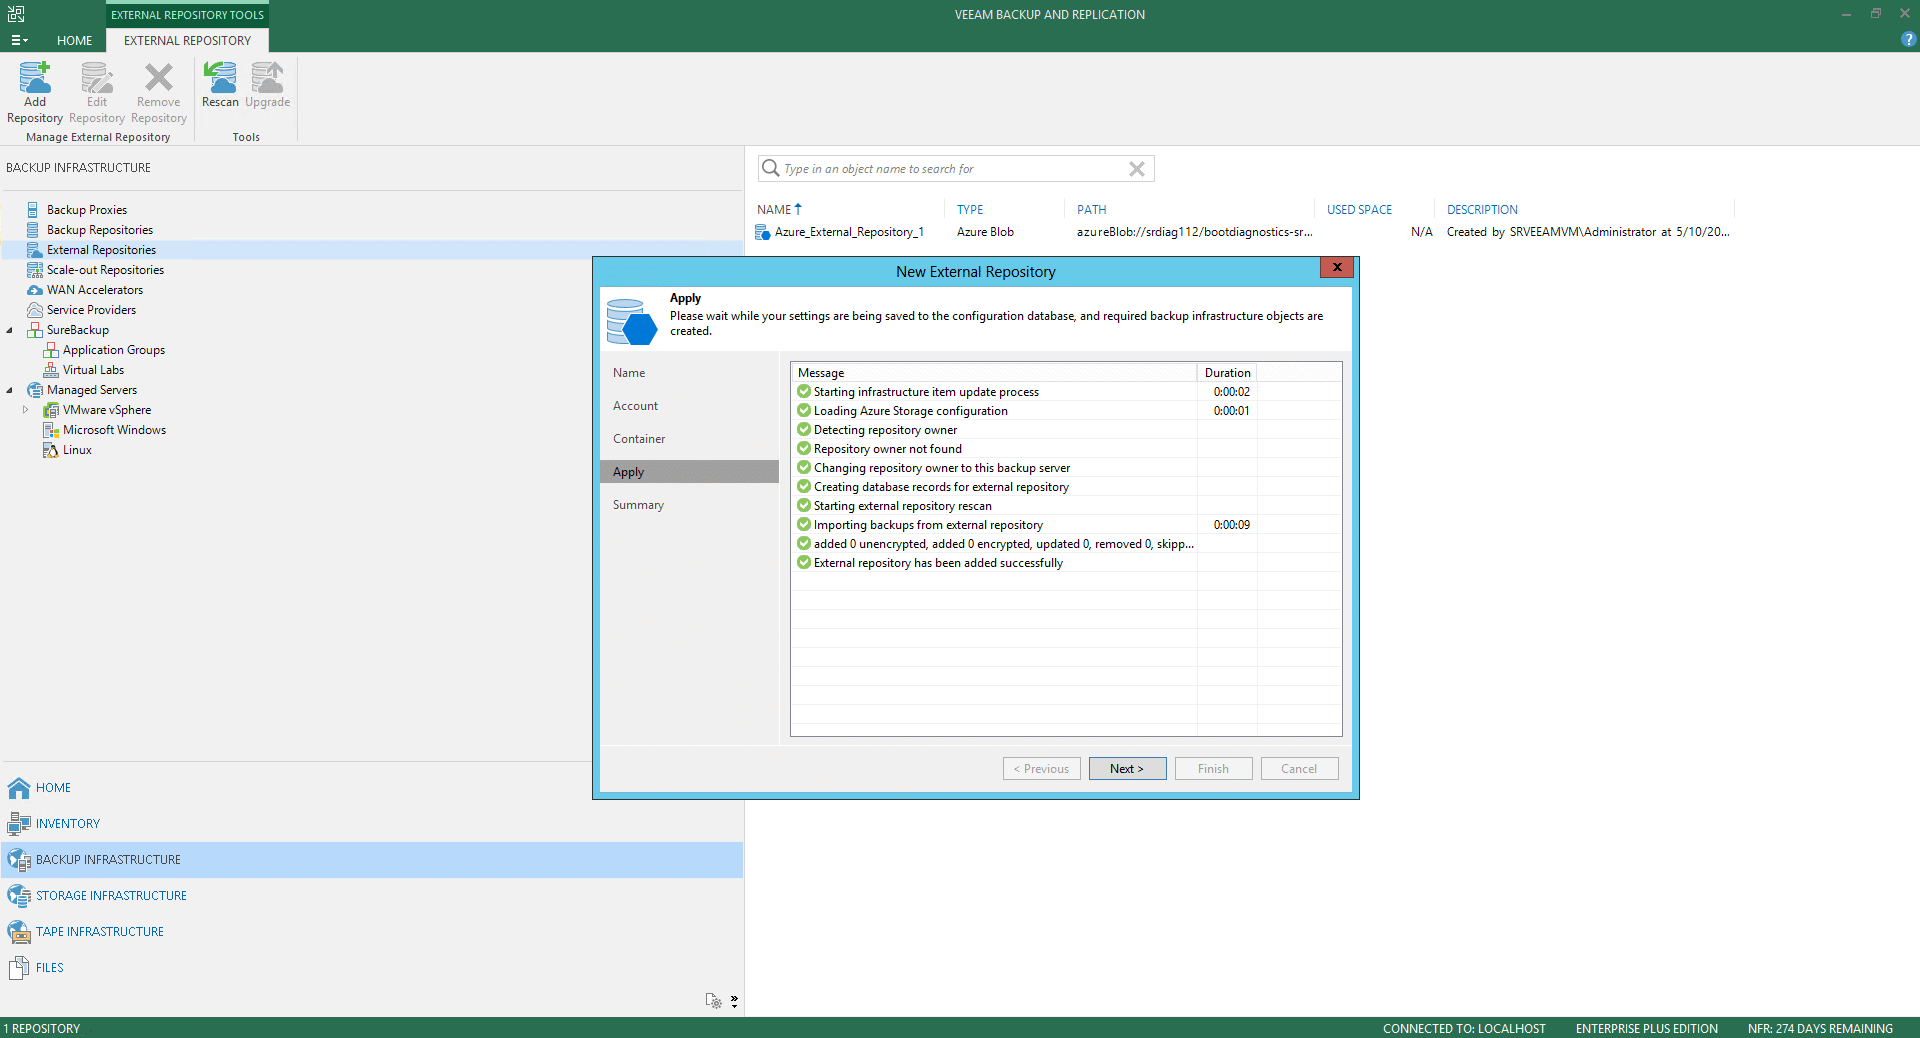
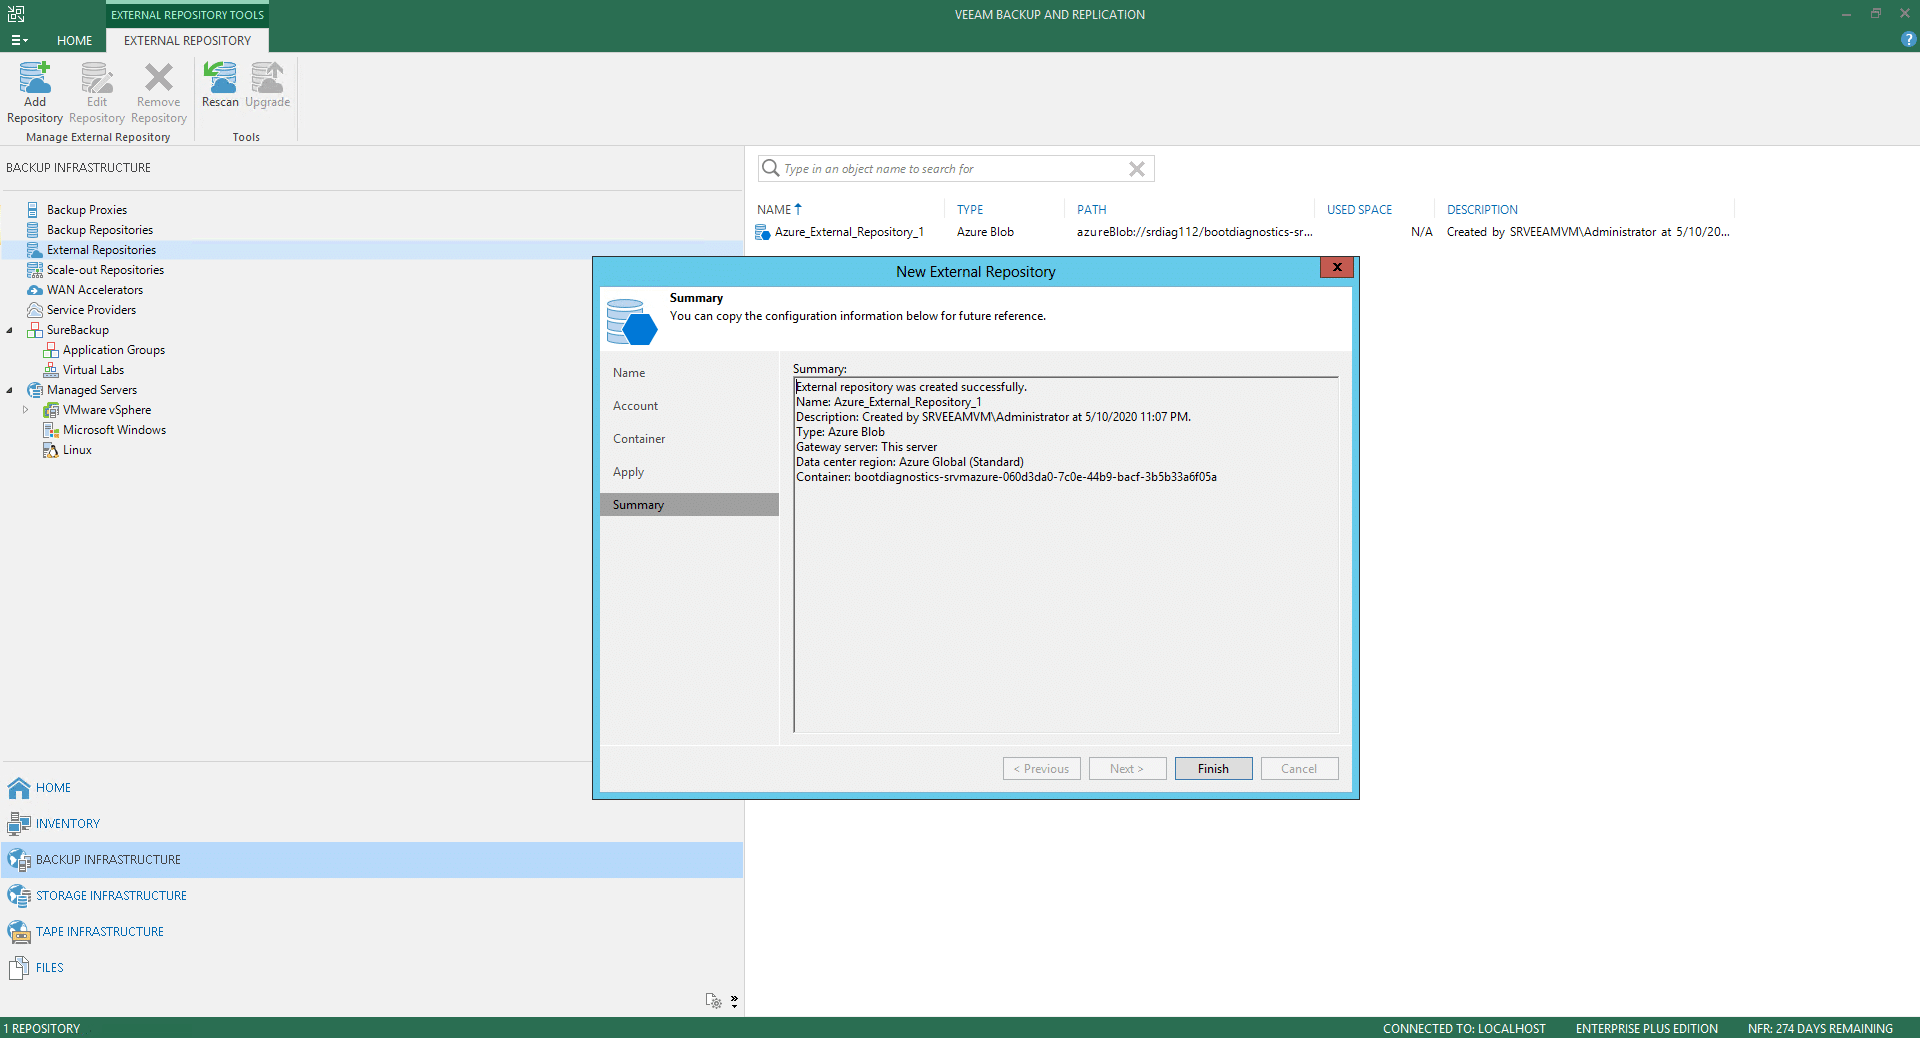
Review the configuration under the summary page and click Finish.
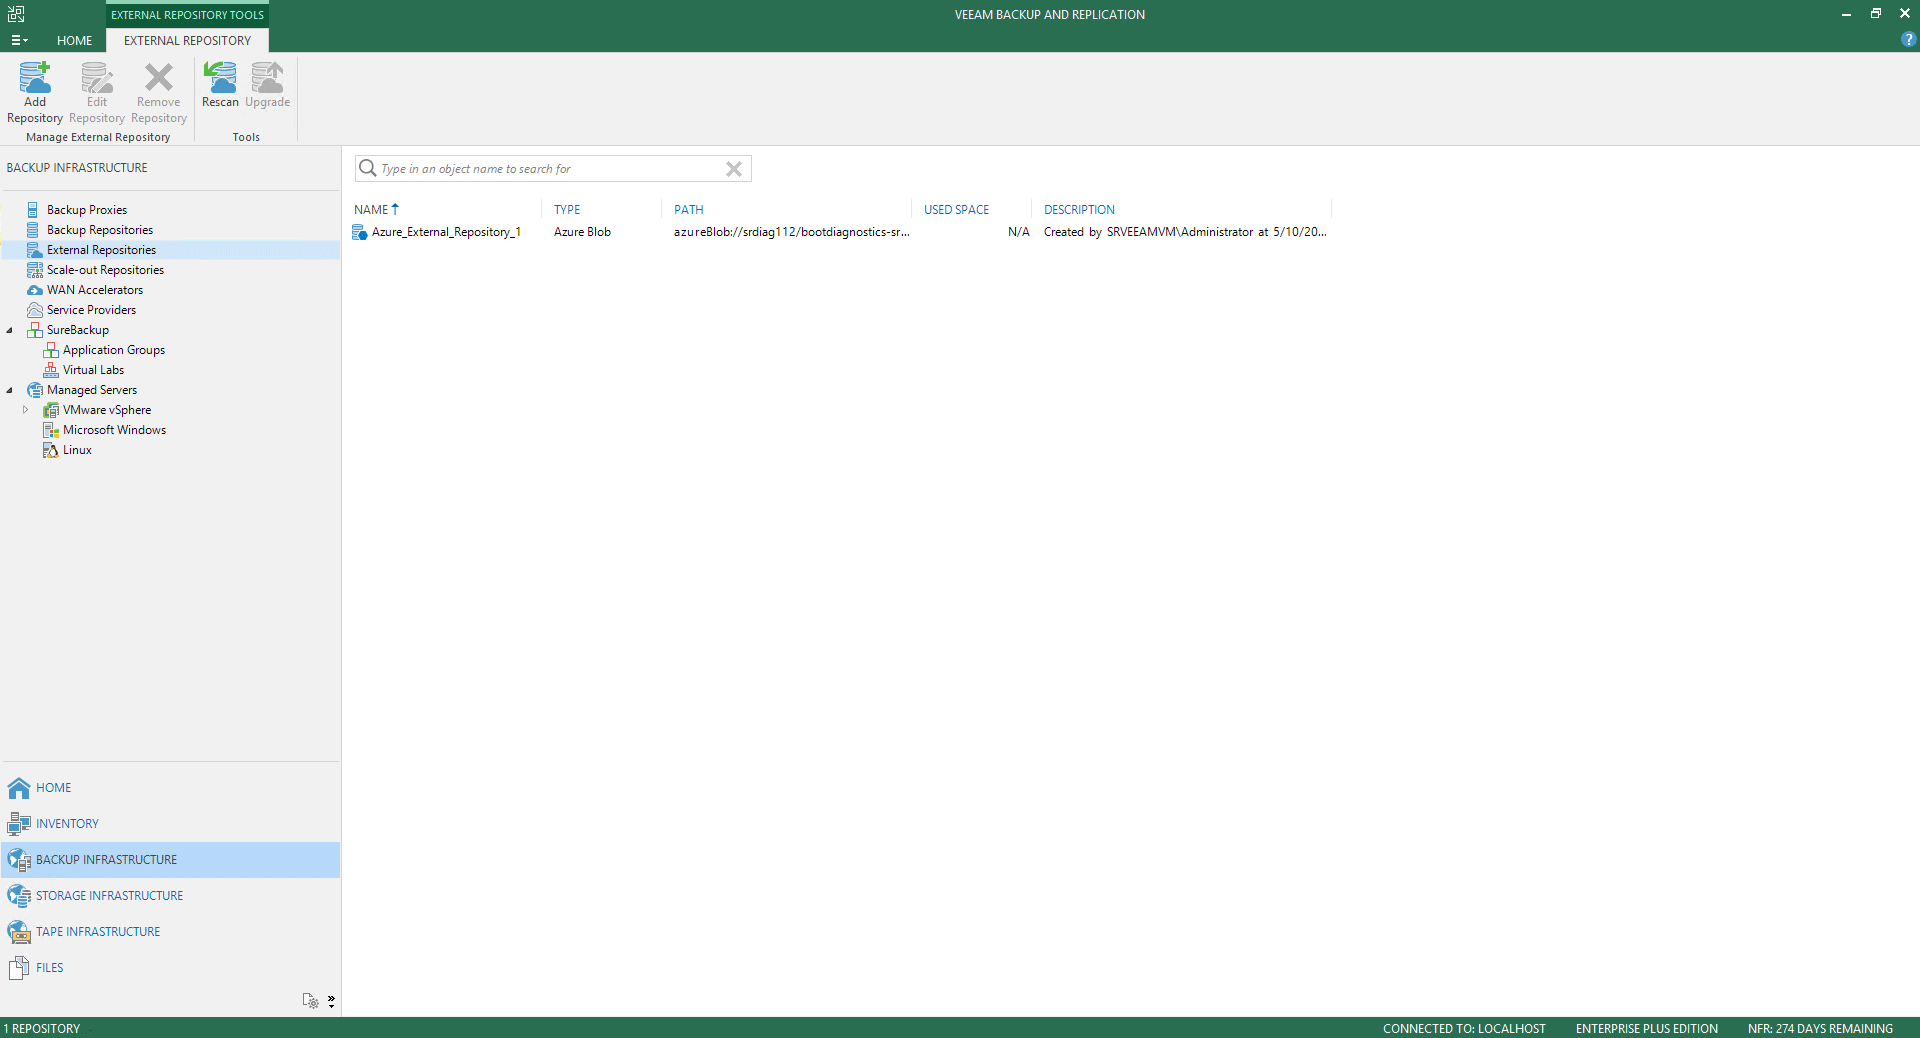
Now, under External Repositories, we see the newly created repository. As we didn’t start the policy in the last step of the previous section, we won’t see the VMs that are protected under the policy. In a real environment, all the protected VMs are listed under the repositories.
These are the necessary configurations to have your Veeam-Microsoft environment up and running. You can always visit the Veeam and Microsoft azure websites for more and advanced options.
Conclusion
Microsoft Azure provides a robust IaaS solution for building, experimenting, and deploying applications. Nevertheless, as stated by Microsoft’s Services Agreement, it is recommended that you regularly backup your content and data stored on Microsoft’s services, using third-party apps and services. Businesses are still responsible for their data.
Veeam, a Gold Microsoft Partner, continues to demonstrate its commitment to support dynamic infrastructures and their customer’s emerging demands. With the Veeam Backup for Microsoft Azure, the company strengthens its data protection offering, while supporting enterprises to move applications and data to Microsoft Azure.
The service is easy to roll out via the Azure Marketplace, and it can be quickly configured and connected with Veeam Backup and Replication platform. Among our favorite features, we have the very granular policy-based control and the built-in backup cost estimation. Overall, this solution is powerful and complete; it not only allows organizations to protect and manage Azure’s cloud but also virtual and physical apps and data.
Engage with StorageReview
Newsletter | YouTube | Podcast iTunes/Spotify | Instagram | Twitter | Facebook | RSS Feed
